1. Introduzione
This manual provides detailed instructions for the installation, operation, and maintenance of your Zebronics H61 Motherboard. Please read this manual thoroughly before proceeding with installation to ensure proper setup and functionality.
The Zebronics H61 Motherboard is designed to support Intel LGA 1155 socket processors (i7/i5/i3/Pentium/Celeron series) and DDR3 dual-channel memory. It features an Intel H61 chipset, providing a stable and efficient platform for your computing needs.
2. Informazioni sulla sicurezza
- Scollegare sempre l'alimentazione prima di installare o rimuovere qualsiasi componente.
- Handle the motherboard by its edges to avoid electrostatic discharge (ESD) damage. Use an anti-static wrist strap if available.
- Assicurare una corretta ventilazione all'interno del case del computer per evitare il surriscaldamento.
- Non esporre la scheda madre a umidità o temperature estreme.
- Refer to the component manufacturer's manuals for specific installation instructions for your CPU, RAM, and other peripherals.
3. Contenuto della confezione
Verificare che tutti gli articoli siano presenti nel pacco:
- Zebronics H61 Motherboard
- Schermo I / O
- Cavo/i dati SATA
- Driver CD (for operating systems that do not automatically install drivers)
- Manuale dell'utente (questo documento)
4. Specifiche
| Caratteristica | Descrizione |
|---|---|
| Modello | H61 |
| Chipset | Intel H61 Espresso |
| Presa CPU | LGA1155 |
| Processori compatibili | Intel i7/i5/i3/Pentium/Celeron processors (2nd and 3rd Generation) |
| Slot di memoria | 2 x DDR3 Dual-channel slots |
| Supporto di memoria | DDR3 1066/1333/1600MHz, up to 16GB |
| Interfaccia grafica | 1 x PCI-Express x16 slot |
| Slot di espansione | 1 slot PCI Express x1 |
| Magazzinaggio | 4 x SATA II ports |
| Rete locale | Realtek 8106E 10/100 Mbps Ethernet |
| Audio | 6-Channel HD Audio Codec onboard (5.1 surround sound support) |
| Porte I/O posteriori | 1 x HDMI, 1 x VGA, 6 x USB 2.0, 1 x RJ45, 1 x 3-in-1 Audio Jacks (Line-in, Line-out, Mic-in), PS/2 (Keyboard/Mouse) |
| Fattore di forma | ATX |
| Dimensioni | Dimensioni: 25 x 20 x 3 cm |
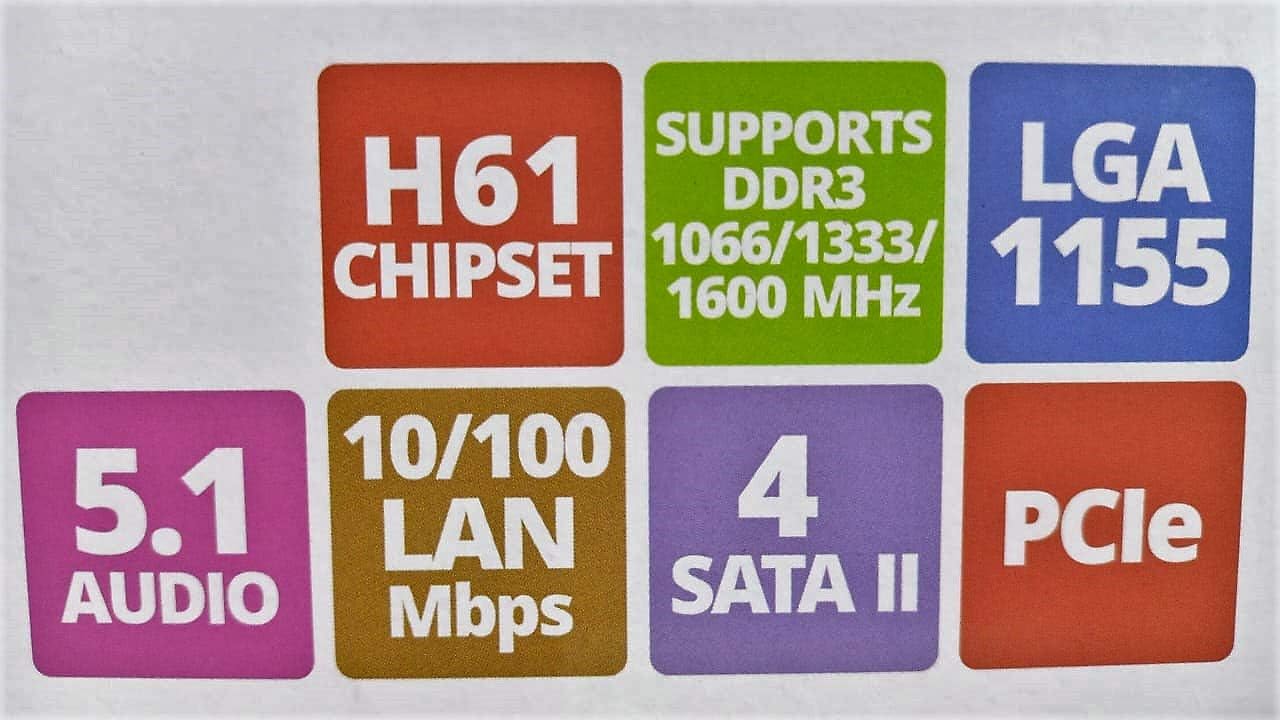
Image: Detailed specifications of the Zebronics H61 Motherboard, including chipset, CPU socket, memory support, and I/O interfaces.

Image: Visual representation of key features such as H61 Chipset, DDR3 support, LGA 1155 socket, 5.1 Audio, 10/100 LAN, 4 SATA II ports, and PCIe.
5. Configurazione e installazione
5.1 Layout della scheda madre

Immagine: dall'alto verso il basso view of the Zebronics H61 Motherboard, showing the CPU socket, RAM slots, PCIe slot, and various headers.

Image: Another top-down perspective of the Zebronics H61 Motherboard, highlighting component placement.
5.2 Pannello I/O posteriore

Image: Rear I/O panel of the Zebronics H61 Motherboard, displaying ports for PS/2 keyboard/mouse, VGA, HDMI, USB 2.0, LAN, and audio jacks.
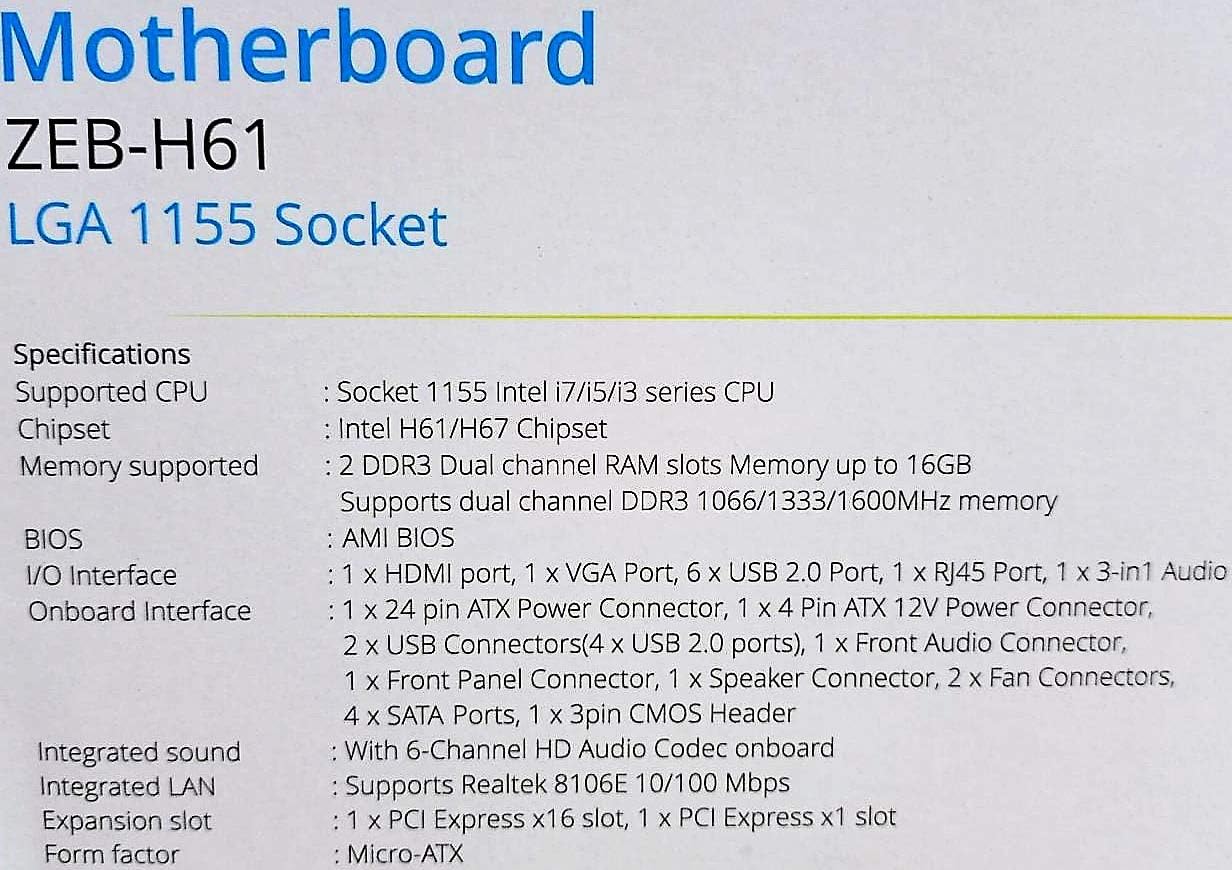
Immagine: Uno sguardo più da vicino view of the rear I/O ports, detailing the VGA, HDMI, USB, LAN, and audio connections.
5.3 Passaggi di installazione dei componenti
- Installare la CPU:
- Aprire la leva del socket della CPU.
- Carefully align the CPU with the socket, ensuring the golden triangle on the CPU matches the mark on the socket.
- Inserire delicatamente la CPU nel socket senza forzarla.
- Chiudere la leva per fissare la CPU.
- Applicare la pasta termica e installare il dissipatore della CPU seguendo le istruzioni del produttore.
- Installa RAM:
- Aprire le clip su entrambe le estremità degli slot di memoria DDR3.
- Allineare il modulo di memoria allo slot, assicurandosi che la tacca sul modulo corrisponda alla chiave nello slot.
- Premere con decisione su entrambe le estremità del modulo di memoria finché le clip non scattano in posizione.
- Installa la scheda grafica (facoltativo):
- Locate the PCI-Express x16 slot.
- Rimuovere il coperchio dello slot di espansione corrispondente dal case del PC.
- Align the graphics card with the slot and press down firmly until it is seated correctly.
- Fissare la scheda al case del PC con una vite.
- Collegare i dispositivi di archiviazione:
- Connect SATA data cables from the motherboard's SATA ports to your hard drives or SSDs.
- Ensure power cables from the power supply are connected to these devices.
- Collegare l'alimentazione:
- Collegare il connettore di alimentazione ATX a 24 pin dall'alimentatore alla scheda madre.
- Collegare il connettore di alimentazione ATX 12V a 4 pin (alimentazione CPU) alla scheda madre.
- Collegare le intestazioni del pannello frontale:
- Connect the power switch, reset switch, HDD LED, and power LED cables from your PC case to the corresponding pins on the motherboard's front panel header. Refer to the motherboard diagram for pin assignments.
- Connect front USB and audio headers.
6. Istruzioni per l'uso
6.1 Primo avvio e configurazione del BIOS
- Dopo aver assemblato tutti i componenti, collega il monitor, la tastiera e il mouse.
- Accendi il computer.
- Premere il tasto designato (solitamente DEL or F2) ripetutamente durante l'avvio per accedere all'utilità di configurazione BIOS/UEFI.
- Nel BIOS, verificare che tutti i componenti installati (CPU, RAM, storage) siano rilevati correttamente.
- Configura l'ordine di avvio per installare il sistema operativo da un'unità USB o da un'unità ottica.
- Salvare le modifiche ed uscire dal BIOS. Il sistema verrà riavviato.
6.2 Installazione del driver
After installing your operating system, install the necessary drivers for optimal performance. Drivers can be found on the included driver CD or downloaded from the official Zebronics websito.
- Driver del chipset
- Driver grafici (se si utilizza una scheda grafica integrata o una GPU dedicata)
- Driver LAN
- Driver audio
- USB Drivers (if applicable)
7. Manutenzione
- Mantienilo pulito: Regularly clean dust from inside your PC case, especially from fans and heatsinks, to ensure proper airflow and prevent overheating. Use compressed air.
- Aggiornamenti del BIOS: Check the Zebronics website periodically for BIOS updates. BIOS updates can improve system stability, compatibility, and performance. Follow update instructions carefully.
- Aggiornamenti driver: Keep your drivers updated to ensure compatibility and optimal performance with your operating system and applications.
- Batteria CMOS: The motherboard uses a CR2032 battery to retain BIOS settings. If your system frequently loses time or BIOS settings, the battery may need replacement.
8. Risoluzione Dei Problemi
- No Power / System Does Not Boot:
- Ensure all power cables (24-pin ATX, 4-pin ATX 12V) are securely connected to the motherboard.
- Check if the power supply unit (PSU) is switched on and functioning.
- Verificare il collegamento dell'interruttore di alimentazione sul pannello frontale.
- Prova a reinstallare i moduli RAM e la scheda grafica.
- Nessuna visualizzazione sul monitor:
- Ensure the monitor is connected to the correct video output (either integrated graphics on the motherboard or dedicated graphics card).
- Controllare l'alimentazione del monitor e la selezione dell'ingresso.
- Reseat the graphics card (if installed) and RAM modules.
- Instabilità del sistema/arresti anomali:
- Controlla le temperature di CPU e GPU. Il surriscaldamento può causare instabilità.
- Ensure RAM modules are properly seated and compatible. Test with one RAM stick if multiple are installed.
- Aggiornare i driver e il BIOS alle versioni più recenti.
- Eseguire strumenti di diagnostica della memoria per verificare la presenza di RAM difettosa.
- CMOS Battery Issue (Loss of Time/Settings):
- If the system loses time or BIOS settings after being powered off, the CMOS battery (CR2032) may need replacement.
- To reset CMOS: Disconnect power, remove the CMOS battery, short the battery socket's positive and negative terminals for 30 seconds, then reinsert the battery.
9. Garanzia e supporto
Per informazioni sulla garanzia e supporto tecnico, fare riferimento al sito ufficiale Zebronics webo contattare il servizio clienti. Conservare la ricevuta d'acquisto come prova d'acquisto per eventuali reclami in garanzia.
Zebronics Official Websito: www.zebronics.com