1. Introduzione
This manual provides comprehensive instructions for the assembly, operation, and maintenance of your Levenhuk Skyline Travel 70 Portable Refractor Telescope. Please read these instructions carefully before using your telescope to ensure proper function and longevity of the instrument. This telescope is designed for both astronomical and terrestrial observations, offering a compact and lightweight solution for beginners and enthusiasts.

Image 1.1: The Levenhuk Skyline Travel 70 Portable Refractor Telescope with its included backpack, ready for transport.
2. Contenuto della confezione
Verifica che tutti i componenti elencati di seguito siano presenti nel tuo pacchetto:
- Levenhuk Skyline Travel 70 Refractor Telescope Optical Tube
- Monte altazimutale
- Treppiede in alluminio
- Optical Finderscope
- K10mm Eyepiece
- K20mm Eyepiece
- 3 lenti di Barlow
- Specchio diagonale
- Backpack for storage and transport

Image 2.1: Included K10mm and K20mm eyepieces, 3x Barlow lens, and diagonal mirror.

Image 2.2: The telescope and its accessories neatly packed inside the provided backpack, demonstrating its portability.
3. Diagramma delle parti
Familiarize yourself with the various parts of your telescope using the diagram below:
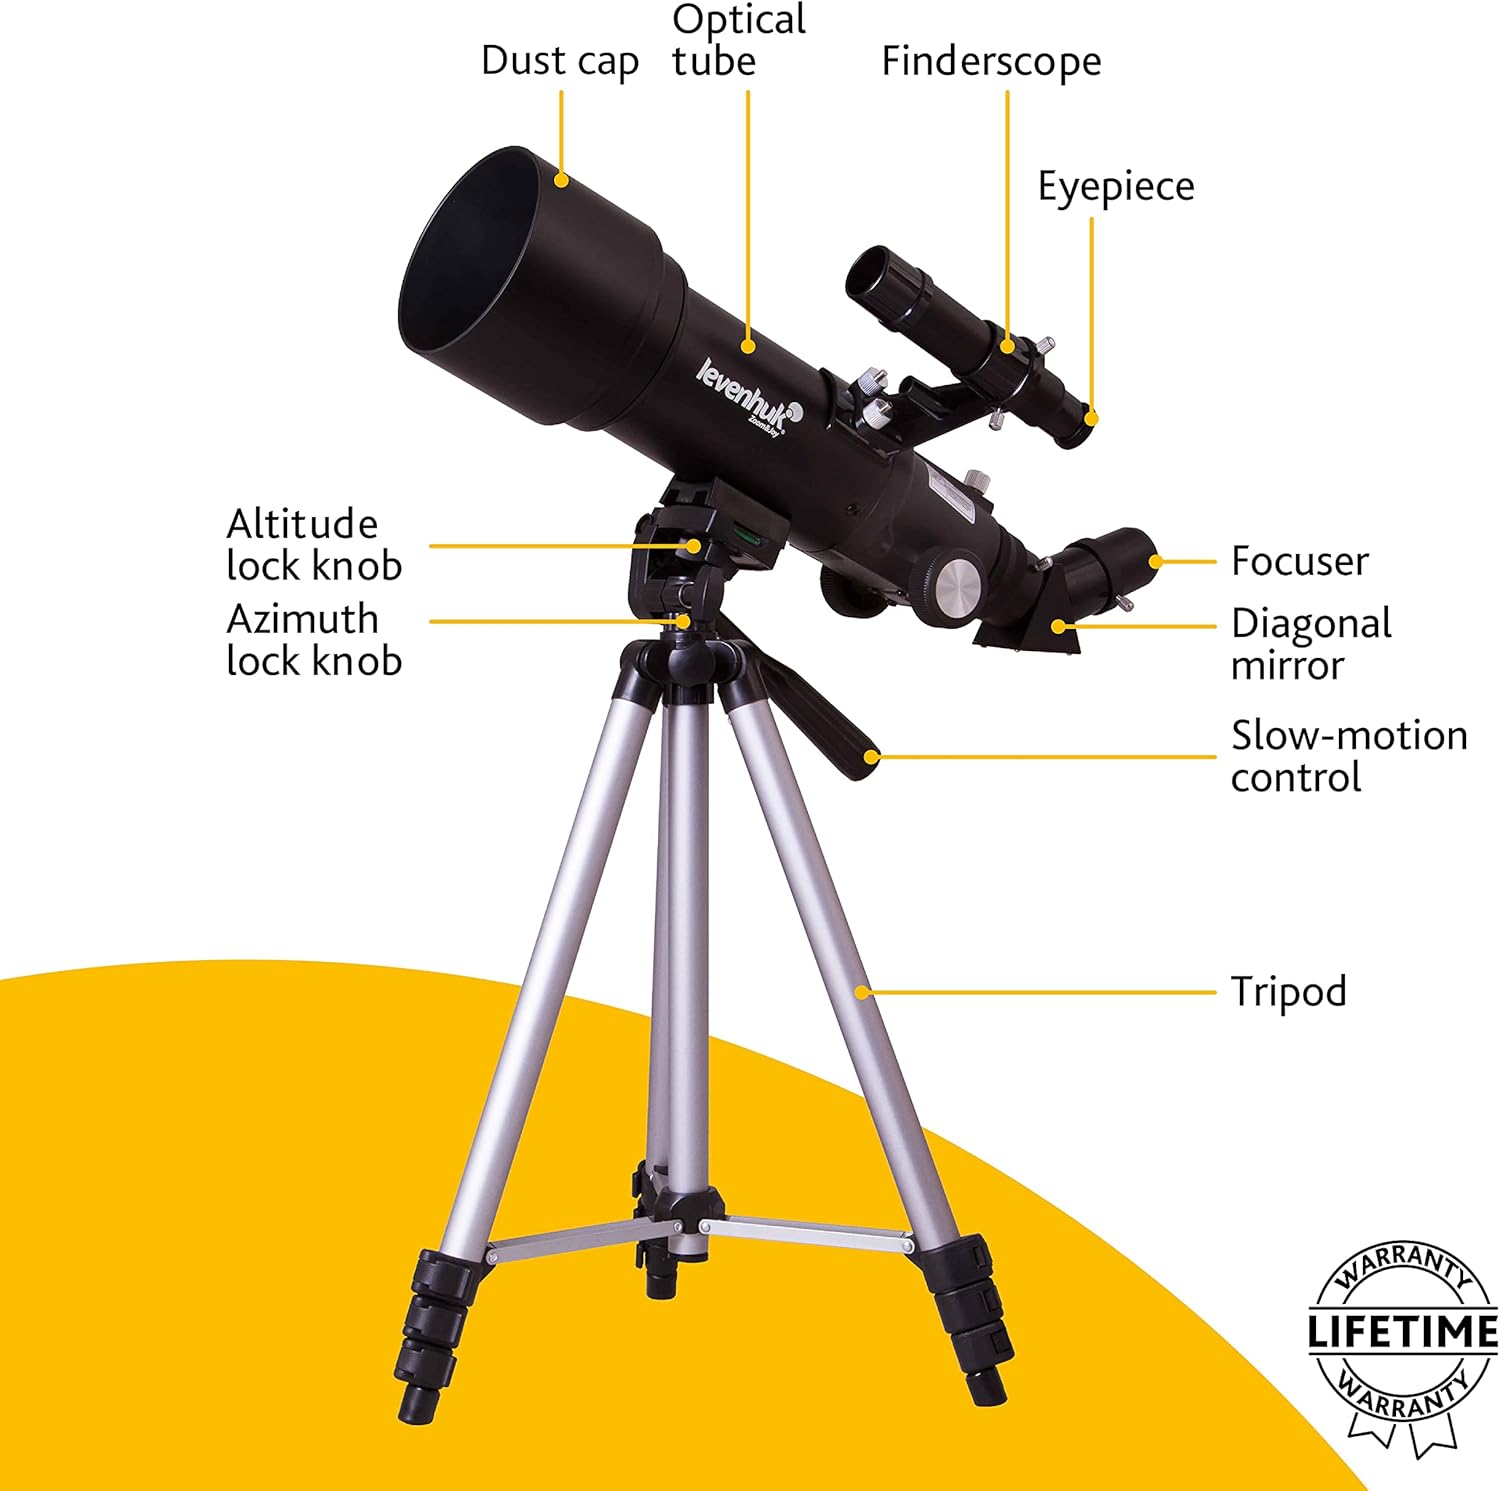
Image 3.1: A detailed diagram illustrating the key components of the Levenhuk Skyline Travel 70 telescope, including the optical tube, dust cap, finderscope, eyepiece, focuser, diagonal mirror, slow-motion control, altitude lock knob, azimuth lock knob, and tripod.
4. Impostazione
Per assemblare il telescopio, segui questi passaggi:
- Montare il treppiede: Extend the tripod legs to a stable height. Ensure the tripod is placed on a level surface.
- Fissare il supporto: The altazimuth mount is pre-attached to the tripod. Ensure all knobs are tightened for stability.
- Collegare il tubo ottico: Secure the telescope optical tube to the mount using the provided screws or clamps. Make sure it is firmly attached.
- Installare il cercatore: Slide the finderscope into its bracket on the optical tube and tighten the retaining screws. Remove the dust caps from both ends of the finderscope.
- Inserire lo specchio diagonale: Loosen the thumbscrew on the focuser and insert the diagonal mirror. Tighten the thumbscrew to secure it.
- Inserire un oculare: Loosen the thumbscrew on the diagonal mirror and insert either the K10mm or K20mm eyepiece. Tighten the thumbscrew. The K20mm eyepiece provides lower magnification and a wider field of view, useful for locating objects.
- Rimuovere il tappo antipolvere: Remove the large dust cap from the front of the telescope's optical tube.
5. Funzionamento del telescopio
Once assembled, you can begin observing.
5.1 Allineamento del cercatore
The finderscope helps you locate objects quickly. It must be aligned with the main telescope tube:
- Puntare il telescopio principale verso un oggetto distante e fermo (ad esempio un albero o un edificio) durante le ore diurne.
- Centrare l'oggetto nell'oculare del telescopio principale.
- Guardare attraverso il cercatore e regolare le viti di allineamento finché lo stesso oggetto non risulta centrato nel reticolo del cercatore.
5.2 Messa a fuoco
To achieve a clear image, rotate the focuser knob until the object appears sharp. You may need to make fine adjustments as objects move or as your eyes adjust.
5.3 Osservazione
Use the altitude and azimuth lock knobs to move the telescope up/down and left/right. For fine adjustments, use the slow-motion control knob.
- Osservazioni astronomiche: Start with the K20mm eyepiece to locate celestial objects. Once centered, you can switch to the K10mm eyepiece for higher magnification.
- Terrestrial Observations: The diagonal mirror provides a corrected image for land viewing.
5.4 Using the Barlow Lens
The 3x Barlow lens increases the magnification of any eyepiece by three times. Insert the Barlow lens into the focuser first, then insert an eyepiece into the Barlow lens. This is useful for observing finer details on planets or the moon.

Image 5.1: A user observing through the Levenhuk Skyline Travel 70 telescope, demonstrating typical usage.
6. Manutenzione
Proper care will ensure your telescope provides years of enjoyment.
- Pulizia dell'ottica: Use a soft, clean brush to remove dust from lenses. For smudges, use a specialized optical cleaning solution and a microfiber cloth. Apply solution to the cloth, not directly to the lens. Avoid touching optical surfaces with your fingers.
- Pulizia generale: Pulisci il tubo del telescopio e la montatura con un panno morbido e asciutto.amp stoffa. Evitare detergenti abrasivi.
- Magazzinaggio: Always replace dust caps on the objective lens and eyepiece when not in use. Store the telescope in its backpack in a dry, dust-free environment. Avoid extreme temperatures and humidity.
7. Risoluzione Dei Problemi
Ecco le soluzioni ai problemi più comuni che potresti riscontrare:
| Problema | Possibile causa | Soluzione |
|---|---|---|
| L'immagine è sfocata o fuori fuoco | Improper focus setting | Adjust the focuser knob until the image is sharp. |
| Cannot find objects easily | Finderscope is not aligned | Align the finderscope with the main telescope (refer to Section 5.1). Use the K20mm eyepiece for wider field of view. |
| L'immagine è scura o poco definita | High magnification eyepiece used in low light; dust cap still on | Use a lower magnification eyepiece (e.g., K20mm). Ensure the objective lens dust cap is removed. |
| Image is upside down or reversed | Normal for astronomical telescopes without an erecting prism; diagonal mirror provides corrected image for terrestrial viewing | Questo è normale per l'astronomia viewing. Per terrestre viewing, ensure the diagonal mirror is correctly installed. |
8. Specifiche
| Caratteristica | Specificazione |
|---|---|
| Marca | Levenhuk |
| Nome del modello | Levenhuk Refractor telescope magnification 140x (max) |
| Diametro della lente dell'obiettivo | 70 millimetri |
| Lunghezza focale | 400 millimetri |
| Supporto per telescopio | Monte altazimutale |
| Descrizione della lente dell'oculare | Barlow (includes 3x Barlow lens) |
| cercatore | Dritto |
| Tipo di messa a fuoco | Messa a fuoco manuale |
| Peso dell'articolo | 2.5 chilogrammi |
9. Garanzia e supporto
Levenhuk products are designed for durability and performance. This product includes a Garanzia a vita, ensuring coverage against defects in materials and workmanship for the life of the product. For detailed warranty terms, service, or technical support, please refer to the official Levenhuk websito o contattare direttamente il servizio clienti.
Per ulteriore assistenza, visitare il sito Levenhuk Store on Amazon.