1. Introduzione
Grazie per l'acquistoasing the Medeli DD620NR Electronic Drum Kit. This comprehensive electronic drum kit is designed for both practice and performance, offering a rich set of features to enhance your drumming experience. It includes advanced functions such as Auto-Fill (AFI), Double Bass Trigger (DBT), and a Coach mode to assist in learning and skill development. With 226 high-quality sounds, 25 preset drum kits, and 60 sequencer patterns, the DD620NR provides versatility for various musical styles. This manual will guide you through the setup, operation, maintenance, and troubleshooting of your new instrument.
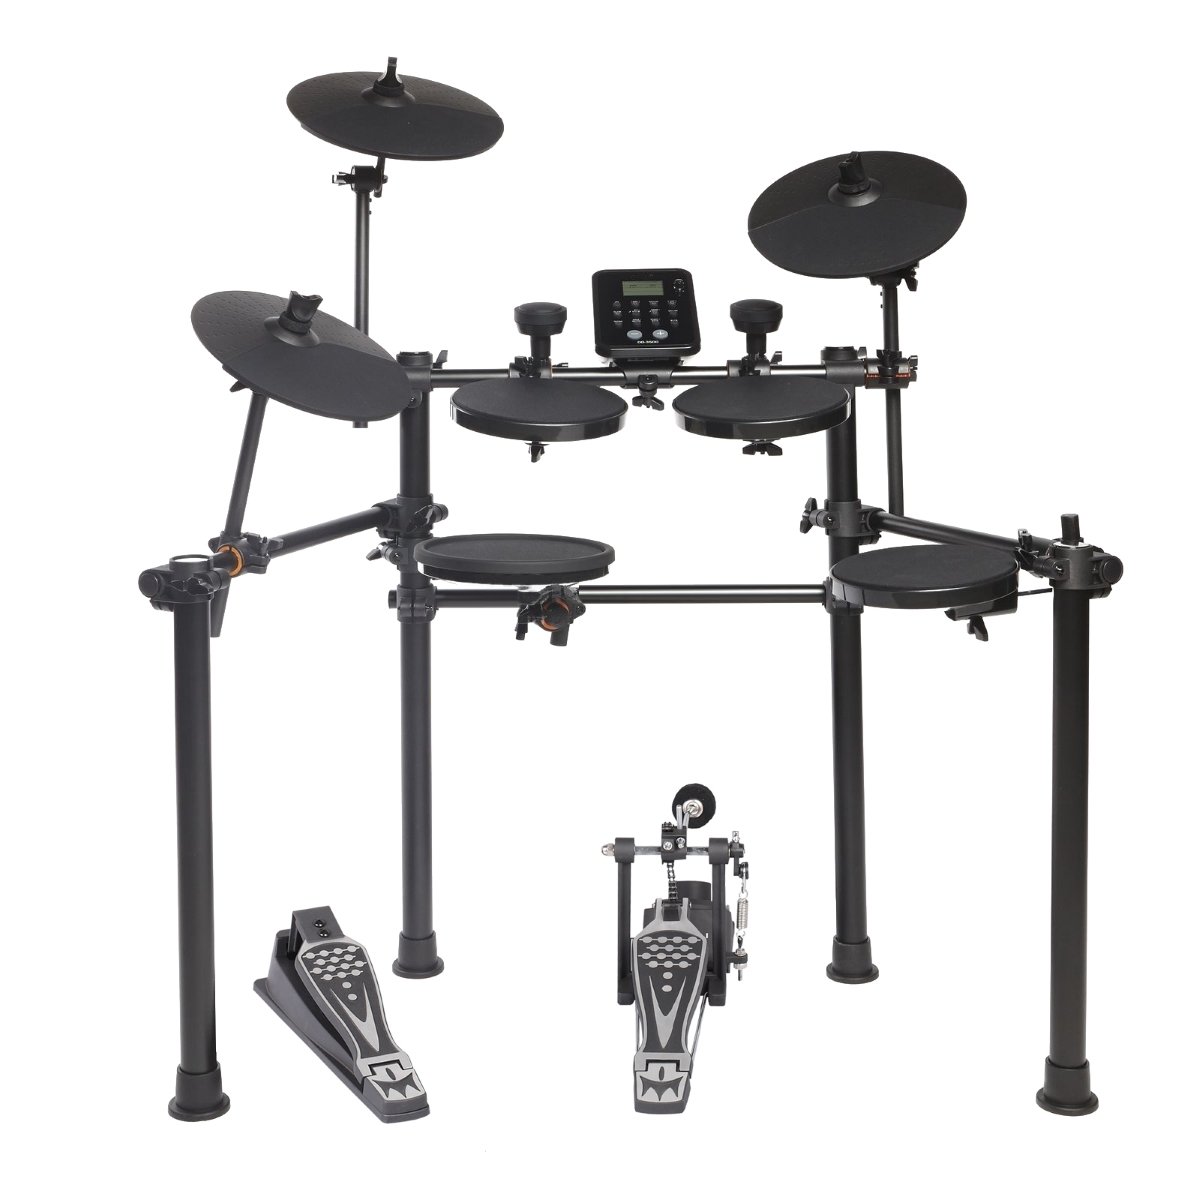
Figure 1.1: The Medeli DD620NR Electronic Drum Kit, showcasingrazie al suo design compatto e robusto.
2. Informazioni sulla sicurezza
Please read these safety instructions carefully before using your Medeli DD620NR Electronic Drum Kit to ensure safe and optimal performance. Keep this manual for future reference.
- Alimentazione elettrica: Utilizzare solo l'adattatore di alimentazione specificato. Assicurarsi che il volumetage corrisponde all'alimentazione elettrica locale.
- Acqua e umidità: Non esporre l'unità a pioggia, umidità o umidità eccessiva. Tenere i liquidi lontano dalla batteria.
- Ventilazione: Do not block any ventilation openings. Ensure adequate airflow around the module.
- Posizionamento: Place the drum kit on a stable, level surface to prevent it from falling. Avoid placing it near heat sources or in direct sunlight.
- Pulizia: Clean the unit only with a dry, soft cloth. Do not use abrasive cleaners or solvents.
- Manutenzione: Non tentare di riparare l'unità da soli. Per qualsiasi intervento di manutenzione, rivolgersi a personale qualificato.
- Bambini: Tenere le parti di piccole dimensioni e i materiali di imballaggio fuori dalla portata dei bambini per evitare rischi di soffocamento.
3. Impostazione
3.1 Contenuto della confezione
Prima del montaggio, verificare che tutti i componenti siano presenti nella confezione:
- DD620NR Drum Module
- Drum Pads (Snare, Tom x3, Crash x2, Ride, Hi-Hat)
- Kick Pad and Kick Pedal
- Pedale di controllo del charleston
- Telaio per rack per batteria
- Cables for Pad Connections
- Adattatore di alimentazione
- Manuale dell'utente (questo documento)
- Drum Sticks (optional, may vary by region)
3.2 Istruzioni di montaggio
Per assemblare la tua batteria, segui questi passaggi:
- Disimballare i componenti: Rimuovere con cautela tutte le parti dalla confezione.
- Assemblare il rack: Connect the frame tubes as shown in the assembly diagram. Ensure all clamps sono serrati saldamente.
- Supporti per piatti e cuscinetti: Attach the snare, tom pads, and cymbal pads (crash, ride, hi-hat) to the rack using the provided clampe braccia. Regola la loro posizione per suonare comodamente.
- Position Kick Pad and Pedals: Place the kick pad in front of the rack and attach the kick pedal. Position the hi-hat control pedal on the floor.
- Modulo tamburo di montaggio: Secure the DD620NR drum module to the rack using its dedicated mount.

Figure 3.1: Assembly diagram illustrating the correct placement and connection points for the drum kit components.
3.3 Collegamento dei cavi
Once the physical assembly is complete, connect the pads and pedals to the drum module:
- Pad Cables: Connect each drum pad and cymbal pad to its corresponding input on the DD620NR module using the included trigger cables. Labels on the module indicate "Snare," "Tom1," "Crash," etc.
- Pedal Cables: Connect the kick pad cable and the hi-hat control pedal cable to their respective inputs on the module.
- Adattatore di alimentazione: Connect the power adapter to the DC IN jack on the module, then plug it into a wall outlet.
- Uscita audio: For sound, connect headphones to the TELEFONI jack or connect the PRODUZIONE jacks to an amplifier, mixer, or speakers.
- USB/MIDI: To connect to a computer, use a standard USB cable to connect the module's USB A HOST port to your computer.
- Ingresso ausiliario: To play along with external audio, connect a mobile device or audio player to the AUX IN cricco.
4. Istruzioni per l'uso
This section details the basic operation and functions of your DD620NR drum kit.
4.1 Accensione/spegnimento
- Accensione: Premere il tasto ENERGIA button located on the drum module. The display will illuminate.
- Spegni: Premere e tenere premuto il tasto ENERGIA button until the display turns off. Always power off the unit when not in use.
4.2 Funzioni di base
The DD620NR module features an intuitive control panel for accessing various functions.

Figure 4.1: The DD620NR drum module control panel, showing the display, navigation buttons, and function keys.
- Selezione del kit di batteria: Utilizzare il KIT pulsante e il +/- buttons or data dial to select from 25 preset drum kits or 5 user-defined kits.
- Selezione del suono: In Voice mode, use the VOCE pulsante e +/- buttons to browse through 226 available sounds.
- Sequencer (Patterns): Premere il tasto CANZONE button to enter sequencer mode. Use +/- to select from 60 preset patterns or 1 user-defined pattern. Press AVVIO/ARRESTO per riprodurre/mettere in pausa.
- Auto-Fill (AFI): This function automatically adds drum fills to your playing. Refer to the module's display and dedicated button (if present) for activation and settings.
- Double Bass Trigger (DBT): Enhances the response for double bass drumming techniques. Consult the module's settings menu for configuration.
- Funzione di allenatore: Coinvolgere il ALLENATORE mode to access various exercises and timing drills designed to improve your drumming skills.
4.3 Connettività
- Connessione dispositivo mobile: Connect your smartphone or tablet to the AUX IN jack using a stereo audio cable. You can then play along with your favorite music through the drum kit's audio output.
- Connessione USB/MIDI: IL USB A HOST port allows you to connect the DD620NR to a computer. This enables MIDI communication for recording, using virtual instruments, or updating firmware (if applicable). No special drivers are usually required for basic MIDI functionality on modern operating systems.
5. Manutenzione
Proper maintenance will ensure the longevity and optimal performance of your Medeli DD620NR.
- Pulizia: Regularly wipe down the drum pads, cymbals, and module with a soft, dry, lint-free cloth. For stubborn dirt, a slightly damp cloth can be used, followed immediately by a dry cloth. Avoid using chemical cleaners, waxes, or solvents.
- Cura del cuscinetto: Avoid striking the pads with excessive force, which can reduce their lifespan. Rotate pad positions periodically to distribute wear evenly.
- Gestione dei cavi: Keep cables neatly organized and avoid sharp bends or kinks. Periodically check cable connections for looseness.
- Magazzinaggio: When not in use for extended periods, store the drum kit in a clean, dry environment away from extreme temperatures and direct sunlight. If disassembling, store components carefully to prevent damage.
6. Risoluzione Dei Problemi
If you encounter issues with your DD620NR, refer to the following common problems and solutions:
| Problema | Possibile causa | Soluzione |
|---|---|---|
| Nessun suono dalle cuffie/altoparlanti. | Volume troppo basso; cavi scollegati; uscita selezionata non corretta. | Check master volume and individual pad volumes. Ensure headphones/speakers are properly connected and powered on. Verify correct output (PHONES/OUTPUT) is used. |
| A specific pad is not triggering sound. | Pad cable loose or damaged; pad sensitivity too low; pad faulty. | Check the cable connection for the specific pad at both the pad and module ends. Adjust pad sensitivity in the module settings. If issue persists, try swapping cables with a working pad to isolate the problem. |
| Il modulo non si accende. | Power adapter not connected; power outlet faulty; adapter damaged. | Ensure the power adapter is securely connected to the module and a working power outlet. Try a different outlet. Verify the power adapter is the correct one for the unit. |
| MIDI connection to computer not working. | USB cable faulty; incorrect driver/software settings; module not recognized. | Try a different USB cable. Ensure your computer's software (DAW, MIDI utility) is configured to recognize the DD620NR as a MIDI input device. Restart both the module and computer. |
If the problem persists after trying these solutions, please contact Medeli customer support.
7. Specifiche
- Modello: Medeli DD620NR
- Suoni: 226
- Batteria: 25 Preset, 5 User-defined
- Sequencer Patterns: 60 Preset, 1 User-defined
- Funzioni: Auto-Fill (AFI), Double Bass Trigger (DBT), Coach Mode
- Connettività: USB TO HOST (MIDI), AUX IN, PHONES Out, OUTPUT L/MONO, R
- Produttore: MEDELI
- Riferimento del produttore: E010E
- ASIN: B0774RDYY7
- Product Launch Date: 4 novembre 2017
8. Garanzia e supporto
Medeli products are manufactured to high-quality standards and are backed by a limited warranty. Please refer to the warranty card included with your product or visit the official Medeli websito per termini e condizioni di garanzia dettagliati specifici per la tua regione.
For technical support, service, or inquiries regarding your Medeli DD620NR, please contact your local dealer or visit the official Medeli support websito. Quando contatti l'assistenza, tieni a portata di mano il modello e il numero di serie del tuo prodotto.