1. Introduzione
This manual provides detailed instructions for the installation, operation, maintenance, and troubleshooting of your FSP 400W Micro ATX Power Supply (Model FSP400-60GHS(85)-R1). This power supply unit is designed for compact small form factor PC systems, offering 400 watts of power output with 80 Plus Bronze certification for high efficiency. It is compatible with Intel and AMD CPU systems and standard PC configurations.
Please read this manual thoroughly before installation and operation to ensure proper usage and to prevent damage to the unit or other components.
2. Informazioni sulla sicurezza
AVVERTIMENTO: Gli alimentatori contengono alta tensionetage componenti. Non aprire l'alimentatore casing. Non ci sono parti riparabili dall'utente all'interno. L'apertura del casing will void the warranty and poses a risk of electric shock.
- Prima di procedere all'installazione o alla manutenzione, assicurarsi che l'alimentazione sia scollegata dalla presa di corrente CA.
- Installare l'alimentatore in un'area ben ventilata.
- Do not operate the power supply in high humidity or extreme temperature environments.
- Utilizzare solo i cavi forniti con l'alimentatore.
- Prima di accendere il sistema, assicurarsi che tutti i cavi siano collegati saldamente.
- Questo prodotto è progettato per l'uso con personal computer. Non utilizzarlo per altri scopi.
3. Contenuto della confezione
Verifica che tutti gli articoli elencati di seguito siano presenti nel tuo pacco:
- FSP 400W Micro ATX Power Supply (FSP400-60GHS(85)-R1)
- Cavo di alimentazione CA
- SFX to PS2 Bracket
- Manuale d'uso
- Mounting Screws (typically included with PC cases, but sometimes with PSUs)

Figure 3.1: Package Contents. Shows the power supply unit, user manual, various power cables, an AC power cord, and an SFX to PS2 adapter bracket.
4. Prodotto finitoview
The FSP400-60GHS(85)-R1 is a compact power supply designed for small form factor systems. Key features include an 80mm cooling fan with thermal sensing technology and an energy-saving 1-watt standby mode.
4.1 Disposizione fisica

Figura 4.1: Angolato view of the FSP 400W Micro ATX Power Supply, highlighting the fan grille, power switch, and AC power input.

Figura 4.2: Posteriore view of the power supply, detailing the main power switch and the AC power input socket.

Figura 4.3: in alto view of the power supply, showing the protective grille over the 80mm cooling fan.
4.2 Connettori di uscita
The power supply includes various connectors to power your system components:
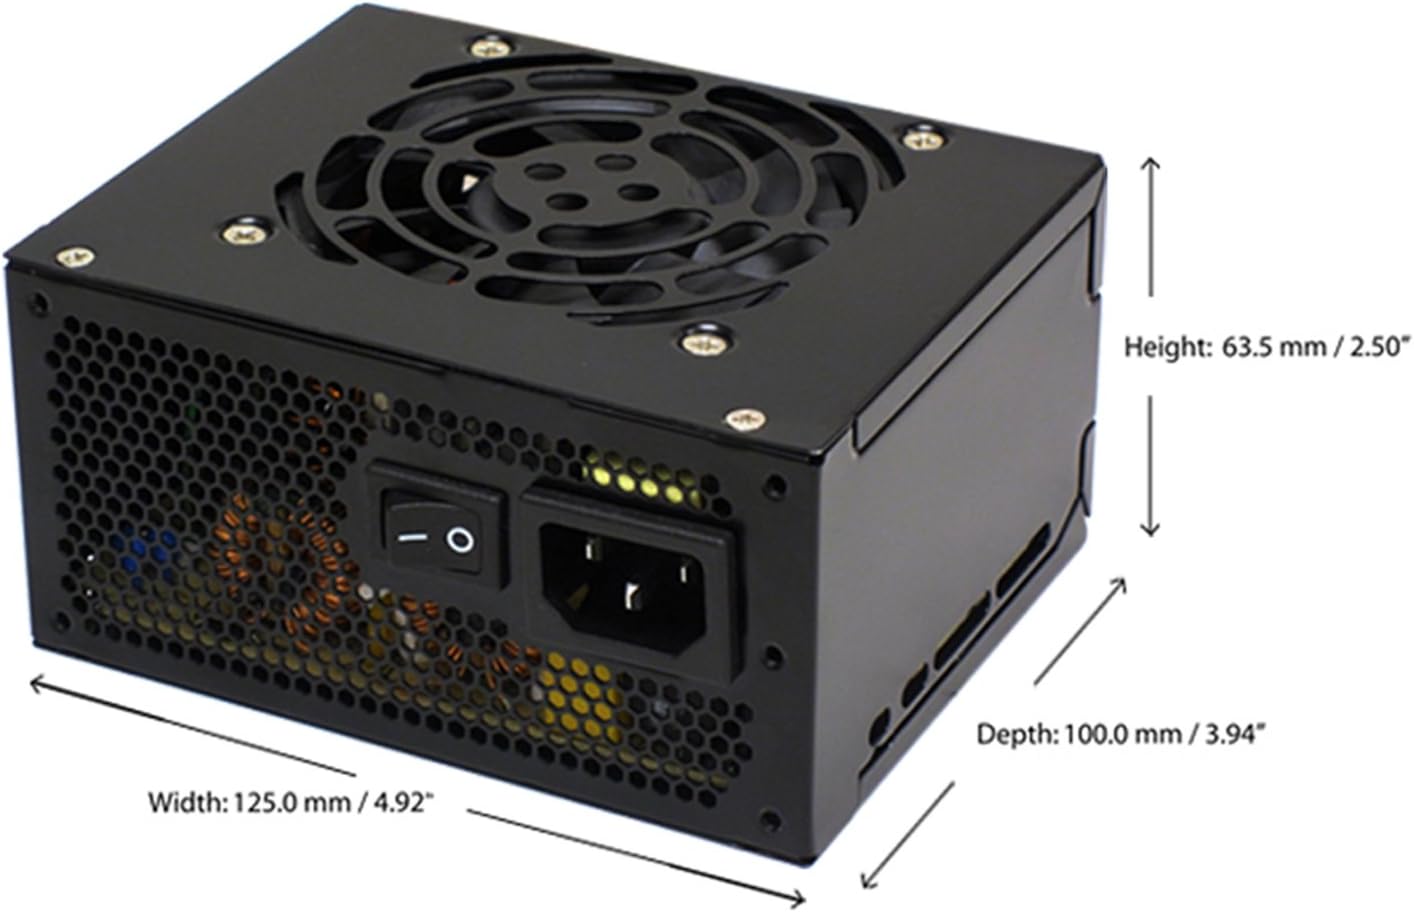
Figure 4.4: Diagram illustrating the types and quantities of output connectors available on the FSP400-60GHS(85)-R1 power supply.
- Main 24 Pin (1): Per l'alimentazione della scheda madre.
- P4 | EPS 4+4 Pin (1): For CPU power.
- PCI-E 8 Pin (6+2) (1): Per schede grafiche.
- Molex 4 Pin (3): For older peripherals and fans.
- Serial ATA 15 Pin (3): For SATA hard drives and SSDs.
- FDD 4 Pin (1): For floppy disk drives or other legacy devices.
5. Configurazione e installazione
Before beginning installation, ensure your computer system is powered off and disconnected from the AC power outlet. It is recommended to wear an anti-static wrist strap to prevent electrostatic discharge (ESD) damage to components.
5.1 Installazione dell'alimentatore
- Preparare il caso: Open your computer case. Identify the power supply mounting area.
- Montaggio dell'alimentatore:
- For SFX cases: Insert the FSP400-60GHS(85)-R1 directly into the SFX power supply bay and secure it with screws.
- For standard ATX cases: Attach the included SFX to PS2 bracket to the power supply. Then, mount the power supply with the bracket into the ATX power supply bay and secure it with screws.

Figure 5.1: The FSP 400W Micro ATX Power Supply shown with the SFX to PS2 adapter bracket installed, ready for mounting in a standard ATX case.

Figure 5.2: Illustration demonstrating how the SFX power supply fits into a PS2 (ATX) case using the provided adapter bracket.
5.2 Cavi di collegamento
Connect the appropriate cables to your motherboard and components. Refer to your motherboard and component manuals for specific connection points.
- Potenza della scheda madre: Connect the 24-pin ATX connector to the corresponding socket on your motherboard.
- Potenza CPU: Connect the 4+4-pin EPS/ATX 12V connector to the CPU power socket on your motherboard.
- Potenza della scheda grafica: If your graphics card requires external power, connect the 6+2-pin PCI-E connector(s) to the graphics card.
- Dispositivi di archiviazione: Connect SATA power connectors to your SATA hard drives, SSDs, and optical drives.
- Periferiche: Use Molex 4-pin connectors for case fans or other legacy peripherals as needed.
- Gestione dei cavi: Disporre i cavi in modo ordinato per garantire un corretto flusso d'aria all'interno del case.
Once all internal connections are made, close your computer case.
5.3 Collegamento esterno
- Connect the AC power cord to the power supply's AC inlet.
- Collegare l'altra estremità del cavo di alimentazione CA a una presa a muro con messa a terra o a un dispositivo di protezione da sovratensioni.
- Ensure the power switch on the back of the power supply is in the "OFF" (O) position before plugging it in.
6. Istruzioni per l'uso
6.1 Accensione del sistema
- After all connections are secure, flip the power switch on the back of the power supply to the "ON" (I) position.
- Premere il pulsante di accensione sul case del computer per avviare il sistema.
6.2 Thermal Control System
The FSP400-60GHS(85)-R1 features an 80mm cooling fan with thermal sensing technology. This system automatically adjusts the fan speed based on the internal temperature of the power supply, optimizing cooling performance while minimizing noise.
6.3 Energy Saver Standby Mode
This power supply is designed with an energy-saving 1-watt standby mode, reducing power consumption when the system is in a low-power state or turned off but still connected to AC power.
7. Manutenzione
Una corretta manutenzione garantisce la longevità e le prestazioni ottimali del tuo alimentatore.
- Pulizia: Periodically clean the exterior of the power supply and its fan grille to prevent dust buildup. Use a soft, dry cloth or compressed air. Ensure the power supply is disconnected from AC power before cleaning.
- Ventilazione: Ensure that the power supply's fan and ventilation openings are not obstructed. Good airflow is crucial for cooling.
- Integrità del cavo: Controllare regolarmente tutti i cavi di alimentazione per verificare la presenza di segni di usura, sfilacciamento o danni. Sostituire immediatamente i cavi danneggiati.
Do not attempt to open the power supply unit for internal cleaning or repair. This will void the warranty and can be dangerous.
8. Risoluzione Dei Problemi
Se riscontri problemi con l'alimentatore, fai riferimento ai seguenti problemi comuni e alle relative soluzioni:
8.1 No Power to System
- Controllare l'alimentazione CA: Ensure the AC power cord is securely plugged into both the power supply and a working wall outlet.
- Interruttore di alimentazione: Verify that the power switch on the back of the power supply is in the "ON" (I) position.
- Collegamenti interni: Confirm that the 24-pin ATX and 4+4-pin EPS/ATX 12V connectors are firmly seated in the motherboard.
- Corto circuito: Disconnect all peripheral power cables (SATA, Molex, PCI-E) and attempt to power on. If the system powers on, a short circuit may exist in one of the connected components or cables. Reconnect them one by one to identify the faulty component.
8.2 System Instability or Random Shutdowns
- Sovraccarico: Assicurarsi che i requisiti di alimentazione del sistema non superino la capacità di 400 W dell'alimentatore.
- Ventilazione: Check for proper airflow within the case and ensure the power supply's fan is not obstructed. Overheating can cause instability.
- Connessioni via cavo: Re-check all power connections to ensure they are secure. Loose connections can lead to intermittent power delivery.
8.3 Rumore eccessivo della ventola
- Accumulo di polvere: Clean the fan grille and fan blades with compressed air.
- Ostruzione: Ensure no cables or foreign objects are interfering with the fan's rotation.
- Ambiente operativo: High ambient temperatures can cause the thermal control system to increase fan speed. Ensure adequate room ventilation.
If troubleshooting steps do not resolve the issue, contact FSP customer support or your retailer for assistance.
9. Specifiche
Detailed technical specifications for the FSP400-60GHS(85)-R1 power supply:
| Nome del modello | FSP 400W Micro ATX Power Supply |
| Numero di modello | FSP400-60GHS(85)-R1 |
| Marca | FSP |
| Uscita Wattage | 400 Watt |
| Certificazione 80 Plus | 80 più bronzo |
| Fattore di forma | Micro ATX (SFX with PS2 bracket) |
| Metodo di raffreddamento | Air (80mm fan with thermal control) |
| Progettazione dell'alimentatore | Non modulari |
| Ingresso volumetage | 100 - 265 Volt (CA) |
| Dimensioni (L x P x A) | 4.9 x 3.9 x 2.5 pollici (125.0 x 100.0 x 63.5 mm) |
| Peso dell'articolo | 2.31 libbre |
| Dispositivi compatibili | Personal Computer (AMD/Intel CPU systems) |
| Connettori | Main 24 Pin (1), P4 | EPS 4+4 Pin (1), PCI-E 8 Pin (6+2) (1), Molex 4 Pin (3), Serial ATA 15 Pin (3), FDD 4 Pin (1) |
| Conformità ambientale | RoHS, Lead-Free, Green Product (G.P) |

Figure 9.1: Physical dimensions of the FSP 400W Micro ATX Power Supply.

Figure 9.2: Illustrative diagram showing typical cable lengths for the power supply connectors.
10. Informazioni sulla garanzia
The FSP 400W Micro ATX Power Supply (FSP400-60GHS(85)-R1) is covered by a Garanzia del produttore di 3 anni. This warranty guarantees the quality and performance of the product for the specified period from the date of purchase.
The warranty covers defects in materials and workmanship under normal use. It does not cover damage resulting from improper installation, accidents, misuse, abuse, natural disasters, or unauthorized modifications or repairs. Opening the power supply casing invaliderà la garanzia.
For warranty claims or service, please retain your proof of purchase and contact FSP customer support.
11. Assistenza clienti
If you require further assistance, have questions, or need to report an issue that cannot be resolved using the troubleshooting guide, please contact FSP customer support.
- FSP Websito: Visit the official FSP websito per informazioni sui prodotti, FAQ e risorse di supporto.
- Informazioni sui contatti: Refer to the FSP website or your product packaging for the most current customer service contact details (phone, email, or support portal).
When contacting support, please have your product model number (FSP400-60GHS(85)-R1) and proof of purchase readily available.