1. Introduzione
Thank you for choosing the Purelux Bathroom Sink Pop-Up Drain Assembly with Overflow. This manual provides detailed instructions for the proper installation, operation, and maintenance of your new drain assembly. Please read this manual thoroughly before beginning installation to ensure correct setup and long-lasting performance.
Caratteristiche principali:
- Durable solid brass construction ensures longevity.
- Designed for sinks with overflow, fitting 1-1/2" or 1-3/4" sink holes.
- Easy push-button operation: click to seal, click again to drain.
- Enhanced sealing with a robust rubber washer for leak-free performance.
- Includes complimentary plumber's tape for installation assistance.
2. Componenti inclusi
Carefully unpack all components and ensure you have received all items listed below. If any parts are missing or damaged, please contact Purelux customer support.
- Pop-Up Drain Body (Brushed Nickel)
- Top Rubber Washer
- Bottom Rubber Washer
- Dado di montaggio in ottone
- Plumber's Tape (complimentary)

Figura 2.1: Esploso view of the Purelux pop-up drain assembly, showing the drain body, washers, and mounting nut.
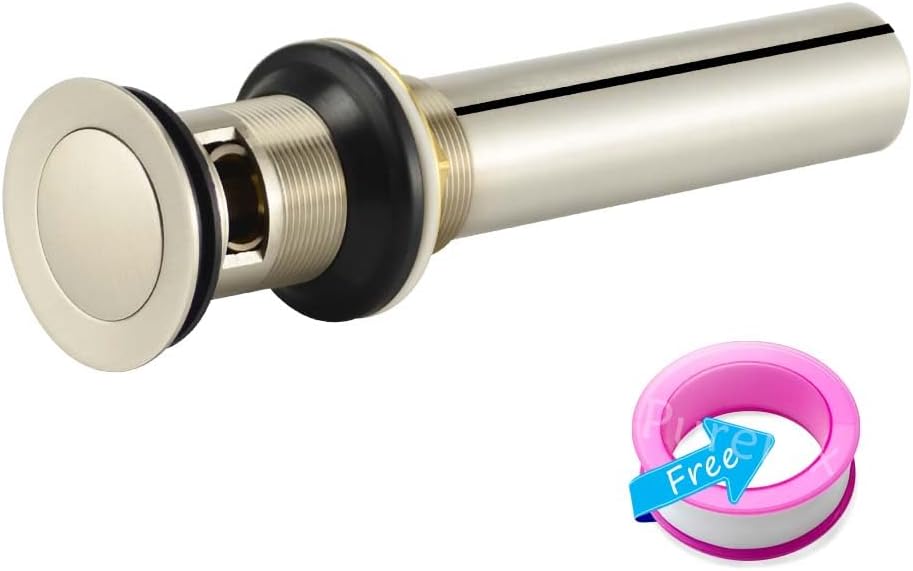
Figura 2.2: The Purelux pop-up drain assembly shown alongside the complimentary roll of plumber's tape.
3. Istruzioni per l'installazione
Before you begin, ensure the water supply to the sink is turned off. You may need basic plumbing tools such as a wrench or pliers.
3.1 Prepare the Sink Hole
- Clean the sink drain hole thoroughly, removing any old caulk, putty, or debris.
- Ensure the sink hole is compatible with the drain assembly (1-1/2" or 1-3/4" diameter).
3.2 Assemble the Drain
- Apply plumber's tape (provided) clockwise around the threads of the drain body.
- Place the top rubber washer onto the top flange of the drain body.
- Insert the drain body into the sink hole from above, ensuring the top rubber washer is seated flush with the sink surface.

Figura 3.1: The Purelux pop-up drain assembly with the top rubber washer correctly positioned for installation.
3.3 Secure the Drain
- From underneath the sink, slide the bottom rubber washer onto the threaded portion of the drain body, against the underside of the sink.
- Thread the brass mounting nut onto the drain body and hand-tighten it.
- Using a wrench or pliers, carefully tighten the mounting nut until the drain assembly is secure and does not move. Do not overtighten.
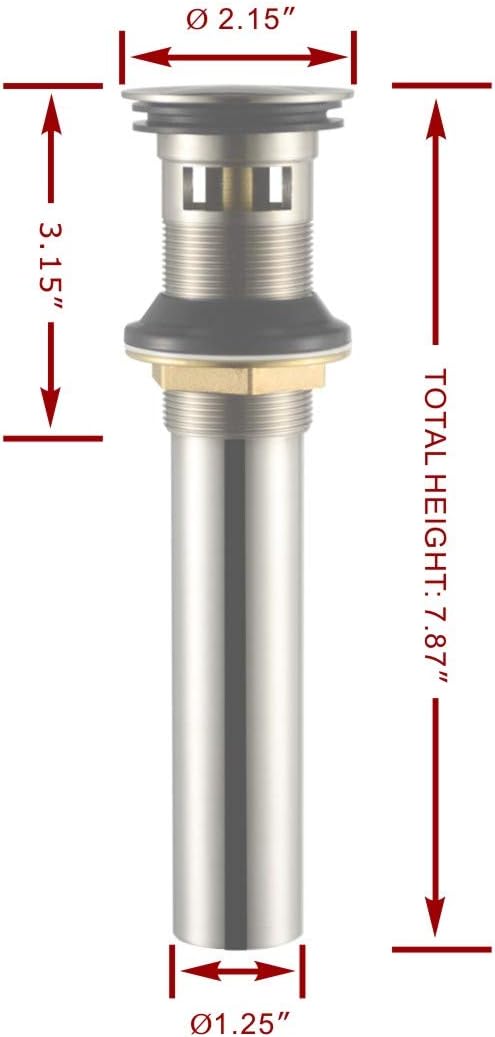
Figura 3.2: Diagram illustrating the dimensions of the pop-up drain assembly, including total height and diameters.
3.4 Connect to P-Trap
- Connect the tailpiece of the pop-up drain assembly to your existing P-trap. Ensure all connections are tight to prevent leaks.
- Turn on the water supply and check for any leaks around the drain and P-trap connections. Tighten as necessary.

Figura 3.3: Illustration demonstrating the purpose of a sink overflow opening, which prevents water from spilling if the drain is closed and the faucet is left on.
4. Istruzioni per l'uso
The Purelux Pop-Up Drain Assembly features a simple push-button mechanism for opening and closing the drain.
4.1 Closing the Drain
To close the drain and fill the sink, simply press down firmly on the center of the drain stopper. You will feel a click as it locks into the closed position.

Figura 4.1: The drain stopper in its closed position, effectively sealing the sink.
4.2 Opening the Drain
To open the drain and allow water to flow out, press down firmly on the center of the drain stopper again. It will click and pop up, allowing water to drain.

Figura 4.2: The drain stopper in its open position, allowing water to drain freely from the sink.
5. Manutenzione
Regular cleaning and maintenance will ensure the longevity and proper function of your Purelux drain assembly.
5.1 Pulizia
- Clean the drain stopper and visible parts with a soft cloth and mild soap.
- Evitare detergenti abrasivi, prodotti chimici aggressivi o pagliette abrasive, poiché potrebbero danneggiare la finitura in nichel spazzolato.
- For deeper cleaning, the pop-up stopper can often be unscrewed or pulled out for easy access to the drain pipe. Refer to the assembly diagram for guidance.
5.2 Prevenire gli intasamenti
- Regularly remove hair and debris from the drain opening to prevent blockages.
- Avoid pouring grease or harsh chemicals down the drain.
6. Risoluzione Dei Problemi
If you encounter issues with your Purelux drain assembly, refer to the common problems and solutions below.
| Problema | Possibile causa | Soluzione |
|---|---|---|
| Drain is leaking from under the sink. | Loose mounting nut or improperly seated washers. | Ensure the brass mounting nut is securely tightened. Check that both rubber washers are correctly positioned and not damaged. Apply more plumber's tape if necessary. |
| Drain stopper does not seal completely. | Debris under the stopper or worn rubber seal. | Remove the stopper and clean any debris. Inspect the rubber seal on the stopper for wear or damage. |
| L'acqua defluisce lentamente. | Accumulo di capelli o detriti nel tubo di scarico. | Remove the pop-up stopper and clear any obstructions from the drain pipe. Use a drain snake if necessary. |
| Stopper mechanism is stiff or stuck. | Accumulo di minerali o mancanza di lubrificazione. | Clean the stopper mechanism thoroughly. A small amount of silicone grease can be applied to moving parts if accessible. |
7. Specifiche
- Marca: Purelux
- Numero modello: DS0022
- Colore: Nichel spazzolato
- Stile: With Overflow
- Materiale: Costruzione in ottone massiccio
- Dimensioni del prodotto: 1.25" L x 7.87" A
- Peso dell'articolo: 0.64 libbre (circa 10.2 once)
- Compatible Sink Hole Size: 1-1/2" to 1-3/4"
- Codice UPC: 603827003058
- Data prima disponibilità: 20 marzo 2018
8. Garanzia e supporto
Purelux products are manufactured to high-quality standards and are backed by a manufacturer's warranty. For specific warranty details, please refer to the product packaging or contact Purelux customer service.
Assistenza clienti:
If you have any questions, require assistance with installation, or need to report a missing or damaged part, please contact Purelux customer support through the retailer where the product was purchased or visit the official Purelux websito per le informazioni di contatto.