
Introduzione
Thank you for choosing the Genius GLT-85.4D 4-Channel Class-D Car Amplifier. This compact, high-performance amplifier is designed to deliver exceptional audio quality and power efficiency for your vehicle's sound system. This manual provides essential information for proper installation, operation, and maintenance of your amplifier. Please read it thoroughly before attempting installation or use.
Informazioni sulla sicurezza
Durante l'installazione e il funzionamento, osservare sempre le seguenti precauzioni di sicurezza:
- Disconnect the vehicle's negative battery terminal before any electrical work to prevent short circuits.
- Ensure all wiring is properly insulated to prevent damage and electrical hazards.
- Montare il amplifier securely in a dry, well-ventilated area, away from direct sunlight, heat sources, and moisture.
- Utilizzare cavi di calibro appropriato per i collegamenti di alimentazione, messa a terra e altoparlanti, come specificato nel presente manuale.
- Non azionare il amplifier if it is damaged or malfunctioning. Refer to the troubleshooting section or seek professional assistance.
- Mantieni il amplifier lontano dalla portata dei bambini.
Contenuto della confezione
Verificare che tutti gli articoli siano presenti nel pacco:
- Genius GLT-85.4D 4-Channel Amppiù vivace
- Hardware di montaggio (viti)
- Manuale dell'utente (questo documento)
Prodotto finitoview
The Genius GLT-85.4D is a compact 4-channel Class-D amplifier designed for high efficiency and powerful audio output. Its nanotechnology and SMD components contribute to its small size and robust performance.
Amplificatore Top View

Questa immagine mostra la parte superiore view of the Genius GLT-85.4D amplifier, highlighting its compact design and the "GENIUS AUDIO" branding along with the model number "GLT-85.4D" and "1000wMax" power rating.
Control Panel Layout (Input Side)
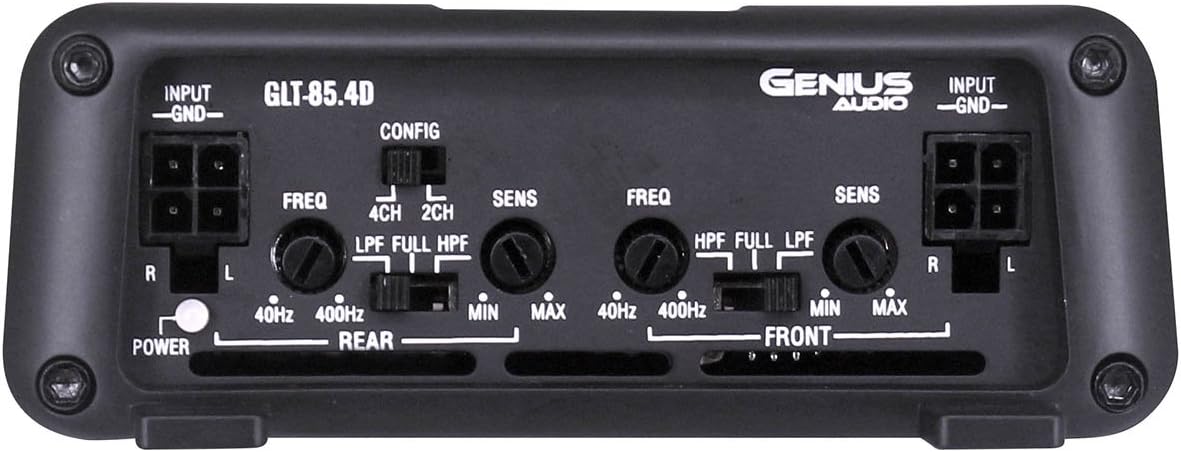
This image displays the input side of the GLT-85.4D amplifier, detailing the various controls and connections. It includes RCA input terminals (R, L) for both Rear and Front channels, gain controls (SENS MIN/MAX), frequency adjustment knobs (FREQ 40Hz-400Hz), and crossover switches (LPF, FULL, HPF) for both Rear and Front channels. A configuration switch (CONFIG 4CH, 2CH) is also visible, along with the Power indicator light.
Power and Speaker Terminal Layout (Output Side)

This image shows the output side of the GLT-85.4D amplifier, featuring the power and speaker terminals. From left to right, it includes the GROUND terminal, REMOTE turn-on terminal, +12V power terminal, and speaker output terminals for REAR BRIDGED (L+, L-, R+, R-) and FRONT BRIDGED (L+, L-, R+, R-) connections. The "4 Channel 'CLASS D' 2 ohm Stable Stereo Bridgeable MOSFET" text indicates key ampcapacità di lifier.
Configurazione e installazione
Un'installazione corretta è fondamentale per prestazioni e sicurezza ottimali. In caso di dubbi su qualsiasi passaggio, consultare un installatore professionista.
Posizione di montaggio
- Choose a location that is dry, well-ventilated, and protected from direct sunlight, excessive heat, and moisture.
- Assicurare un flusso d'aria sufficiente attorno al amplificatore per un raffreddamento adeguato.
- Montare il amplifier securely to a solid surface using the provided mounting hardware to prevent movement during vehicle operation.
Collegamenti elettrici
Prima di effettuare qualsiasi collegamento, scollegare il terminale negativo della batteria del veicolo.
- Cavo di alimentazione (+12 V): Run a heavy-gauge power cable (e.g., 8 AWG or thicker, depending on total system power) directly from the positive terminal of the vehicle's battery to the +12V terminal on the amplifier. Install an in-line fuse holder with an appropriate fuse (not supplied) within 18 inches (45 cm) of the battery.
- Cavo di terra (GND): Connect a heavy-gauge ground cable (same gauge as power wire) from the GND terminal on the amplificatore su una superficie metallica pulita e non verniciata del telaio del veicolo. Assicurarsi che il collegamento sia solido e a bassa resistenza.
- Remote Turn-On Wire (REMOTE): Connect a remote turn-on wire (typically 18 AWG) from your head unit's remote output to the REMOTE terminal on the amplificatore. Questo filo segnala il amplifier per accendere e spegnere con l'unità principale.
- RCA Input Cables: Collegare i cavi RCA dal pre-amplificatore dell'unità principaleamp outputs (Front and Rear) to the corresponding RCA input jacks on the amppiù vivace.
- Cavi dell'altoparlante: Collega i tuoi altoparlanti a amplifier's speaker output terminals. Ensure correct polarity (+ to + and - to -). The GLT-85.4D supports 2-ohm stereo and 4-ohm bridged configurations. Refer to the "Power and Speaker Terminal Layout" image for terminal identification.
Nota: For bridged operation, connect the speaker to the designated bridged terminals (e.g., L+ and R- for a single channel in bridged mode). Consult a wiring diagram for specific bridged configurations.
Istruzioni per l'uso
Accensione iniziale
- After all connections are made and verified, reconnect the vehicle's negative battery terminal.
- Accendi l'unità principale. ampLa spia di alimentazione del lifier dovrebbe illuminarsi.
- Inizia con il amplifier's gain (SENS) controls set to minimum.
- Play a familiar piece of music at a moderate volume level on your head unit.
Regolazione dei controlli
- Gain (SENS): Slowly increase the gain control for each channel until you hear distortion, then back off slightly. The gain control matches the ampsensibilità di ingresso del lifier al volume di uscita dell'unità principaletage. It is not a volume control.
- Crossover (LPF/FULL/HPF):
- LPF (filtro passa basso): Allows only frequencies below the set point to pass. Typically used for subwoofers.
- HPF (filtro passa alto): Allows only frequencies above the set point to pass. Typically used for full-range speakers to prevent low-frequency distortion.
- PIENO: Allows all frequencies to pass.
- Configuration (CONFIG 4CH/2CH): This switch determines how the input signals are routed to the ampcanali lifier.
- 4 canali: Uses all four RCA inputs (Front L/R, Rear L/R) to drive the four output channels independently.
- 2 canali: Uses only the Front L/R RCA inputs and internally routes them to all four output channels. Useful if your head unit only has two pre-amp outputs but you want to power four speakers.
Raccomandazione: Fine-tune settings gradually and listen carefully to avoid speaker damage or poor sound quality.
Manutenzione
- Mantieni il ampPulire il filtro con un panno morbido e asciutto. Non utilizzare prodotti chimici aggressivi o detergenti abrasivi.
- Assicurarsi che il ampLe alette di raffreddamento del lifier sono prive di polvere e detriti per garantire una corretta dissipazione del calore.
- Controllare periodicamente tutti i collegamenti elettrici per verificarne la tenuta e la corrosione.
Risoluzione dei problemi
| Problema | Possibile causa | Soluzione |
|---|---|---|
| Nessun potere / Amplifier non si accende |
|
|
| Nessun suono |
|
|
| Suono distorto |
|
|
| Amplifier si surriscalda |
|
|
Specifiche
| Caratteristica | Dettaglio |
|---|---|
| Modello | GLT-85.4D |
| Canali | 4 |
| Ampclasse lifier | Class-D |
| Max Power @ 12.6V | 1700W |
| RMS Power Output (4 Ohm Stereo @ 12.6V) | 85W x 4 |
| RMS Power Output (2 Ohm Stereo @ 12.6V) | 120W x 4 |
| RMS Power Output (4 Ohm Bridged @ 12.6V) | 240W x 2 |
| Volume minimo di fornituratage | 8.5V |
| Volume massimo di fornituratage | 16.8V |
| Idle Current Consumption @ 12.6VDC | 0.66A |
| Musical Max Current Consumption @ 12.6VDC | 31A |
| Dimensioni (L x P x A) | 11.02 x 7.99 x 2.76 pollici |
| Peso dell'articolo | 3.5 libbre |
Garanzia e supporto
For warranty information, technical support, or service inquiries, please refer to the official Genius Audio webo contattare il servizio clienti. Conservare la ricevuta d'acquisto come prova d'acquisto per eventuali reclami in garanzia.
Ufficiale Websito: Genius Audio Store on Amazon