
1. Introduzione
The EPEVER VS6048AU is a 60A common positive Pulse Width Modulation (PWM) solar charge controller designed for 12V, 24V, 36V, and 48V solar panel power systems. It incorporates advanced digital techniques to ensure efficient and reliable battery charging and load management. This controller is suitable for various applications, including solar home systems, traffic signals, solar street lights, and solar garden lamps.
Caratteristiche principali:
- 3-Stage ricarica PWM intelligente: Bulk, Boost/Equalize, Float.
- Supports three battery charging options: Sealed, Gel, and Flooded.
- Integrated LCD display for dynamic monitoring of operating data and working conditions.
- Dual USB output ports (Max. 5VDC/2.4A) for charging electronic devices.
- Impostazioni dei pulsanti intuitive per un utilizzo comodo e pratico.
- Multiple load control modes for versatile application.
- Funzione statistica energetica.
- Funzione di compensazione della temperatura della batteria.
- Extensive electronic protections for system safety.

Image 1.1: The EPEVER VS6048AU Solar Charge Controller shown in various application settings, including home power supply, street lighting, monitoring, and green energy solutions.
2. Informazioni sulla sicurezza
Leggere attentamente tutte le istruzioni e le avvertenze prima dell'installazione e dell'uso. Il mancato rispetto di queste istruzioni può causare scosse elettriche, incendi o lesioni gravi.
- Assicurarsi che tutti i cavi siano correttamente polarizzati e saldamente collegati per evitare danni al controller e ad altri componenti.
- Scollegare sempre il pannello solare e la batteria prima di installare o regolare il controller.
- Install the controller in a well-ventilated area, away from flammable gases, moisture, and direct sunlight.
- Utilizzare interruttori automatici o fusibili appropriati per i circuiti del pannello solare, della batteria e del carico.
- Non smontare o tentare di riparare il controller da soli. Contattare personale qualificato per l'assistenza.
- Wear appropriate personal protective equipment, including eye protection, when working with batteries.
- Tenere i bambini lontani dai componenti dell'impianto solare.
Protezioni elettroniche: The VS6048AU controller includes comprehensive electronic protections:
- Protezione da inversione di polarità fotovoltaica
- Batteria sovraccaricatage protezione
- Protezione da scarica eccessiva della batteria
- Protezione da inversione di polarità della batteria
- Protezione dal surriscaldamento della batteria
- Protezione da sovraccarico del carico
- Protezione da cortocircuito del carico
- Protezione dal surriscaldamento del controller

Image 2.1: Visual representation of the electronic protections integrated into the controller and a basic solar power system connection diagram.
3. Prodotto finitoview
Familiarize yourself with the components and interface of your EPEVER VS6048AU solar charge controller.

Immagine 3.1: anteriore view of the EPEVER VS6048AU controller with key components labeled.
- Schermo LCD: Shows system status, parameters, and error codes.
- Pulsante MENU: Used to navigate through different display interfaces and enter/exit setting modes.
- Pulsante IMPOSTA: Used to confirm selections, modify parameters, and clear data.
- USB Output Ports (5VDC/2.4A): Per caricare dispositivi elettronici esterni.
- Temp. Sensor Port (RTS Port): Connects to the optional remote temperature sensor for accurate battery temperature compensation.
- Terminali fotovoltaici: Connect to the solar panel array.
- Terminali della batteria: Connect to the battery bank.
- Terminali di carico: Collegare ai carichi CC.
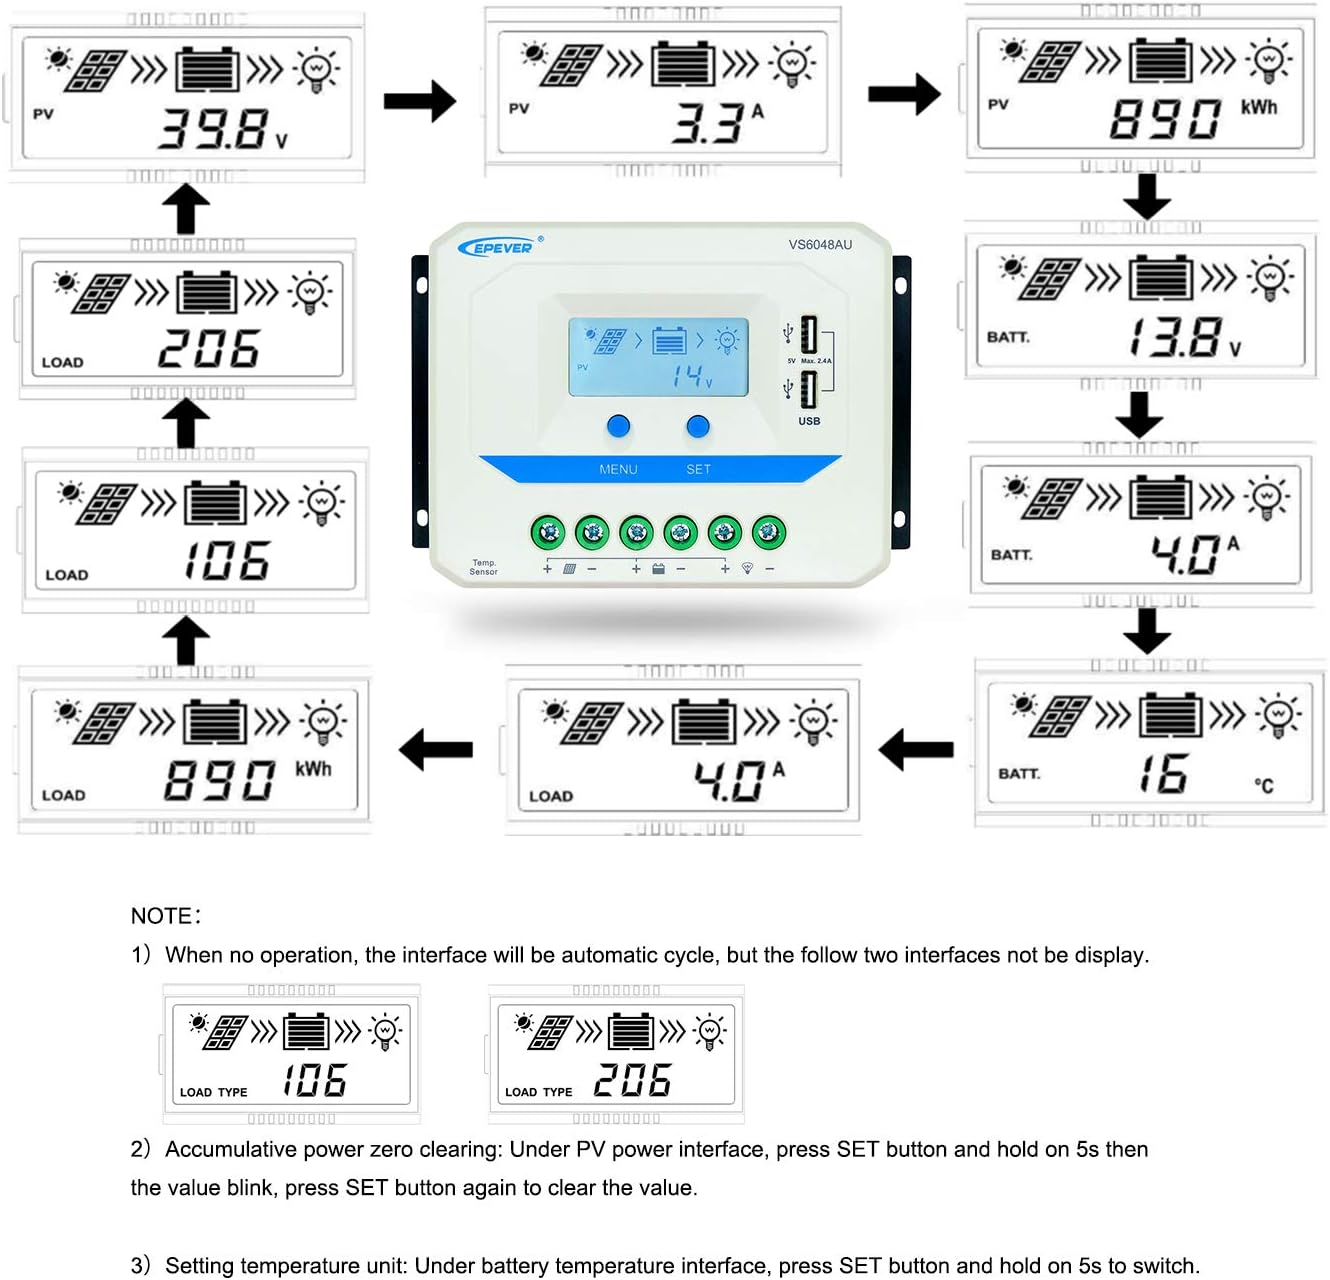
Image 3.2: Dimensions of the EPEVER VS6048AU Solar Charge Controller (approximately 21.4 cm x 12.87 cm x 7.22 cm).
LCD Display Status Description
The LCD display provides visual feedback on the system's operational status. Refer to the table below for icon meanings:

Image 3.3: Detailed description of the icons displayed on the VS6048AU LCD screen.
4. Configurazione e installazione
Follow these steps for proper installation of your solar charge controller. Ensure all power sources are disconnected before making any connections.
Sequenza di cablaggio:
- Collegare la batteria: Connect the battery to the controller's battery terminals. Ensure correct polarity (positive to positive, negative to negative). The controller will detect the battery voltage.
- Collegare il carico: Collegare il carico CC ai terminali di carico del controller. Assicurarsi che la polarità sia corretta.
- Collegare il pannello solare: Collegare il pannello solare ai terminali FV del controller. Assicurarsi che la polarità sia corretta.
Importante: Collegare sempre prima la batteria, poi il pannello solare e infine il carico. Scollegare in ordine inverso: carico, poi pannello solare, poi batteria.
Guida video all'installazione:
Video 4.1: An official EPEVER video demonstrating the connection process for the solar charge controller, including battery and load connections. This visual guide can assist with proper installation.
5. Istruzioni per l'uso
The EPEVER VS6048AU controller features an intuitive LCD display and button interface for monitoring and configuration.
Navigazione con display LCD:
When no operation is performed, the LCD interface will automatically cycle through various display screens, showing real-time data such as PV voltage, corrente, volume della batteriatage, e lo stato del carico.
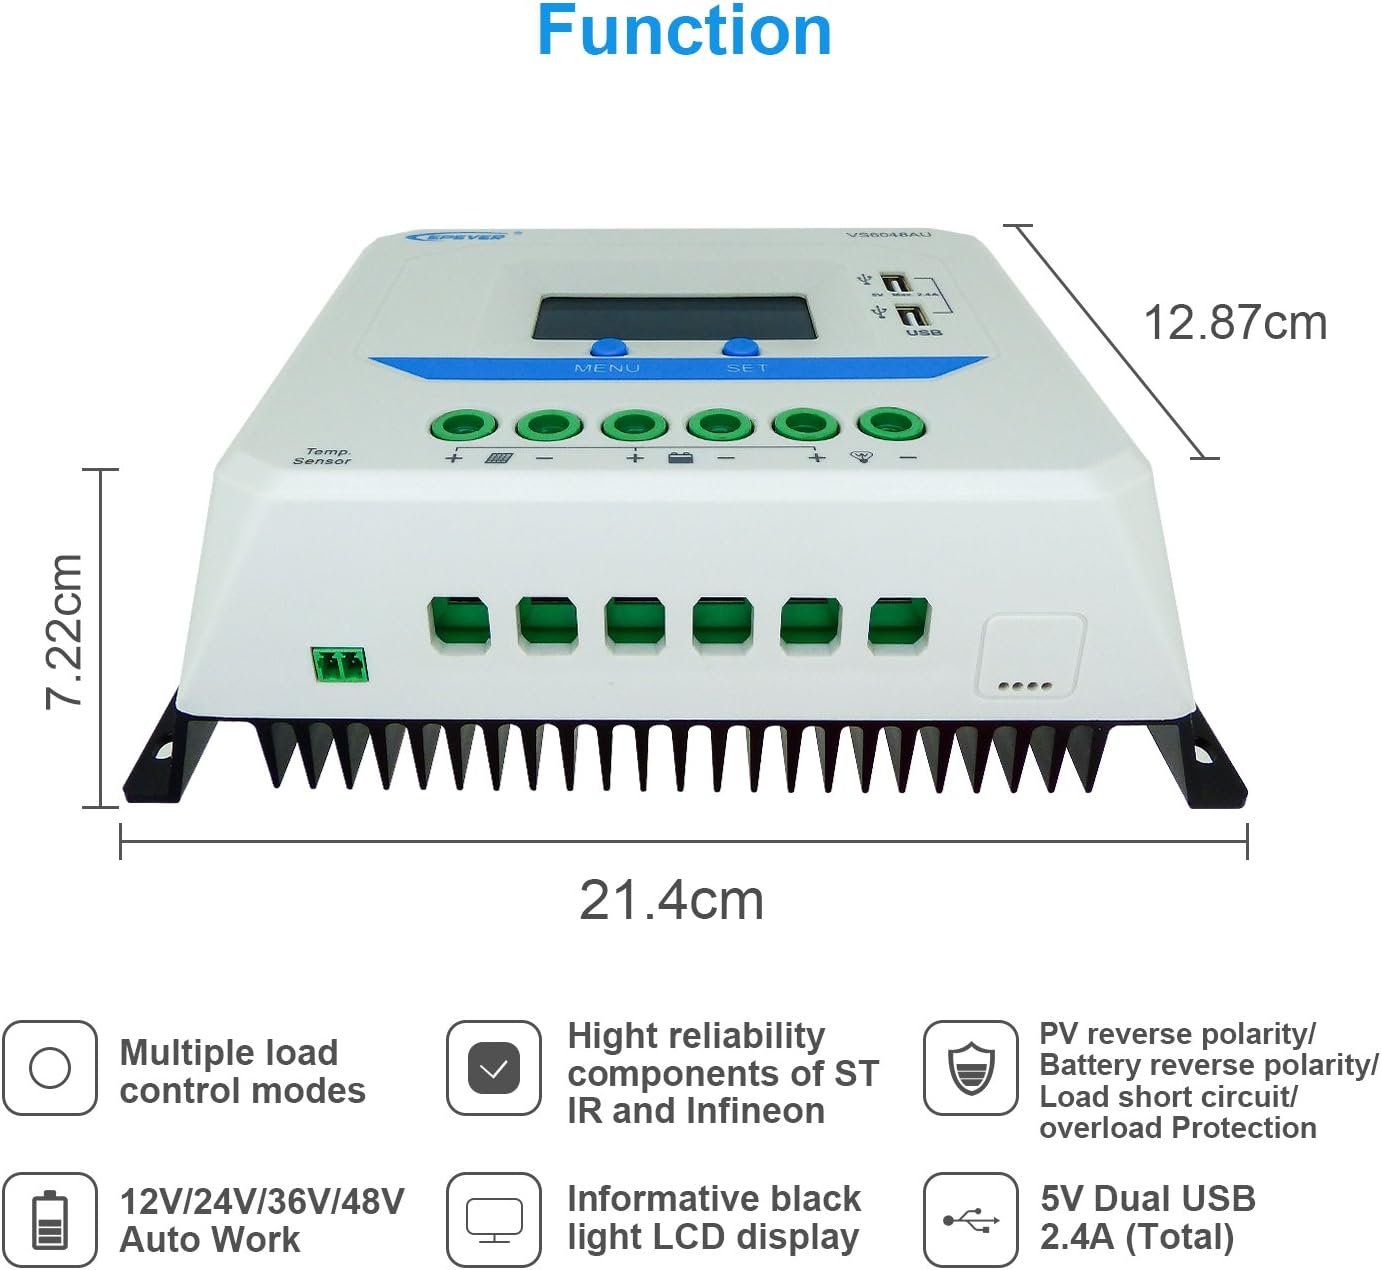
Image 5.1: Illustration of the automatic cycling interfaces on the VS6048AU LCD display.
- Premere il tasto MENU button to manually cycle through the display interfaces.
- Premere e tenere premuto il tasto MENU button to enter or exit the parameter setting mode.
- In parameter setting mode, use the IMPOSTATO button to adjust values or confirm selections.
Operazioni speciali:
- Accumulative Power Clearing: Under the PV power interface, press and hold the IMPOSTATO button for 5 seconds until the value blinks, then press IMPOSTATO again to clear the accumulative power value.
- Impostazione dell'unità di temperatura: Under the battery temperature interface, press and hold the IMPOSTATO per 5 secondi per passare da Celsius (°C) a Fahrenheit (°F).
Modalità di ricarica:
Il controller utilizza un 3-stage intelligent PWM charging algorithm:
- Ricarica in blocco: La batteria viene caricata alla massima corrente fino al suo voltage raggiunge il Boost voltage.
- Boost/Equalize Charging: La batteria viene caricata a una tensione costantetage. An Equalize charge is typically performed once a month to balance battery cells.
- Carica galleggiante: Il volume della batteriatage is maintained at the Float voltage, and the charging current is reduced to a trickle to keep the battery fully charged.
The controller supports charging for Sealed, Gel, and Flooded battery types. Ensure the correct battery type is selected in the settings for optimal charging performance.
Uscita USB:
The dual USB ports provide a maximum output of 5VDC/2.4A for charging compatible electronic devices.
6. Manutenzione
Regular maintenance ensures the longevity and optimal performance of your EPEVER VS6048AU solar charge controller.
- Pulizia: Mantenere il controller pulito e privo di polvere e detriti. Utilizzare un panno asciutto per la pulizia.
- Connessioni: Controllare periodicamente tutti i collegamenti elettrici per verificarne la tenuta e la corrosione. Collegamenti allentati possono causare surriscaldamento e danni.
- Ventilazione: Assicurarsi che l'area di installazione abbia una ventilazione adeguata per evitare il surriscaldamento del controller.
- Ispezione: Inspect the controller and wiring for any signs of damage, such as frayed cables or cracked casing. Replace damaged components immediately.
- Stato della batteria: Monitorare il voltage and performance regularly. Ensure the battery type setting in the controller matches your battery.
7. Risoluzione Dei Problemi
Questa sezione affronta i problemi più comuni che potresti riscontrare con il tuo regolatore di carica solare.
| Problema | Possibile causa | Soluzione |
|---|---|---|
| Nessuna visualizzazione sul display LCD | Batteria non collegata o bassa tensionetage; polarità inversa. | Controllare i collegamenti e la polarità della batteria. Assicurarsi che la batteria sia carica.tage è superiore a 9 V. |
| Batteria non in carica | PV panels not connected; PV reverse polarity; insufficient sunlight; PV open circuit voltage troppo basso. | Controllare i collegamenti e la polarità del fotovoltaico. Assicurarsi che la luce solare sia adeguata. Verificare la tensione del circuito aperto del fotovoltaico.tage rientra nelle specifiche. |
| Il carico non funziona | Load disconnected; load short circuit; load overload; battery low voltage scollegare. | Check load connections. Remove short circuit. Reduce load. Recharge battery. |
| Surriscaldamento del controller | Poor ventilation; excessive ambient temperature; prolonged high current operation. | Ensure proper ventilation. Relocate controller to a cooler environment. Reduce load if possible. |
| L'uscita USB non funziona | Device not compatible; controller fault. | Try another USB device. If issue persists, contact support. |
8. Specifiche
Detailed technical specifications for the EPEVER VS6048AU Solar Charge Controller.

Image 8.1: Comprehensive technical specifications table for the EPEVER VS-AU series, including the VS6048AU model.
| Parametro | Value (VS6048AU) |
|---|---|
| Modello | VS6048AU |
| Sistema nominale Voltage | 12V/24V/36V/48V Auto Work |
| Vol. ingresso batteriatage Gamma | 9V ~ 64V |
| Corrente di carica/scarica nominale | 60A |
| Massimo Circuito aperto fotovoltaico voltage | 96V |
| Tipo di batteria | Sigillato (predefinito) / Gel / Allagato |
| Aumenta il volume di caricatage | Sealed: 14.4V, Gel: 14.2V, Flooded: 14.6V |
| Equalizza il volume di caricatage | Sealed: 14.6V, Gel: No, Flooded: 14.8V |
| Volume di carica del galleggiantetage | Sigillato/Gel/Allagato: 13.8V |
| Basso volumetage Riconnetti Voltage | Sigillato/Gel/Allagato: 12.6V |
| Basso volumetage Disconnetti Voltage | Sigillato/Gel/Allagato: 11.1V |
| Autoconsumo | ≤10 mA (12 V), ≤18 mA (24 V) |
| Compensazione della temperatura | -3mV/°C/2V (77°F) |
| Messa a terra | Positivo comune |
| Uscita USB | 5 V CC/2.4 A (totale) |
| Dimensione complessiva | Dimensioni: 214x128.7x72.2 mm |
| Terminali | 3 AWG (25 mm²) |
| Peso netto | 1.02 kg |
| Allegato | Grado di protezione IP30 |
| Temperatura dell'ambiente di lavoro | Temperatura di esercizio -25°C ~ +55°C |
| Umidità ambiente | ≤95% (NC) |
9. Garanzia e supporto
EPEVER products are designed for reliability and performance. For technical assistance or warranty inquiries, please refer to the following:
- Supporto tecnico: EPEVER provides technical support through its local service centers. For assistance, please contact the authorized dealer or service center in your region.
- Informazioni sulla garanzia: Please refer to the warranty card included with your product or visit the official EPEVER websito per termini e condizioni di garanzia dettagliati.
- Free Solar System Design: EPEVER's service centers may offer free solar system design assistance to help you optimize your setup.