
1. Introduzione
This manual provides essential information for the safe and correct operation of your Shinco SO3A 32-inch HD Ready LED TV. Please read all instructions carefully before using the television and retain this manual for future reference.
The Shinco SO3A offers a 32-inch HD Ready display with a resolution of 1366x768p, a 60Hz refresh rate, and a 178-degree viewing angle. It features an A+ Grade Panel, 16.7 million colors, noise reduction, and multiple picture modes. Connectivity options include 2 HDMI ports, 2 USB ports, and 1 VGA port. Audio is delivered through 20W speakers with surround sound capability. Additional features include USB to USB copy, Dynamic Light Control, Eco Vision, and Eye Safe Feature.
2. Informazioni sulla sicurezza
Osservare sempre le seguenti precauzioni di sicurezza per evitare scosse elettriche, incendi o danni al televisore.
- Fonte di energia: Collegare il televisore solo a una presa di corrente CA con il volume correttotagcome indicato sull'etichetta del televisore.
- Ventilazione: Assicurare un'adeguata ventilazione attorno al televisore. Non ostruire le aperture di ventilazione.
- Acqua e umidità: Non esporre il televisore a pioggia o umidità. Non posizionare oggetti contenenti liquidi, come vasi, sul televisore.
- Pulizia: Scollegare il televisore prima di pulirlo. Utilizzare un panno morbido e asciutto. Non utilizzare detergenti liquidi o spray.
- Posizionamento: Posizionare il televisore su una superficie stabile e piana oppure fissarlo saldamente a una parete. Evitare di esporlo alla luce diretta del sole o vicino a fonti di calore.
- Fulmine: During lightning storms or when unused for long periods, unplug the TV from the wall outlet.
3. Contenuto della confezione
Verificare che tutti gli articoli siano presenti nel pacco:
- 1 x Shinco SO3A LED TV Unit
- 1 x Table Stand Pair
- 1 x telecomando
- 1 x Scheda di garanzia
- 1 x Manuale utente (questo documento)
- 1 x Wall Mount Kit (includes screws and anchors)

4. Impostazione
4.1 Disimballaggio
Carefully remove the TV from its packaging. It is recommended to keep the original packaging for future transport or service needs.
4.2 Stand Installation (Table Mount)
- Posizionare il televisore a faccia in giù su una superficie morbida e pulita per evitare di danneggiare lo schermo.
- Align the table stand legs with the corresponding screw holes on the bottom of the TV.
- Fissare le gambe del supporto utilizzando le viti in dotazione. Assicurarsi che siano ben serrate.

4.3 Installazione a parete
If you choose to wall mount your TV, ensure you use the included wall mount kit and follow the instructions provided with the kit. Professional installation is recommended for wall mounting.

4.4 Collegamento delle periferiche
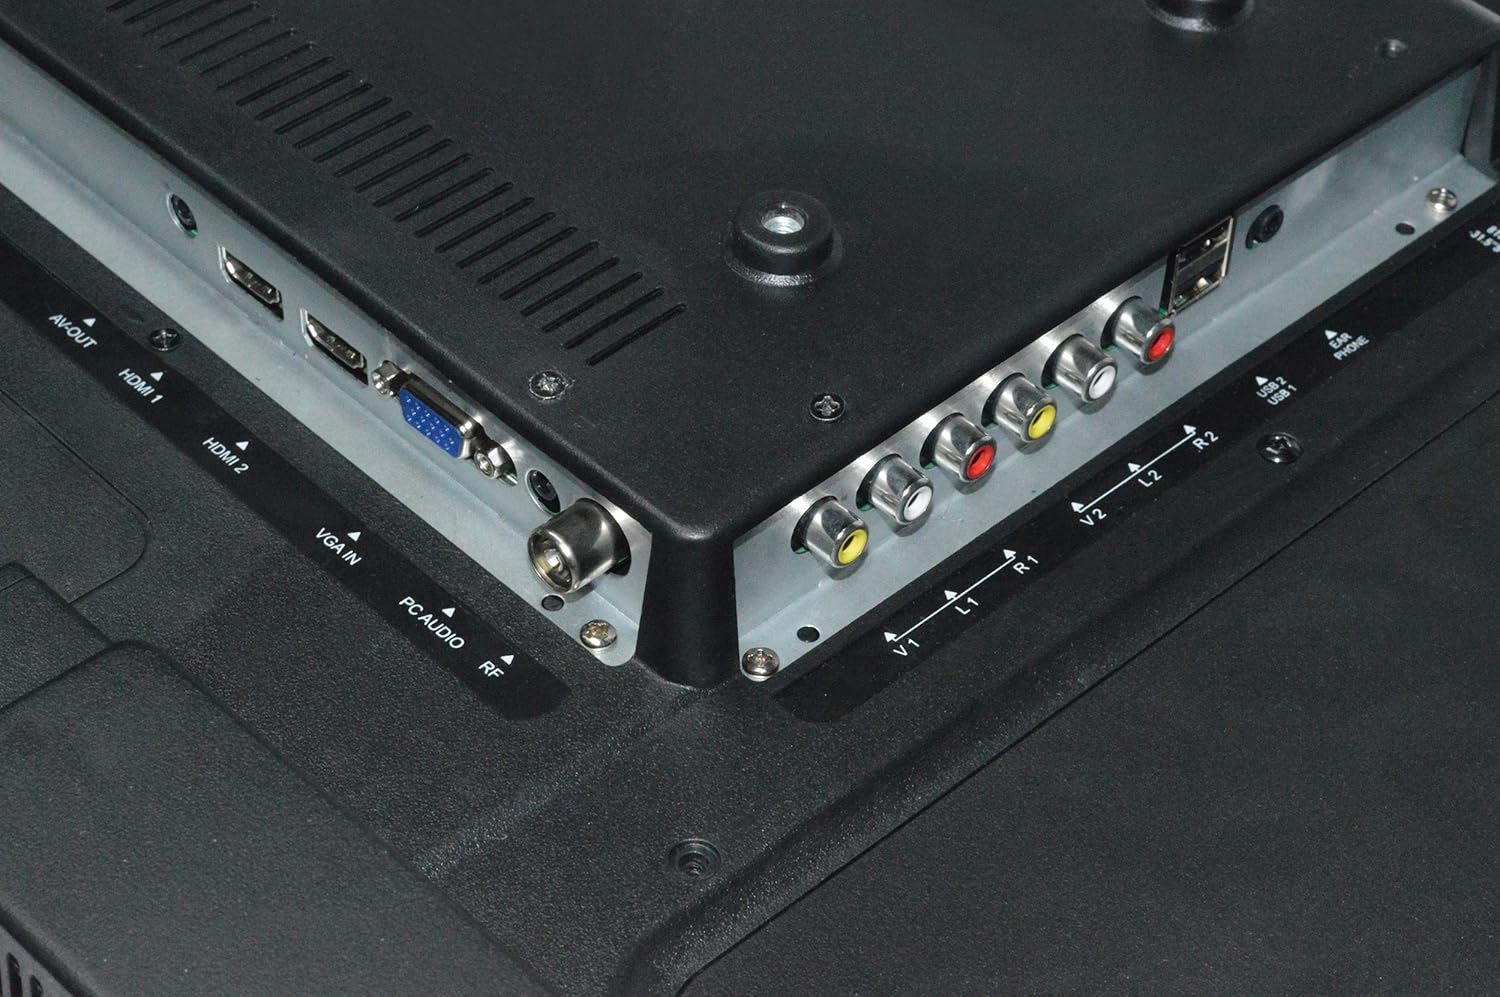
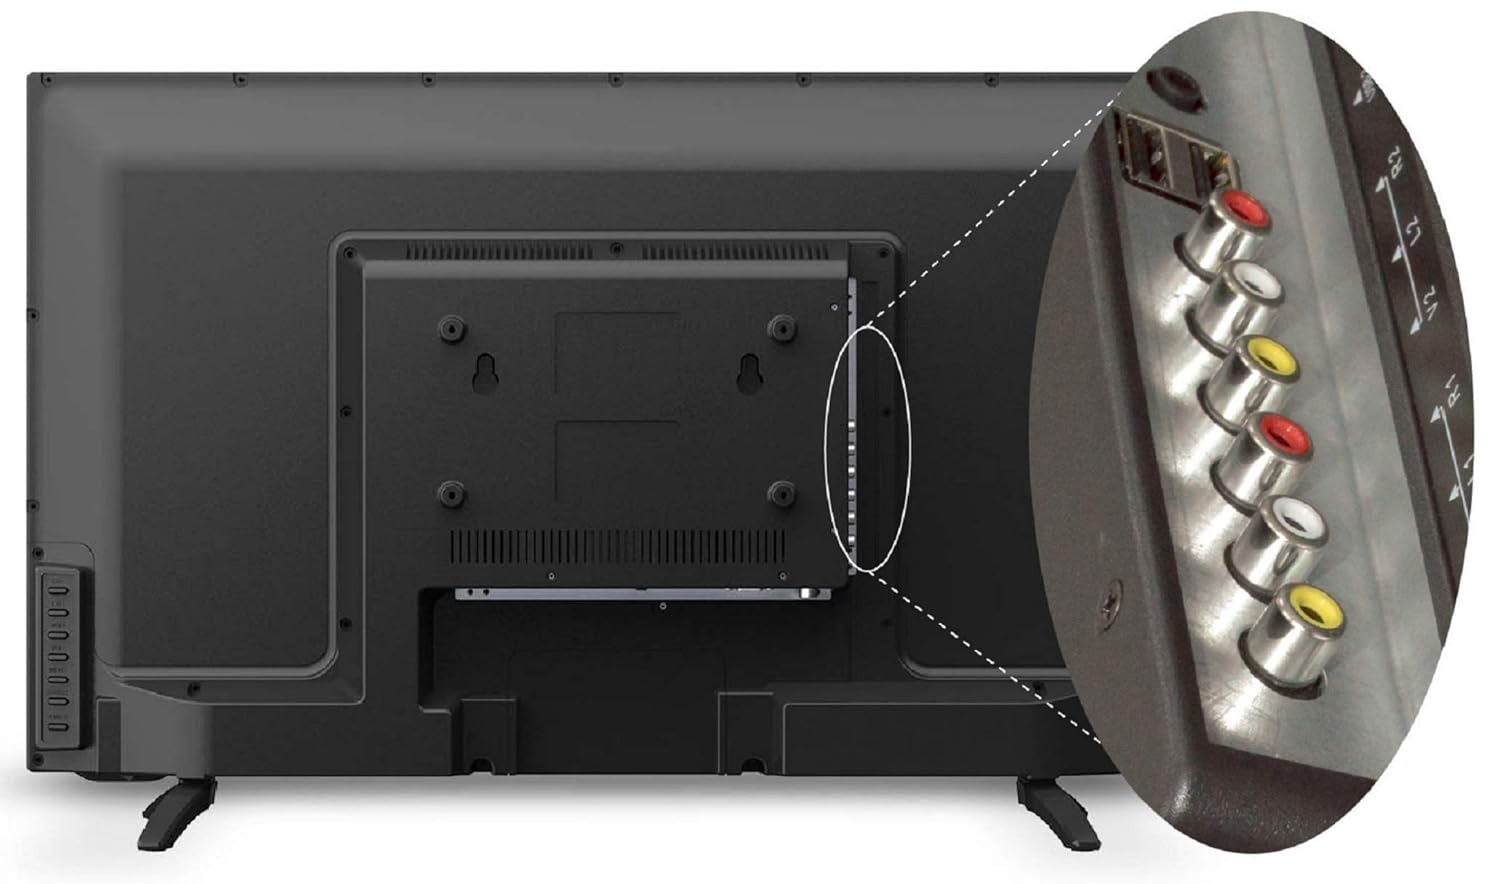
Il televisore è dotato di diverse porte per il collegamento di dispositivi esterni:
- Porte HDMI (x2): Collega decoder, lettori Blu-ray, console di gioco o altri dispositivi abilitati HDMI.
- Porte USB (x2): Connect USB storage devices for media playback or USB to USB copy function.
- Porta VGA (x1): Connect a computer or laptop.
- Ingresso AV: Collegare i dispositivi più vecchi utilizzando cavi video compositi e audio stereo.
- Ingresso RF: Collegare un'antenna o un cavo per la trasmissione televisiva.
4.5 Collegamento di alimentazione
After connecting all necessary cables, plug the power cord into a wall outlet. The TV will enter standby mode.
5. Istruzioni per l'uso
5.1 Funzioni del telecomando
The remote control allows you to operate all TV functions. Insert two AAA batteries (not included) into the remote control, ensuring correct polarity.

- ENERGIA: Accende o spegne la TV (modalità standby).
- FONTE: Selects input source (HDMI1, HDMI2, AV, VGA, USB, TV).
- VOL +/-: Regola il livello del volume.
- CH +/-: Cambia canale.
- MENU: Accede al menu principale.
- OK: Conferma le selezioni nei menu.
- Pulsanti di navigazione (su/giù/sinistra/destra): Naviga attraverso i menu e le opzioni.
- MUTO: Disattiva o ripristina l'audio.
- ECO: Activates Eco Vision mode for power saving.
- ASPETTO: Modifica le proporzioni dello schermo.
5.2 Prima configurazione
Upon first power-on, the TV will guide you through initial setup steps:
- Selezione della lingua: Scegli la tua lingua preferita.
- Selezione del Paese: Seleziona la tua regione.
- Scansione canali: The TV will automatically scan for available channels if an antenna or cable is connected.
5.3 Funzioni TV di base
- Accensione/spegnimento: Premere il pulsante POWER sul telecomando o sul pannello di controllo del televisore.
- Selezione della sorgente di ingresso: Press the SOURCE button to cycle through available inputs (HDMI, AV, USB, TV, VGA).
- Regolazione del volume: Use VOL +/- buttons.
- Cambio canale: Use CH +/- buttons for sequential change or number buttons for direct input.
5.4 Impostazioni immagine
Access the Picture menu to adjust display settings:
- Modalità Immagine: Select from Standard, Dynamic, Mild, or User to suit your viewing preferenza.
- Luminosità: Regola la luminosità complessiva dello schermo.
- Contrasto: Regola la differenza tra aree chiare e scure.
- Colore: Regola la saturazione del colore.
- Nitidezza: Regola la nitidezza dei bordi dell'immagine.
- Dynamic Light Control: Automatically adjusts backlight based on content.
- Riduzione del rumore: Reduces visual noise in the picture.
- Eye Safe Feature: Riduce l'emissione di luce blu per un comfort viewing.
5.5 Impostazioni audio
Access the Sound menu to adjust audio settings:
- Modalità audio: Select from Standard, Music, Movie, or User.
- Equalizzatore: Customize audio frequencies in User mode.
- Suono surround: Enable or disable virtual surround sound.
- Bilancia: Regola il bilanciamento degli altoparlanti sinistro/destro.
5.6 Riproduzione multimediale USB
Insert a USB storage device into one of the USB ports. The TV will detect the device and prompt you to open the media browser. You can play supported audio (MP3), image (JPEG), and video files.
- USB to USB Copy: This feature allows direct copying of files between two USB devices connected to the TV.
6. Manutenzione
6.1 Pulizia del televisore
- Scollegare sempre la TV prima di pulirla.
- Per pulire lo schermo e il telaio, utilizzare un panno morbido, asciutto e privo di lanugine.
- Per segni ostinati, leggermente dampPulire il panno con acqua o con un detergente per schermi delicato e non abrasivo. Non spruzzare il liquido direttamente sul televisore.
- Avoid using chemical cleaners, as they may damage the TV's finish.
6.2 Cura del telecomando
- Tenere il telecomando asciutto.
- Evitare di farlo cadere o di sottoporlo a forti urti.
- Sostituire le batterie quando la portata del telecomando diminuisce o smette di rispondere.
7. Risoluzione Dei Problemi
Se riscontri problemi con il tuo televisore, fai riferimento ai seguenti problemi comuni e alle relative soluzioni:
| Problema | Possibile soluzione |
|---|---|
| Nessun potere | Controllare che il cavo di alimentazione sia collegato saldamente al televisore e alla presa a muro. Assicurarsi che la presa a muro sia alimentata. |
| Nessuna immagine, ma l'audio è presente | Check the input source. Ensure the external device (set-top box, DVD player) is turned on and connected correctly. |
| Nessun suono, ma l'immagine è presente | Check the volume level and ensure the TV is not muted. Check audio settings in the menu. |
| Il telecomando non funziona | Controllare e sostituire le batterie. Assicurarsi che non vi siano ostacoli tra il telecomando e il sensore IR del televisore. |
| Qualità dell'immagine scadente | Adjust picture settings (brightness, contrast, sharpness). Check antenna connection for broadcast TV. Ensure the source device is outputting a high-quality signal. |
8. Specifiche
Key technical specifications for the Shinco SO3A 32-inch HD Ready LED TV:
| Caratteristica | Specificazione |
|---|---|
| Marca | Shinco |
| Modello | SO3A |
| Dimensioni dello schermo | 32 pollici (80 cm) |
| Tecnologia di visualizzazione | GUIDATO |
| Risoluzione | HD Ready (1366x768 pixel) |
| Frequenza di aggiornamento | Frequenza 60 Hz |
| Viewangolo di ing | 178 gradi |
| Tipo di visualizzazione | Pannello di grado A+ |
| Porte HDMI | 2 |
| Porte USB | 2 |
| Port VGA | 1 |
| Uscita audio | 20 Watt |
| Dimensioni del prodotto (LxWxH) | Dimensioni: 73.6 x 19 x 47.4 cm |
| Peso dell'articolo | 6.35 kg |
| Fonte di alimentazione | AC |
| Anno del modello | 2019 |


9. Informazioni sulla garanzia
Your Shinco SO3A LED TV comes with a Garanzia standard del produttore di 1 anni dalla data di acquisto. La presente garanzia copre i difetti di fabbricazione in condizioni di normale utilizzo.
For any product defects, damage, or features not matching the description provided, this product is eligible for replacement within 10 giorni di consegna. Please contact customer support for assistance.
10. Supporto
For technical assistance, service, or warranty claims, please contact the manufacturer:
Produttore: Videotex International Pvt Ltd
Indirizzo: 347-C, Ecotech-3, Udyog Kendra -2, Greater, Noida - 201306, Uttar Pradesh, India
Numero di contatto: 8882569569