
1. Introduzione
This manual provides detailed instructions for the setup, operation, and maintenance of your OWLENZ SD60 Wi-Fi Mini Projector. Please read this manual thoroughly before using the product to ensure proper functionality and safety. The SD60 features advanced LED light technology with 1500 lumens brightness, Wi-Fi screen sharing capabilities (Miracast/Airplay), and multiple media playback options for a versatile home theater experience. Its portable and compact design allows for easy installation and use.
2. Informazioni importanti sulla sicurezza
- Non guardare direttamente nell'obiettivo del proiettore quando lamp è acceso.
- Garantire un'adeguata ventilazione attorno al proiettore per evitare il surriscaldamento.
- Tenere il proiettore lontano dall'acqua o da altri liquidi.
- Utilizzare solo l'adattatore di alimentazione fornito con il proiettore.
- Evitare di posizionare il proiettore su superfici instabili.
- The LED light technology is designed to be gentle on the eyes and has no radiation.
3. Contenuto della confezione
Verifica che tutti gli articoli elencati di seguito siano inclusi nel pacco. Se alcuni articoli risultano mancanti o danneggiati, contatta l'assistenza clienti.
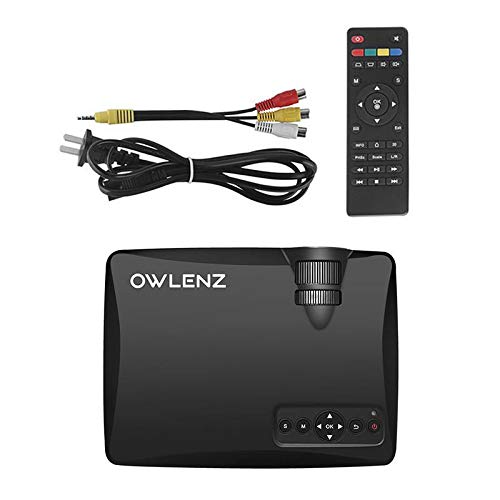
Image: OWLENZ SD60 Projector, remote control, power cable, and AV cables.
- OWLENZ SD60 Mini Projector
- Telecomando
- Cavo di alimentazione
- cavo AV
- Manuale dell'utente (questo documento)
4. Prodotto finitoview
Familiarize yourself with the various parts and controls of your OWLENZ SD60 projector.
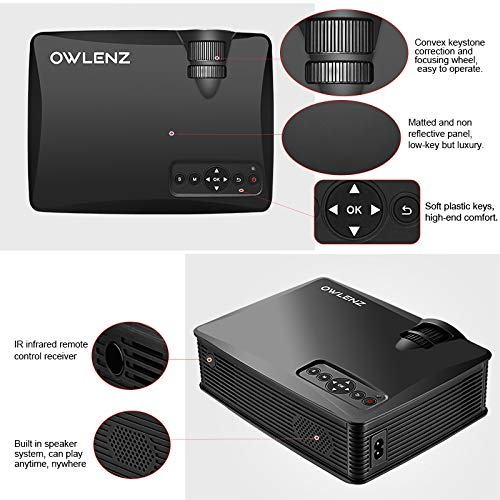
Image: Key features of the OWLENZ SD60 projector, including the focusing wheel, keystone correction, control panel, IR receiver, and built-in speaker.
- Convex Keystone Correction and Focusing Wheel: Located on the top, these allow for easy image adjustment.
- Matted and Non-Reflective Panel: Provides a sleek, low-key appearance.
- Soft Plastic Keys: For comfortable and responsive control.
- IR Infrared Remote Control Receiver: For remote operation.
- Built-in Speaker System: A 3W speaker for integrated audio playback.
- Porte di ingresso: HDMI, USB, AV, SD Card slot (located on the side/rear).
5. Impostazione
5.1 Collegamento di alimentazione
- Collegare il cavo di alimentazione alla porta di ingresso dell'alimentazione del proiettore.
- Collegare l'altra estremità del cavo di alimentazione a una presa elettrica adatta.
- Premere il pulsante di accensione sul proiettore o sul telecomando per accenderlo.
5.2 Collegamento delle sorgenti di ingresso
The projector supports various input options:
- HDMI: Connect an HDMI cable from your device (laptop, gaming console, etc.) to the projector's HDMI port.
- USB: Inserire un'unità USB nella porta USB per la riproduzione diretta dei contenuti multimediali.
- AV: Utilizzare il cavo AV in dotazione per collegare i dispositivi dotati di uscita AV.
- Scheda SD: Insert an SD card into the SD card slot for media playback.
After connecting, select the appropriate input source from the projector's menu using the remote or control panel.
5.3 Wi-Fi Screen Sharing (Miracast / Airplay)
The SD60 supports wireless screen sharing from compatible smartphones and tablets.
- Assicurati che il tuo dispositivo mobile e il proiettore siano connessi alla stessa rete Wi-Fi.
- On the projector, navigate to the "Screen Share" or "Miracast/Airplay" option in the main menu.
- On your mobile device, activate the screen mirroring function (e.g., "Smart View" su Android, "Screen Mirroring" su iOS).
- Selezionare il nome del proiettore dall'elenco dei dispositivi disponibili per stabilire la connessione.
5.4 Regolazione della messa a fuoco e della distorsione trapezoidale
- Messa a fuoco: Rotate the focusing wheel near the lens until the projected image is clear and sharp.
- Correzione trapezoidale: Use the keystone correction wheel to adjust the image shape if it appears trapezoidal (wider at the top or bottom).
6. Funzionamento
6.1 Controlli di base
Utilizzare il pannello di controllo del proiettore o il telecomando per navigare nei menu e regolare le impostazioni.
- Pulsante di accensione: Accende/spegne il proiettore.
- Pulsanti di navigazione (frecce/OK): Per la navigazione e la selezione del menu.
- Pulsante sorgente: Switches between input sources (HDMI, USB, AV, SD Card, Wi-Fi).
- Pulsante Menu: Accede al menu delle impostazioni del proiettore.
6.2 Riproduzione multimediale
Once an input source is selected, the projector will display content. For USB/SD card playback, navigate through the file browser to select your desired media.
6.3 Uscita audio
- Altoparlante incorporato: The projector has a built-in 3W speaker suitable for small viewaree di ingaggio.
- Altoparlante esterno: For a better listening experience, connect external speakers or headphones to the 3.5mm audio port.
6.4 Dimensioni di proiezione
The projector supports projection sizes ranging from 40 to 150 inches, offering a large screen experience.
7. Manutenzione
7.1 Pulizia
- Per pulire la parte esterna del proiettore, utilizzare un panno morbido e asciutto.
- Per la pulizia delle lenti, utilizzare un panno e una soluzione specifica per la pulizia delle lenti. Non utilizzare materiali abrasivi.
- Regularly clean the ventilation openings to ensure proper airflow and prevent dust buildup.
7.2 LED Bulb Lifespan
The OWLENZ SD60 features an LED bulb with a lifespan of up to 30,000+ hours, significantly longer than traditional projector lamps. No regular bulb replacement is typically required under normal usage conditions.
8. Casi d'uso
The OWLENZ SD60 Mini Projector is versatile and suitable for various applications:
- Teatro domestico: Goditi film, programmi TV e sport su un grande schermo.
- Gioco: Connect gaming consoles for an immersive gaming experience.
- Finalità didattiche: Project educational content, videos, and presentations.
- Children's Entertainment: Ideal for playing videos and cartoons for children.
- Piccolo Viewing Areas: Its compact design and built-in speaker make it perfect for use in smaller rooms or spaces.
9. Risoluzione Dei Problemi
| Problema | Possibile causa | Soluzione |
|---|---|---|
| Nessuna immagine visualizzata | Incorrect input source selected; loose cable connection; source device not powered on. | Select the correct input source. Check all cable connections. Ensure the source device is powered on. |
| L'immagine è sfocata | Messa a fuoco non regolata correttamente. | Regolare la rotella di messa a fuoco finché l'immagine non risulta nitida. |
| L'immagine è trapezoidale | Keystone not adjusted correctly. | Adjust the keystone correction wheel. |
| Nessun suono | Volume troppo basso; altoparlanti esterni non collegati correttamente; formato audio non supportato. | Increase volume. Check external speaker connection or use built-in speaker. Ensure audio format is compatible. |
| Wi-Fi screen sharing not working | Devices not on the same Wi-Fi network; screen mirroring function not activated on mobile device. | Ensure both devices are on the same Wi-Fi. Activate screen mirroring on your mobile device and select the projector. |
10. Specifiche
| Caratteristica | Dettaglio |
|---|---|
| Marca | GUFO |
| Modello | SD60 |
| Dimensioni del prodotto (LxWxH) | Dimensioni: 20.8 x 16.5 x 8 cm |
| Peso dell'articolo | 949 grammi |
| Interfaccia Hardware | HDMI, USB |
| Tecnologia di connettività | HDMI, USB, Wi-Fi |
| Dispositivi compatibili | Smartphone, tablet, laptop |
| Caratteristiche speciali | Altoparlante incorporato, portatile |
| Tecnologia di visualizzazione | LCD |
| Luminosità | 1500 lumen |
| LED Bulb Lifespan | Fino a 30,000 + ore |
| Dimensioni della proiezione | Da 40 a 150 pollici |
| Potenza altoparlante integrata | 3W |
| Fattore di forma | Portatile |
| Tipo di montaggio | Supporto da tavolo |
| Cosatage | 24 Watt |
| Batterie richieste | Yes (for remote control, not included) |
11. Video del prodotto finitoview
Guarda questo breve video per una rapida panoramicaview of the OWLENZ SD60 Mini Projector's features and capabilities.
Video: Un breve riassuntoview highlighting the OWLENZ SD60 projector's display, sound, smart features, other features, portability, and use cases.
12. Garanzia e supporto
The OWLENZ SD60 Mini Projector comes with a standard brand warranty. For detailed warranty information, technical support, or service inquiries, please refer to the product detail page on Amazon.in or contact OWLENZ customer service directly.
For further information, visit the product detail page: Pagina del prodotto Amazon