
PowMr SL03-30A
PowMr SL03-30A Solar Charge Controller User Manual
Model: SL03-30A
1. Introduzione
The PowMr SL03-30A Solar Charge Controller is designed to manage the power flow from your solar panels to your battery bank, ensuring efficient charging and protecting your batteries from overcharge and over-discharge. This controller is suitable for 12V/24V systems and supports various battery types including Lithium and Lead-Acid batteries. It features an LCD display for monitoring system parameters and offers multiple protection functions to enhance system safety and longevity.
2. Caratteristiche principali

Immagine: Oltreview of the PowMr SL03-30A Solar Charge Controller's main features, including 12V/24V auto-detection, energy recording, temperature compensation, aluminum heat sink, eight electronic protections, compatibility with Lithium/Lead-acid batteries, and light & timer control.
- 12V/24V Auto-detection: Automatically identifies system voltage.
- Energy Recording/Current Display: Provides real-time monitoring of energy and current.
- Compensazione della temperatura: Regola i parametri di carica in base alla temperatura ambiente.
- Dissipatore di calore in alluminio: Garantisce un'efficiente dissipazione del calore per un funzionamento stabile.
- Eight Electronic Protections: Comprehensive safety features including overcharge, over-discharge, short-circuit, and reverse current protection.
- Compatibilità della batteria: Supports Lithium and Lead-Acid battery types (Flooded, GEL, AGM, LiFePO4).
- Light & Timer Control: Programmable load control functions.
- Schermo LCD: Clear interface for parameter viewing e regolazione.

Immagine: Interna view of the controller highlighting key components such as the copper coil for stable charge/discharge, a fuse for double protection, and MOSFETs made from good raw materials for current sensing.
3. Istruzioni di sicurezza
Please read all instructions carefully before installation and operation. Failure to follow these instructions may result in damage to the controller, battery, or solar panels, and may void the warranty.
- Ensure the battery is connected first to allow the controller to recognize the system voltage.
- Always connect the solar panels and load after the battery.
- Disconnect the solar panels and load before disconnecting the battery.
- Install the controller in a well-ventilated, dry, and cool environment, away from flammable materials.
- Avoid touching or short-circuiting wires or terminals.
- Utilizzare cavi di sezione adeguata per tutti i collegamenti per evitare il surriscaldamento.
- This device is for indoor use only. Avoid exposure to water or excessive humidity.
- Tenere fuori dalla portata dei bambini.
4. Installazione
4.1 Sequenza di cablaggio
- Connect the battery to the charge controller. Ensure correct polarity (+ to + and - to -). The controller will display the battery voltage.
- Connect the solar panel to the charge controller. Ensure correct polarity. The controller will begin charging the battery.
- Connect the load to the charge controller. Ensure correct polarity.
Importante: Always connect the battery first and disconnect it last. This sequence prevents damage to the controller from voltage picchi.
4.2 Montaggio
Mount the controller vertically on a wall or flat surface in a well-ventilated area, away from direct sunlight, high temperatures, and water. Ensure there is sufficient air circulation around the heat sink.

Image: The PowMr SL03-30A Solar Charge Controller showing its mounting holes on the sides, indicating how it can be affixed to a surface.
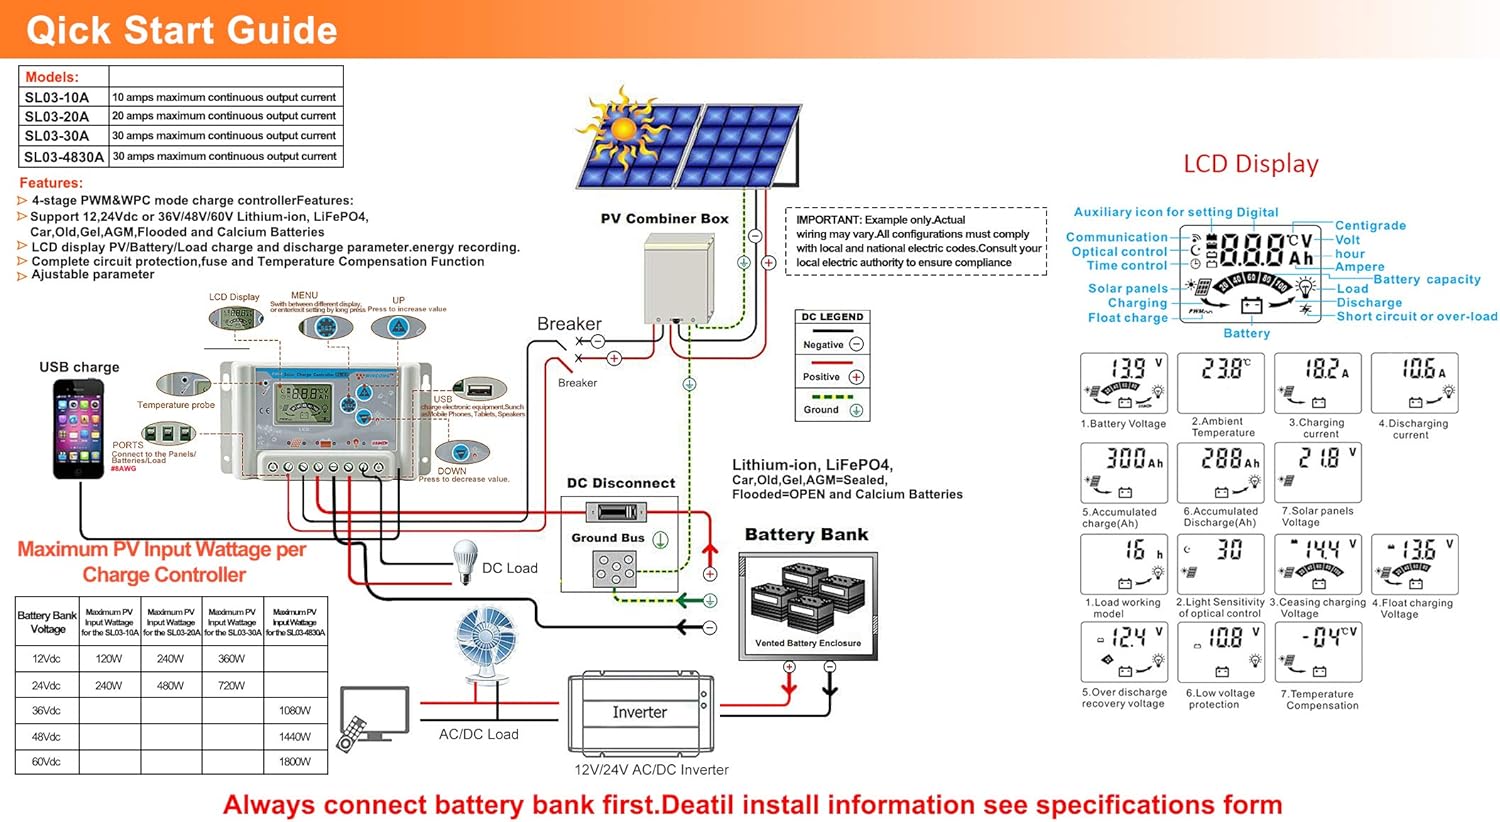
Image: A detailed wiring diagram for the solar charge controller, showing connections for PV combiner box, battery bank, DC load, and inverter. It also illustrates the LCD display and various parameters.
4.3 Video Guide: How to Connect the Controller
Video: This video demonstrates the correct wiring procedure for the PowMr SL03-30A Solar Charge Controller, showing how to connect the battery and solar panels. It also shows how to browse the interface and adjust settings.
5. Funzionamento
Display LCD e pulsanti 5.1
The controller features an LCD display and three buttons for operation: UP, DOWN, and SET.
- Pulsante SU: Navigates through display interfaces, increases parameter values.
- Pulsante GI: Navigates through display interfaces, decreases parameter values.
- Pulsante IMPOSTA: Enters/exits setting mode, confirms parameter changes.
5.2 Browsing Display Interfaces
Press the UP or DOWN button to cycle through various display interfaces, including battery voltage, charging current, accumulated discharge, and load status.
5.3 Impostazioni dei parametri
To enter the setting interface, long-press the SET button for 5 seconds. Use the UP and DOWN buttons to adjust values and the SET button to confirm and move to the next parameter. Long-press SET again to save changes and exit.
I parametri regolabili includono:
- Tipo di batteria: Select the correct battery type (e.g., Lead-Acid, Lithium).
- Modalità di controllo del carico: Set timer for load operation (e.g., 24H for continuous, 16H for dusk-to-dawn).
- Volume di caricatage: Adjust maximum charge voltage.
- Volume di interruzione dello scaricotage: Imposta il volume minimotage before load disconnection.
- Scarica Ricollega Voltage: Imposta il volumetage at which the load reconnects.
Refer to the "Specifications" section for default and adjustable ranges for each parameter.
6. Funzioni di protezione

Image: A circular diagram illustrating the eight electronic protection features of the PowMr SL03-30A Solar Charge Controller, including power off memory, short-circuit, over-charging, open-circuit, over-load, under-voltage discharge, over-heat, and dual MOSFET reverse current protection.
The PowMr SL03-30A controller incorporates multiple protection mechanisms to ensure the safety and longevity of your solar system:
- Protezione da sovraccarico: Previene danni alla batteria dovuti a cariche eccessive.
- Protezione da scarica eccessiva: Disconnette il carico quando la batteria è scaricatage scende al di sotto di un livello di sicurezza.
- Protezione da cortocircuito: Si spegne automaticamente in caso di cortocircuito.
- Open-circuit Protection: Protects the system if the solar panel circuit is open.
- Protezione da inversione di polarità: Previene i danni causati da collegamenti errati della batteria o del pannello solare.
- Protezione da sovraccarico: Disconnects the load if current exceeds the rated limit.
- Protezione contro il surriscaldamento: Reduces power or shuts down if the controller's internal temperature is too high.
- Memoria di spegnimento: Mantiene le impostazioni anche dopo un'interruzione di corrente.
7. Specifiche

Image: A comprehensive table detailing the specifications for PowMr SL03-10A, SL03-20A, SL03-30A, and SL03-40A models, including normal battery voltage, charge/discharge current, battery type, system recognize range, charging regulation, maximum PV open circuit voltage, and various protection parameters.
| Parametro | Value (SL03-30A) |
|---|---|
| Volume batteria normaletage | Auto 12V / 24V |
| Corrente di carica | 30A |
| Corrente di scarica | 30A |
| Tipo di batteria | Lead-Acid Battery (Flooded, AGM, Gel, Calcium), LiFePO4 (Lithium) |
| System Recognize Range | Lead-Acid Battery: 8V-15V(12V System), 18V-30V(24V System) LiFePO4: 8V-15V(12V), 18V-30V(24V) |
| Charging Regulation | Bulk, Absorption, Float, Equalization |
| Massimo Circuito aperto fotovoltaico voltage (voce) | <= 50 V. |
| Max. PV Input Wattage(12V/24V) | 360W/720W |
| Stop-charge Voltage | Default 14.4V (12V), 28.8V (24V) (adjustable) |
| Float-charge Voltage | Default 13.6V (12V), 27.2V (24V) (adjustable) |
| Basso volumetage Reconnected | Default 12.4V (12V), 24.8V (24V) (adjustable) |
| Basso volumetageDisconnessione | Default 10.8V (12V), 21.6V (24V) (adjustable) |
| No Load Losses | <10mA |
| Compensazione della temperatura della batteria | Automatic with optional NTC thermal probe (adjustable) |
| Temperatura di esercizio | da -20°C a +60°C |
| Outline Size (L*W*H) | 143*77*40mm |
| Distanza tra i fori di montaggio | 134*55 mm |
| Peso | 260g |
8. Risoluzione Dei Problemi
This section provides solutions to common issues you might encounter with your PowMr SL03-30A Solar Charge Controller.
| Problema | Possibile causa | Soluzione |
|---|---|---|
| Il display del controller è spento. | Nessuna batteria collegata o batteria scaricatage troppo basso. | Connect the battery correctly. Ensure battery voltage è superiore a 8 V. |
| "LLL" or "HHH" displayed on screen. | No PV input or PV voltage troppo basso/alto. | Ensure solar panels are connected and receiving sunlight. Check PV voltage. |
| Batteria non in carica. | Solar panel not connected, insufficient sunlight, or incorrect wiring. | Check solar panel connections and ensure adequate sunlight. Verify wiring polarity. |
| Il carico non funziona. | Load disconnected, battery voltage too low (over-discharge protection), or load control settings. | Check load connections. Charge battery. Adjust load control timer (e.g., set to 24H for continuous). |
| Surriscaldamento del controller. | Scarsa ventilazione o corrente di carico/carica eccessiva. | Ensure proper ventilation around the controller. Reduce load or charging current if consistently overheating. |
9. Manutenzione
Una manutenzione regolare garantisce prestazioni ottimali e prolunga la durata del regolatore di carica solare.
- Pulizia: Mantenere il controller pulito e privo di polvere e detriti. Utilizzare un panno asciutto per la pulizia.
- Connessioni: Controllare periodicamente tutti i collegamenti elettrici per verificarne la tenuta e la corrosione. Collegamenti allentati possono causare surriscaldamento e prestazioni scadenti.
- Ventilazione: Assicurarsi che le aperture di ventilazione non siano ostruite per consentire una corretta dissipazione del calore.
- Stato della batteria: Monitorare il voltage and health regularly. Replace batteries as needed.
- Condizioni ambientali: Assicurarsi che il controller funzioni entro gli intervalli di temperatura e umidità specificati.
10. Garanzia e supporto
For warranty information, technical support, or service inquiries, please contact PowMr customer service through the retailer where the product was purchased or visit the official PowMr website. Please have your model number (SL03-30A) and purchase date available when contacting support.
Per maggiori informazioni, visita il Negozio PowMr.
Ask a question about this manual
Ask about setup, troubleshooting, compatibility, parts, safety, or missing instructions. Manuals+ will review the question and use this page’s manual context to help answer it.