
1. Prodotto finitoview
The Sato One-Touch Timer TM-22 is a versatile digital timer designed for various timing needs, from kitchen use to laboratory applications. It combines ease of use with practical features to enhance your daily tasks.
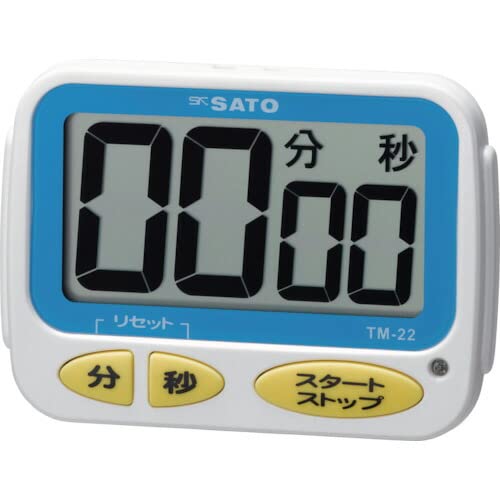
Immagine 1: anteriore view of the Sato One-Touch Timer TM-22. The timer features a clear digital display and control buttons.
Caratteristiche principali:
- Automatic Reset Alarm: The alarm sounds for 5 seconds at the set time and automatically resets to the initial set time.
- Funzionamento semplice: The primary key is for starting; no complex operations are required to stop the timer's alarm cycle.
- Dual Notification: Alerts users with both sound (70dB) and light.
- Drip-Proof Construction: Designed to resist splashes, making it suitable for kitchen environments.
- Molteplici opzioni di montaggio: Equipped with a magnet on the back for attachment to metal surfaces and a strap for hanging.
- Funzioni di conto alla rovescia e conteggio alla rovescia: Supports both decreasing e incrementoasing time measurements.
2. Impostazione
Installazione della batteria:
The TM-22 timer requires one AAA battery for operation. A battery is included with the unit.
- Individuare il coperchio del vano batterie sul retro del timer.
- Per aprire il vano, far scorrere o sganciare il coperchio.
- Inserire una batteria AAA, assicurandosi che i terminali positivo (+) e negativo (-) siano allineati correttamente con le marcature all'interno del vano.
- Riposizionare saldamente il coperchio del vano batteria.
The timer should power on, and the display will show '00:00' or the last set time.
3. Istruzioni per l'uso
The TM-22 timer features both countdown and count-up functionalities.
3.1. Conto alla rovescia
This function allows you to set a specific duration, and the timer will count down to zero.
- Imposta ora: Use the 'M' (Minute) button and 'S' (Second) button to adjust the desired countdown duration. The timer can be set from 1 second up to 99 minutes and 59 seconds.
- Inizia il conto alla rovescia: Press the 'START' button to begin the countdown.
- Notifica di allarme: When the time reaches zero, an alarm will sound for 5 seconds, accompanied by a flashing light.
- Ripristino automatico: After the 5-second alarm, the timer automatically resets to the initial set time, ready for the next countdown without manual intervention.
- Pausa/Interrompi: To pause the countdown, press the 'START' button again. To resume, press 'START' once more. To clear the set time, press the 'RESET' button (if available) or hold the 'START' button for a few seconds.
3.2. Count-up Timer
This function measures elapsed time from zero.
- Start Count-up: Ensure the timer display shows '00:00'. If not, press the 'RESET' button to clear any previous settings. Press the 'START' button to begin counting upwards from zero.
- Pausa/Riprendi: To pause the count-up, press the 'START' button. To resume, press 'START' again.
- Reset: To reset the count-up timer to '00:00', press the 'RESET' button (if available) or hold the 'START' button for a few seconds while paused.
4. Manutenzione
Pulizia:
To maintain the timer's appearance and functionality:
- Pulire la parte esterna del timer con un panno morbido e asciutto.
- Do not use abrasive cleaners, solvents, or chemical agents, as these may damage the casing o display.
- The timer is drip-proof, but do not immerse it in water or expose it to heavy splashing.
Sostituzione della batteria:
Replace the battery when the display becomes dim or the timer's functions become erratic.
- Follow the battery installation steps outlined in the "2. Setup" section.
- Always use a fresh AAA battery.
- Smaltire le batterie usate secondo le normative locali.
5. Risoluzione Dei Problemi
If you encounter issues with your TM-22 timer, refer to the following common problems and solutions:
| Problema | Possibile causa | Soluzione |
|---|---|---|
| Il timer non si accende. | La batteria è scarica o non è installata correttamente. | Controllare la polarità della batteria. Sostituirla con una nuova batteria AAA. |
| Display is faint or flickering. | Batteria scarica. | Sostituire la batteria AAA. |
| L'allarme non suona. | Volume obstruction or internal issue. | Ensure the speaker is not covered. Check battery level. If problem persists, contact support. |
| Timer does not reset automatically after alarm. | This feature is specific to the countdown function. | Ensure you are using the countdown function. For count-up, manual reset is required. |
6. Specifiche
| Caratteristica | Dettaglio |
|---|---|
| Numero di modello | TM-22 |
| Tempismo massimo | 99 minuti 59 secondi |
| Minimum Timing | 1 secondo |
| Dimensioni (A x L x P) | Dimensioni: 67 mm x 93 mm x 20 mm |
| Peso | 96 grammi |
| Fonte di alimentazione | Batteria AAA x 1 (inclusa) |
| Volume dell'allarme | 70 dB |
| Funzioni | Countdown, Count-up |
| Caratteristiche speciali | Drip-proof construction, Magnet on back, Hanging strap, Sound and light notification |
7. Garanzia e supporto
For warranty information, technical assistance, or customer support regarding your Sato One-Touch Timer TM-22, please contact your authorized retailer or the manufacturer, Sato Corporation. Keep your purchase receipt as proof of purchase.
Please visit the official Sato websito per le informazioni di supporto e i recapiti più aggiornati.


