
1. Introduzione
This manual provides essential information for the installation, operation, and maintenance of your Itek Meshcore 36B Gaming Tower PC Case. Please read this manual thoroughly before beginning assembly to ensure proper setup and safe usage. Keep this manual for future reference.
Informazioni sulla sicurezza
- Scollegare sempre l'alimentazione da tutti i componenti prima dell'installazione o della manutenzione.
- Maneggiare con cura i pannelli in vetro temperato per evitare rotture.
- Evitare di esporre la custodia a temperature o umidità estreme.
- Tenere le parti di piccole dimensioni lontano dalla portata dei bambini.
2. Contenuto della confezione
Verificare che tutti i componenti siano presenti nella confezione:
- Itek Meshcore 36B PC Case
- 4 x 14cm ARGB Fans (3 pre-installed in front, 1 pre-installed in rear)
- ARGB Fan Hub
- Accessory box (screws, cable ties, standoffs, etc.)
- Manuale dell'utente (questo documento)
3. Prodotto finitoview
The Itek Meshcore 36B is an ATX gaming tower designed for optimal airflow, ease of assembly, and modern aesthetics. It features a perforated mesh front panel, four pre-installed ARGB fans, and a tempered glass side panel.
Caratteristiche principali
- Excellent Airflow: Full mesh front panel and four pre-installed ARGB fans (3 front, 1 rear) for efficient cooling.
- Pannello laterale in vetro temperato: Fornisce un chiaro view di componenti interni e illuminazione RGB.
- Connettività moderna: Includes 2x USB 3.0 ports and 1x USB-C port on the front/side I/O panel.
- Interno organizzato: Separate compartment for the power supply unit (PSU) and storage drives (HDD/SSD) for clean cable management.
- Ampia compatibilità: Supports ATX motherboards, graphics cards up to 420mm, CPU coolers up to 174mm, and liquid cooling radiators up to 360mm.
Identificazione dei componenti

Figura 3.1: Fronte view of the Itek Meshcore 36B PC case, showcasing the mesh front panel and three 14cm ARGB fans.

Figure 3.2: Angled front-side view, highlighting the tempered glass panel and front I/O ports (USB 3.0, Type-C).

Figura 3.3: Lato posteriore view, illustrating the rear exhaust fan and expansion slots.

Figura 3.4: Interno view from the tempered glass side, detailing the motherboard tray and component layout.
4. Configurazione e installazione
Follow these steps for assembling your PC components within the Itek Meshcore 36B case.
4.1 Preparazione del caso
- Posizionare la custodia su una superficie piana e stabile.
- Carefully remove the tempered glass side panel by unscrewing the thumb screws at the rear and gently pulling the panel away. Set it aside on a soft, non-abrasive surface.
- Remove the solid metal side panel on the opposite side to access the cable management area.
4.2 Installazione della scheda madre
- Installare la schermatura I/O (se non è già fissata alla scheda madre) nell'apertura posteriore del case.
- Align the motherboard with the standoffs in the case. Ensure the standoffs match your ATX motherboard's screw holes.
- Fissare la scheda madre utilizzando le viti fornite. Non serrare eccessivamente.
4.3 Installazione dell'unità di alimentazione (PSU).
- Locate the PSU compartment at the bottom rear of the case.
- Slide the PSU into the compartment from the rear of the case, ensuring the fan faces downwards (if the case has a bottom vent) or upwards.
- Fissare l'alimentatore con le viti dalla parte posteriore del case.
4.4 Installazione dell'unità di archiviazione (HDD/SSD)
The case features dedicated bays for 3.5" HDDs and 2.5" SSDs, typically located in the PSU shroud area or behind the motherboard tray.
- For 3.5" HDDs: Slide the drive into the designated drive cage and secure with screws.
- For 2.5" SSDs: Mount the SSD onto the designated brackets, usually found behind the motherboard tray, and secure with screws.
4.5 Installazione della scheda grafica e della scheda di espansione
- Rimuovere le coperture degli slot di espansione necessari dalla parte posteriore del case.
- Insert the graphics card or other expansion card into the appropriate PCIe slot on the motherboard.
- Fissare la scheda con la vite o il meccanismo di chiusura in dotazione.
4.6 Gestione dei cavi
The Meshcore 36B offers 21mm of cable management space behind the motherboard tray.
- Route all necessary cables (PSU, data, front panel) through the cutouts in the motherboard tray.
- Use the included cable ties to bundle and secure cables, ensuring they do not obstruct airflow or interfere with side panel closure.
- Connect the front panel connectors (USB 3.0, USB-C, audio, power/reset switches, LED indicators) to the corresponding headers on your motherboard.
- Connect the ARGB fan hub to your motherboard's ARGB header (if available) for software control, or use the integrated controller for basic lighting effects. Ensure all fans are connected to the hub.
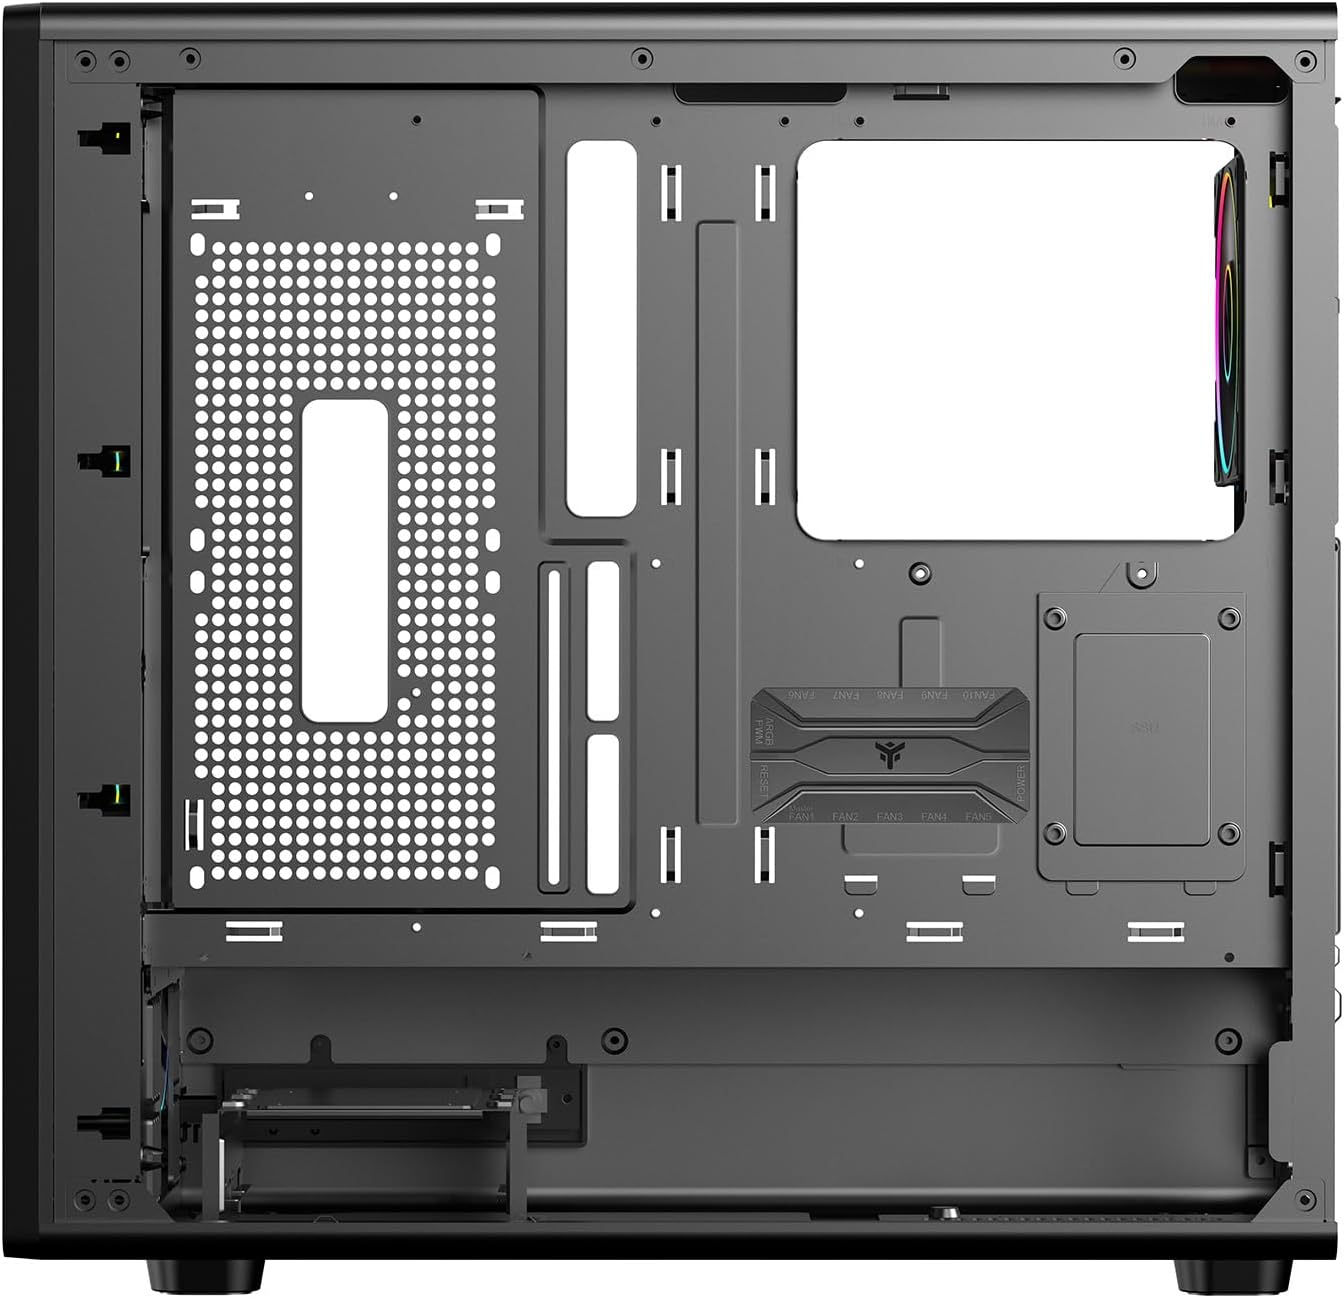
Figura 4.1: Interno view from the backplate side, illustrating cable management options.
5. Istruzioni per l'uso
5.1 Accensione
- Once all components are installed and cables are connected, replace both side panels.
- Collega il monitor, la tastiera, il mouse e le altre periferiche.
- Collegare il cavo di alimentazione all'alimentatore e a una presa a muro.
- Portare l'interruttore di alimentazione dell'alimentatore in posizione "ON".
- Press the power button on the front panel of the case to start your computer.
5.2 Connettività del pannello frontale
The front/side I/O panel provides convenient access to:
- 2 porte USB 3.0: Per il trasferimento dati ad alta velocità con dispositivi compatibili.
- 1 x USB-C Port: For modern USB Type-C devices.
- Jack audio: Per cuffie e microfoni.
- Pulsante di accensione: Per accendere/spegnere il sistema.
- Pulsante di reset: Per riavviare il sistema.
- Indicatori LED: For power and HDD activity.
5.3 Controllo dell'illuminazione ARGB
The pre-installed ARGB fans are connected to an ARGB hub. Lighting can be controlled in two ways:
- Controllo software della scheda madre: If the ARGB hub is connected to a compatible 3-pin 5V ARGB header on your motherboard, you can use your motherboard's RGB software (e.g., ASUS Aura Sync, MSI Mystic Light, Gigabyte RGB Fusion) to synchronize and customize lighting effects.
- Controllore integrato: If not connected to a motherboard ARGB header, the hub typically has a button (often labeled 'LED' or 'RGB') on the case's front I/O panel or directly on the hub itself to cycle through pre-set lighting modes and colors.
6. Manutenzione
Una manutenzione regolare aiuta a garantire prestazioni ottimali e longevità del case del tuo PC.
6.1 Pulizia del filtro antipolvere
The Meshcore 36B includes dust filters to prevent dust buildup inside the case. These filters should be cleaned periodically.
- Locate and remove the dust filters (typically on the top, front, and/or bottom of the case).
- Clean the filters using compressed air, a soft brush, or by rinsing with water (ensure they are completely dry before reinstallation).
- Reinstallare i filtri antipolvere.
6.2 Pulizia generale
- Utilizzare un morbido, damp cloth to wipe down exterior surfaces. Avoid abrasive cleaners.
- Per il pannello in vetro temperato, utilizzare un detergente per vetri e un panno in microfibra per evitare aloni.
- Utilizzare periodicamente aria compressa per eliminare la polvere dai componenti interni e dalle pale della ventola.
7. Risoluzione Dei Problemi
If you encounter issues with your PC case, refer to the following common problems and solutions.
7.1 Fans Not Spinning / ARGB Not Lighting Up
- Controllare i collegamenti di alimentazione: Ensure all fans are properly connected to the ARGB hub, and the hub itself is receiving power from the PSU (usually via a SATA power connector).
- Check ARGB Signal: If using motherboard software control, verify the ARGB hub is connected to a 3-pin 5V ARGB header on the motherboard and that the software is correctly configured.
- Try Integrated Controller: If motherboard control fails, try using the physical button on the case or hub to cycle through lighting modes.
7.2 Front Panel USB/Audio Ports Not Working
- Verify Motherboard Connections: Ensure the USB 3.0, USB-C, and audio headers from the front panel are securely connected to the correct pins on your motherboard. Refer to your motherboard manual for header locations.
- Controlla i driver: Ensure you have installed the latest chipset and audio drivers for your motherboard.
7.3 Surriscaldamento del sistema
- Pulire i filtri antipolvere: Assicurarsi che i filtri antipolvere siano puliti e non ostruiscano il flusso d'aria.
- Check Fan Orientation: Verify that fans are installed with correct airflow direction (front fans typically intake, rear/top fans exhaust).
- Improve Cable Management: Poor cable management can restrict airflow. Re-route cables for better air circulation.
8. Specifiche
| Caratteristica | Specificazione |
|---|---|
| Marca | Itek |
| Nome del modello | Itek Case MESHCORE 36B |
| Numero di modello | ITGCAMC36B |
| Tipo di caso | Torre |
| Compatibilità della scheda madre | ATX |
| Materiale | Metallo, plastica, vetro temperato |
| Colore | Nero |
| Metodo di raffreddamento | Aria |
| Ventole preinstallate | 4 x 14cm ARGB Fans (3 Front, 1 Rear) |
| Porte I / O anteriori | 2 USB 3.0, 1 USB-C |
| Lunghezza massima della GPU | 420mm |
| Altezza massima del dissipatore della CPU | 174mm |
| Supporto per il raffreddamento a liquido | Fino a 360 mm |
| Spazio per la gestione dei cavi | 21mm |
| Caratteristiche aggiuntive | Dust Filter, Perforated Front, ARGB Lighting, Integrated Fan |
9. Garanzia e supporto
9.1 Garanzia del prodotto
The Itek Meshcore 36B PC Case comes with a Garanzia di 24 mesi from the date of purchase. This warranty covers manufacturing defects and faulty components under normal use. It does not cover damage caused by misuse, accidents, unauthorized modifications, or improper installation.
9.2 Supporto tecnico
For technical assistance, troubleshooting beyond this manual, or warranty claims, please contact Itek customer support through their official website or the retailer where the product was purchased. Please have your product model number (ITGCAMC36B) and proof of purchase ready when contacting support.