
Pretul 23065
Pretul 20 L Air Compressor User Manual
Modello: 23065
Introduzione
This manual provides essential information for the safe and efficient operation, maintenance, and troubleshooting of your Pretul 20 L, 2-1/2 HP (maximum power), 120 V Compressor. Please read this manual thoroughly before using the compressor to ensure proper handling and to prevent injury or damage.

Image: Pretul 20 L Air Compressor, a yellow and black portable unit with wheels and a handle.
Informazioni sulla sicurezza
ATTENZIONE: la mancata osservanza di queste istruzioni di sicurezza può causare gravi lesioni o danni alla proprietà.
- Always wear appropriate personal protective equipment (PPE), such as safety glasses, when operating the compressor.
- Assicurarsi che il compressore sia posizionato su una superficie stabile e piana per evitare che si ribalti.
- Non azionare il compressore in ambienti umidi o damp conditions, or near flammable liquids or gases.
- Before performing any maintenance or adjustments, always disconnect the compressor from the power source and release all air pressure from the tank.
- Tenere i bambini e gli astanti lontani dall'area operativa.
- Controllare regolarmente il cavo di alimentazione per verificare che non sia danneggiato. Non utilizzare se il cavo è sfilacciato o danneggiato.
- Non modificare il compressore o i suoi componenti. Utilizzare solo ricambi originali.
Prodotto finitoview e componenti
Familiarize yourself with the various parts of your Pretul air compressor before operation.
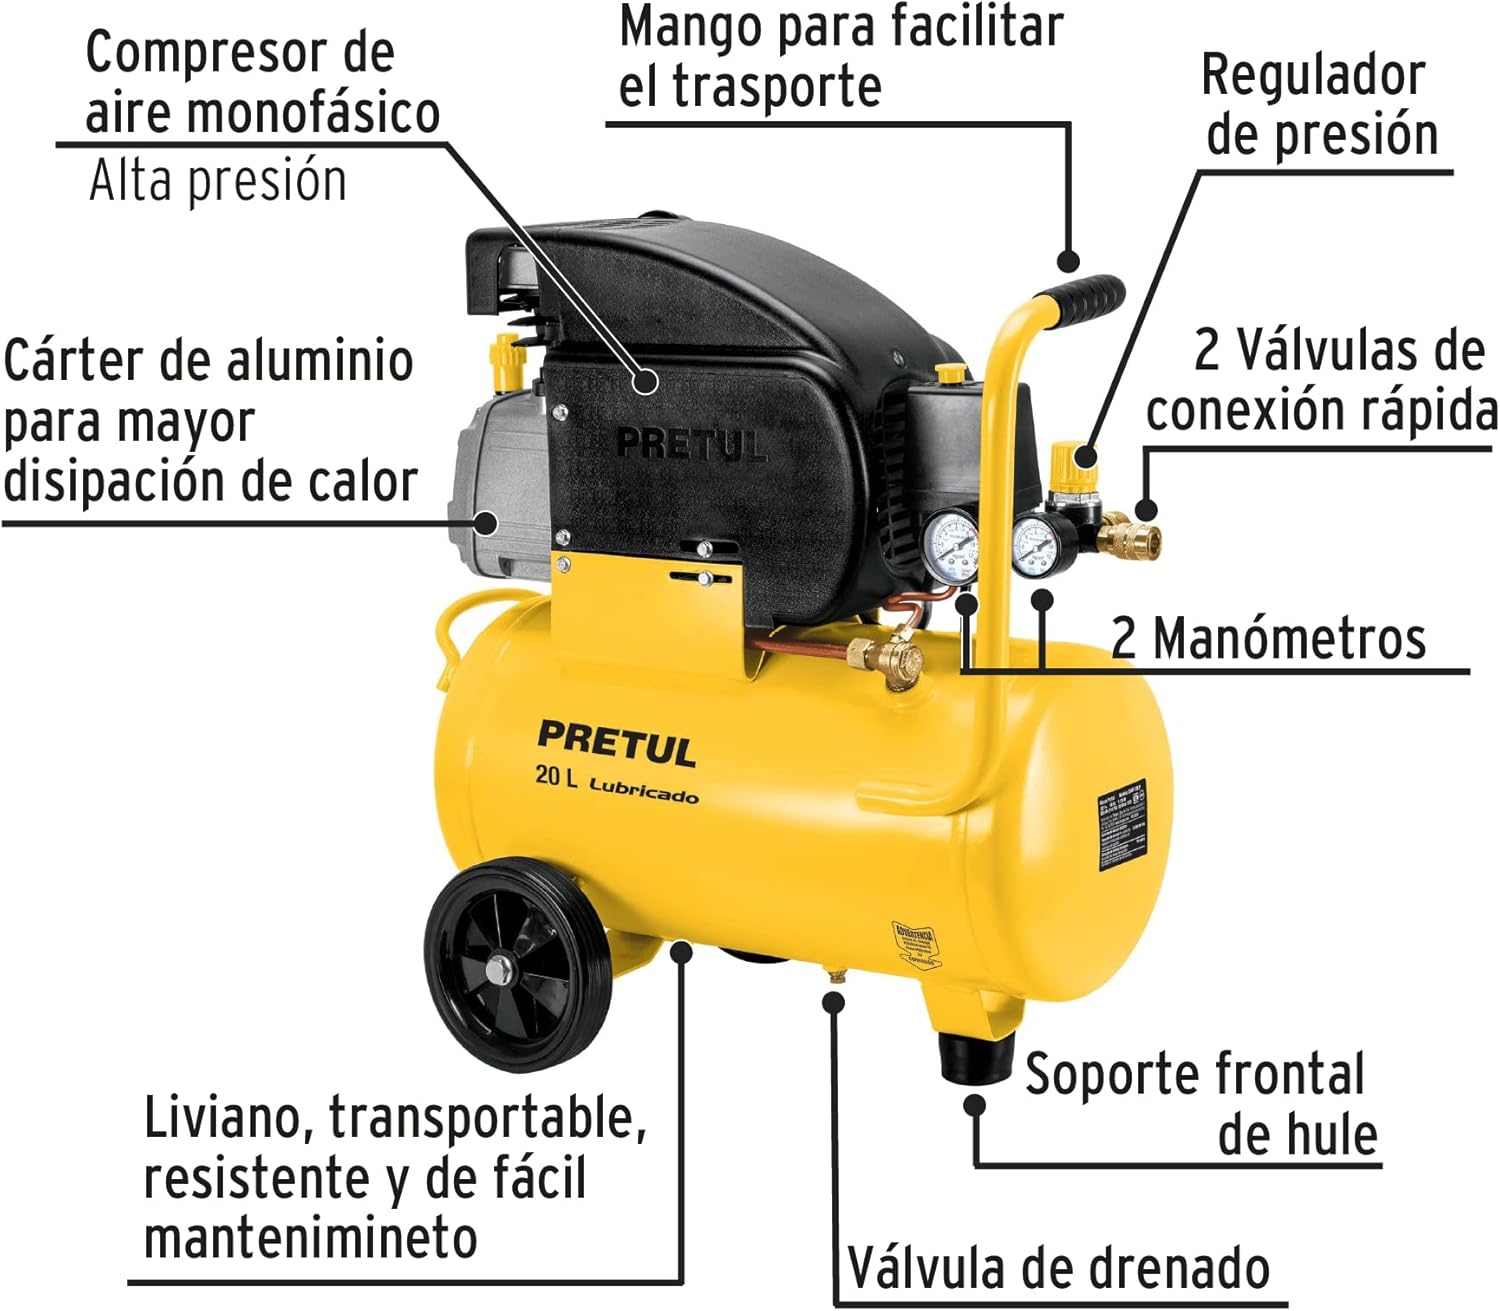
Image: Diagram showing the labeled components of the Pretul air compressor, including the single-phase air compressor, aluminum crankcase, transport handle, pressure regulator, quick-connect valves, pressure gauges, rubber front support, drain valve, and lightweight, transportable, resistant, and easy-to-maintain design.
- Single-phase air compressor: The main unit that compresses air.
- Aluminum Crankcase: Designed for better heat dissipation.
- Maniglia per il trasporto: Per una facile trasportabilità.
- Regolatore di pressione: Regola la pressione dell'aria in uscita.
- Quick-Connect Valves: Per il fissaggio di utensili pneumatici e tubi flessibili.
- Manometri: Visualizza la pressione del serbatoio e la pressione di uscita regolata.
- Rubber Front Support: Fornisce stabilità.
- Valvola di drenaggio: Situato sul fondo del serbatoio per rimuovere l'umidità.
- Ruote: For easy movement of the compressor.
Specifiche
Key technical specifications for the Pretul 20 L Air Compressor.
| Caratteristica | Specificazione |
|---|---|
| Marca | prezzo |
| Nome del modello | 23065 |
| Numero di parte | COMP-20LP |
| Voltage | 120 Volt |
| Potenza massima | 2.5 cavalli |
| Capacità | 20 litri (5.2 galloni) |
| Livello di rumore | 69 dB |
| Fonte di alimentazione | Elettrico con cavo |
| Peso dell'articolo | 21 chilogrammi (46.2 libbre) |
| Dimensioni del prodotto (L x P x A) | 20.87 x 13.39 x 22.83 pollici (53 x 34 x 58 cm) |
| Usi consigliati | Blow Cleaning, Spraying, Tire Inflation |
| Caratteristica speciale | Built-In Gauge |

Image: Diagram illustrating the dimensions of the Pretul air compressor: Height 58 cm, Depth 53 cm, Base 34 cm.
Impostare
1. Disimballaggio e ispezione
Carefully remove the compressor from its packaging. Inspect the unit for any signs of damage that may have occurred during shipping. Report any damage to your retailer immediately.

Image: The Pretul air compressor inside its retail packaging, showing the product details on the box.
2. Posizionamento
Place the compressor on a firm, level surface in a clean, well-ventilated area. Ensure there is adequate space around the unit for air circulation and maintenance access. Avoid placing it near heat sources or in direct sunlight.
3. Collegamento elettrico
Connect the compressor to a grounded 120 V electrical outlet. Ensure the circuit can handle the compressor's power requirements (2.5 HP maximum power).
4. Oil Check (for oil-lubricated models)
This is an oil-lubricated compressor. Before first use, and periodically thereafter, check the oil level. Ensure the oil level is between the minimum and maximum marks on the dipstick or sight glass. Add appropriate compressor oil if necessary.
5. Handle and Wheel Assembly (if not pre-assembled)
If the handle and wheels are not pre-assembled, attach them according to the included hardware. The handle is designed for easy transport.

Image: A person demonstrating how to transport the Pretul air compressor using its integrated handle and wheels.
Istruzioni per l'uso
1. Avviamento iniziale
- Assicurarsi che la valvola di scarico sul fondo del serbatoio sia chiusa.
- Collegare il compressore a una presa elettrica adatta.
- Turn the power switch to the "ON" position. The compressor will begin to build pressure.
- Allow the compressor to reach its maximum pressure and shut off automatically. This indicates the pressure switch is functioning correctly.
2. Regolazione della pressione di uscita
The compressor features a pressure regulator to control the air pressure delivered to your tools.
- Attach your air hose and tool to one of the quick-connect valves.
- Turn the pressure regulator knob (usually located near the output gauges) clockwise to increase pressure and counter-clockwise to decrease pressure.
- Monitor the output pressure gauge to set the desired pressure for your application.

Image: A person demonstrating the adjustment of the air regulating valve on the compressor, with an air hose connected.
3. Overcurrent Protector
Your compressor is equipped with an overcurrent protector to prevent motor damage in case of overload. If the compressor stops unexpectedly, check the overcurrent protector button. If it has popped out, allow the motor to cool down for a few minutes, then press the button to reset it.

Immagine: Primo piano view of the overcurrent protector button on the Pretul air compressor, with a person using a spray gun in the background.
4. Applicazioni
This compressor is suitable for various applications including:
- Blow Cleaning: Use an air blow gun to clean dust and debris from surfaces.
- Spruzzatura: Connect a spray gun for painting or other liquid applications.
- Gonfiaggio pneumatici: Use an inflation gun with a gauge to inflate tires and other inflatables.
Manutenzione
Regular maintenance is crucial for the longevity and optimal performance of your compressor.
1. Draining the Air Tank
WARNING: Always drain the tank after each use or at least daily. Moisture buildup can lead to rust and tank failure.
- Turn off the compressor and disconnect it from the power source.
- Open the drain valve located at the bottom of the air tank.
- Allow all condensed moisture to drain completely.
- Close the drain valve tightly after draining.
2. Oil Maintenance
As an oil-lubricated compressor, regular oil checks and changes are necessary.
- Controllare il livello dell'olio: Before each use, ensure the oil level is within the safe operating range.
- Cambio olio: Refer to the specific oil change interval recommended by Pretul (typically after the first 20 hours, then every 200 hours or 3 months, whichever comes first). Use only compressor-specific oil.
3. Pulizia
- Mantenere il compressore pulito e privo di polvere e detriti.
- Clean the air filter regularly (if accessible) to ensure proper airflow and prevent motor strain.
Risoluzione dei problemi
Questa sezione fornisce soluzioni ai problemi più comuni che potresti riscontrare.
| Problema | Possibile causa | Soluzione |
|---|---|---|
| Il compressore non si avvia. | Nessuna corrente, interruttore automatico scattato, interruttore difettoso. | Controllare il collegamento elettrico, ripristinare l'interruttore automatico, contattare l'assistenza se l'interruttore è difettoso. |
| Il compressore funziona ininterrottamente o esegue cicli troppo frequenti. | Air leak in system, faulty pressure switch. | Check all connections for leaks, tighten fittings. If problem persists, pressure switch may need replacement. |
| Bassa pressione dell'aria in uscita. | Pressure regulator set too low, air leak, clogged air filter. | Adjust pressure regulator, check for leaks, clean or replace air filter. |
| Rumore o vibrazioni eccessivi. | Loose components, worn parts, low oil level. | Check and tighten all fasteners, inspect for worn parts, check and add oil if needed. |
| Overcurrent protector trips. | Overload, motor overheating, low voltage. | Reduce load, allow motor to cool, ensure proper voltage supply. Reset button. |
Se riscontri problemi non elencati qui o se le soluzioni suggerite non risolvono il problema, contatta l'assistenza clienti.
Garanzia e supporto
Pretul products are manufactured to high-quality standards. For information regarding warranty coverage and terms, please refer to the warranty card included with your purchase or visit the official Pretul websito.
For technical assistance, spare parts, or service inquiries, please contact Pretul Customer Support. Details can typically be found on the product packaging or the manufacturer's websito.
Puoi anche visitare il Pretul brand page on Amazon per ulteriori informazioni.
Ask a question about this manual
Ask about setup, troubleshooting, compatibility, parts, safety, or missing instructions. Manuals+ will review the question and use this page’s manual context to help answer it.