1. Introduzione
This manual provides essential information for the proper installation, operation, and maintenance of your JFA J6 Hybrid 6-Way Digital Audio Processor with Limiter. Please read this manual thoroughly before using the device to ensure optimal performance and to prevent damage.
The JFA J6 is designed to offer precise control over your audio system, featuring digital signal processing capabilities combined with a hybrid architecture for superior sound management.
2. Importanti istruzioni di sicurezza
- Sicurezza elettrica: Always disconnect power before making any connections or disconnections. Ensure proper grounding to prevent electrical shock.
- Ventilazione: Install the unit in a location with adequate ventilation to prevent overheating. Do not block ventilation openings.
- Umidità: Non esporre l'unità ad acqua, pioggia o umidità eccessiva.
- Temperatura: Avoid installing the unit in direct sunlight or near heat sources. Operate within specified temperature ranges.
- Installazione professionale: For complex installations, it is recommended to seek assistance from a qualified professional.
- Pulizia: Per la pulizia, utilizzare un panno morbido e asciutto. Non utilizzare detergenti liquidi o spray.
3. Prodotto finitoview
The JFA J6 Hybrid Digital Audio Processor is a sophisticated device designed for advanced audio system management. It provides 6 independent output channels, allowing for precise control over crossovers, equalization, gain, and limiting functions.
3.1 Caratteristiche
- 6-Way Digital Audio Processing
- Hybrid Architecture for enhanced performance
- Integrated Limiter for speaker protection
- Adjustable Crossovers
- Equalizzazione parametrica
- Independent Gain Control for each channel
- User-friendly interface with LCD display
3.2. Contenuto della confezione
- JFA J6 Hybrid Digital Audio Processor
- Manuale d'uso
- Hardware di montaggio (viti, staffe)
- Connettore di alimentazione
3.3. Identificazione dei componenti

Figura 1: pannello frontale View. This image displays the front panel of the JFA J6 Hybrid Digital Audio Processor. It features a central LCD screen for settings and monitoring, surrounded by a rotary encoder for navigation and adjustment. Below the screen are various buttons and indicators for input level, mute, limiter, and output level controls for each of the six channels. The 'LEVEL IN' and 'MAIN IN' indicators are visible on the left, while 'LEVEL OUT 5' and 'LEVEL OUT 6' are on the right, alongside the power terminal.
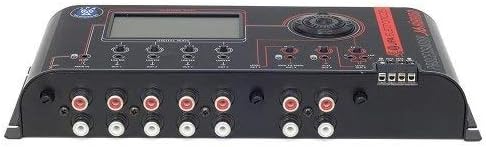
Figura 2: pannello posteriore View. This image shows the rear panel of the JFA J6 Hybrid Digital Audio Processor, highlighting the input and output connections. On the left, there are RCA input jacks labeled 'MAIN IN'. The center features multiple RCA output jacks for OUT 1 through OUT 6. On the right, a screw terminal block is visible for power connections (BAT, REM, GND).
4. Installazione e configurazione
4.1. Montaggio
Select a secure, dry, and well-ventilated location for mounting the JFA J6. Use the provided mounting hardware to firmly attach the unit, ensuring it is protected from vibrations and direct heat.
4.2. Collegamenti elettrici
Ensure all audio components are powered off before making any connections.
- Collegamento elettrico: Connect the power cable to the screw terminal block on the unit's rear panel.
- BAT (+12V): Connect to a fused +12V constant power source.
- REM (telecomando): Connect to the remote turn-on output of your head unit or ignition switch.
- GND (Terra): Collegare a un punto di messa a terra solido del telaio.
- Ingresso audio: Connect the RCA output from your head unit or audio source to the 'MAIN IN' RCA jacks on the JFA J6.
- Uscita audio: Connect the RCA output jacks (OUT 1 to OUT 6) of the JFA J6 to the corresponding input channels of your amplifiers. Ensure correct channel assignment for your speaker configuration (e.g., front, rear, subwoofer).
5. Istruzioni per l'uso
5.1. Accensione/Spegnimento
The JFA J6 will power on automatically when a remote signal is received at the REM terminal. It will power off when the remote signal is removed.
5.2. Navigazione di base
Use the rotary encoder and associated buttons on the front panel to navigate through the menus and adjust settings displayed on the LCD screen. Rotate the encoder to scroll through options and press it to select.
5.3. Input/Output Configuration
Access the input/output menu to configure the routing of audio signals and set individual channel parameters:
- Controllo di guadagno: Adjust the input and output gain levels for each channel to match the sensitivity of connected amplifiers and prevent clipping.
- Impostazioni crossover: Define high-pass, low-pass, and band-pass filters for each output channel. Set crossover frequencies and slopes to optimize speaker performance and protect drivers.
- Regolazione della fase: Adjust the phase (0° or 180°) for each output channel to ensure proper acoustic alignment with other speakers in the system.
5.4. Limiter Function
The integrated limiter protects your speakers from excessive power and distortion. Access the limiter settings to adjust the threshold and attack/release times for each channel. The 'LIMITER' indicators on the front panel will illuminate when the limiter is active.
5.5. Equalizzazione
The JFA J6 offers parametric equalization for precise tonal adjustments. Navigate to the EQ menu to select specific frequencies, adjust their gain (boost/cut), and set the Q-factor (bandwidth) for each band.
5.6. Preselezioni
You can save your customized audio settings as presets for quick recall. This is useful for different music genres or listening preferences. Refer to the on-screen menu for saving and loading presets.
6. Manutenzione
The JFA J6 requires minimal maintenance. Keep the unit clean and free from dust. Use a soft, dry cloth to wipe the exterior. Do not use harsh chemicals or abrasive materials. Ensure all connections remain secure over time.
7. Risoluzione Dei Problemi
| Problema | Possibile causa | Soluzione |
|---|---|---|
| Nessun potere | Incorrect power wiring; Blown fuse; No remote signal | Check BAT, REM, and GND connections. Verify fuse integrity. Ensure remote signal is present. |
| Nessuna uscita audio | Incorrect audio connections; Muted channels; Low gain settings | Verify RCA input/output connections. Check if any channels are muted. Increase gain levels. |
| Suono distorto | Input/output gain too high; Clipping; Incorrect EQ settings | Reduce input/output gain. Check for 'CLIP' indicator. Adjust EQ settings. |
| Surriscaldamento dell'unità | Ventilazione insufficiente; Carico eccessivo | Ensure adequate airflow around the unit. Check speaker impedance and ampcarico di lificatore. |
8. Specifiche tecniche
| Caratteristica | Specificazione |
|---|---|
| Canali di ingresso | 2 (Stereo RCA) |
| Canali di uscita | 6 (RCA) |
| Tipo di elaborazione | Processore di segnale digitale (DSP) |
| Filtri crossover | High-Pass, Low-Pass, Band-Pass (adjustable slopes) |
| Equalizzazione | Equalizzatore parametrico |
| Limitatore | Integrated, adjustable threshold and timing |
| Alimentazione elettrica | 12V DC (Automotive) |
| Dimensioni (circa) | Non specificato |
| Peso (circa) | Non specificato |
9. Garanzia e assistenza clienti
JFA products are manufactured to high-quality standards. This product is covered by a limited warranty against defects in materials and workmanship. The duration and terms of the warranty may vary by region. Please retain your proof of purchase for warranty claims.
For technical assistance, troubleshooting, or warranty inquiries, please contact your authorized JFA dealer or visit the official JFA Electronicos websito per informazioni di supporto.