
Introduzione
This manual provides detailed instructions for the installation, operation, and maintenance of your AKASO Mirror Dash Cam 2K. Please read this manual thoroughly before using the device to ensure proper function and safety. This device is designed to record driving footage and assist with parking.
Contenuto della confezione
Verificare che tutti gli articoli siano presenti nel pacco:
- AKASO Mirror Dash Cam 2K (Main Unit)
- Rear Camera with Extension Cable
- Caricabatterie per auto
- Modulo GPS
- Cinghie/fasce di montaggio
- Scheda Micro SD da 32 GB
- Manuale d'uso
- Cable Clips (optional, for cable management)
Prodotto finitoview
The AKASO Mirror Dash Cam 2K is a comprehensive vehicle recording system designed to enhance driving safety and provide evidence in case of incidents. It features a 12-inch touchscreen display, dual cameras for front and rear recording, advanced night vision, and parking assistance.

Immagine: The AKASO Mirror Dash Cam 2K main unit, showcasing its 12-inch display and key features such as Sony sensor, 2K UHD resolution, wide field of view, IPS touchscreen, GPS module, parking monitor, and night vision capabilities.
- Display: 12-inch IPS Touchscreen for intuitive control and clear viewing.
- Fotocamera frontale: Registra in 1080P con un obiettivo grandangolare da 170°.
- Telecamera posteriore: Records in 1080P with a 170° wide-angle lens, providing a total 340° viewangolo di ing.
- Visione notturna: Equipped with an advanced Sony IMX307 sensor and F1.8 6-glass fixed-focus lens for enhanced low-light performance.
- Monitoraggio del parcheggio: Automatically records and saves video if an impact is detected while parked.
- Sensore G: Detects sudden movements or collisions and locks the current video footage per impedire la sovrascrittura.
- Registrazione in loop: Registra continuamente, sovrascrivendo il più vecchio sbloccato files quando la scheda di memoria è piena.
- Modulo GPS: Records driving route, speed, and location data (requires connection).
- Magazzinaggio: Supports Micro SD cards up to 128GB (32GB card included).
Configurazione e installazione
Follow these steps to properly install your dash cam system.
1. Inserire la scheda Micro SD
Before powering on, insert the provided 32GB Micro SD card (or another compatible card up to 128GB, Class 10 or higher) into the designated slot on the main unit. Ensure the card is inserted correctly until it clicks into place.
2. Montare l'unità principale
Fissare la dash cam sullo specchietto retrovisore alla parte posteriore esistente del veicoloview mirror using the provided rubber mounting straps. Securely fasten the straps to prevent movement during driving.

Immagine: A close-up of the main dash cam unit, highlighting the adjustable front camera lens. The lens can be moved horizontally and rotated to achieve the optimal recording angle.
3. Installare la telecamera posteriore
The rear camera can be installed either inside the rear window or externally near the license plate. For external installation, ensure it is mounted securely and the cable is routed safely into the vehicle, avoiding water ingress. Connect the rear camera cable to the main unit.
- Choose a suitable location for the rear camera (e.g., above the license plate or inside the rear window).
- Secure the camera using screws or adhesive tape.
- Route the rear camera cable to the front of the vehicle, concealing it along the headliner and A-pillars.
- Collegare il cavo della telecamera posteriore alla porta designata sull'unità principale della dash cam.
- (Optional) If using the reverse assist function, connect the red wire from the rear camera cable to your vehicle's reverse light positive wire.
4. Collegare l'alimentazione
Plug the car charger into your vehicle's cigarette lighter socket and connect the other end to the main unit's power input. Route the power cable neatly to avoid obstructing your view o comandi di guida.
5. Connect GPS Module (Optional)
If included, connect the GPS module to its dedicated port on the main unit. Mount the GPS module on the dashboard or windshield where it has a clear view del cielo per una ricezione ottimale del segnale.
Istruzioni per l'uso
Accensione/spegnimento
- The dash cam will automatically power on and begin recording when your vehicle's ignition is turned on (if connected to a switched power source).
- To manually power on/off, press and hold the power button on the side of the unit.
Registrazione di base
Once powered on, the dash cam will automatically start loop recording. Video filevengono salvati in segmenti (ad esempio, 1, 3 o 5 minuti) sulla scheda Micro SD. Quando la scheda è piena, il più vecchio sbloccato files verrà sovrascritto.

Immagine: A graphic representation of loop recording, showing how the dash cam continuously records video in segments, overwriting the oldest filequando la scheda di memoria è piena, garantendo una registrazione ininterrotta.
Funzionamento del touchscreen
The 12-inch IPS touchscreen allows for easy navigation and control:
- Scorri verso sinistra/destra: Passa dalla fotocamera frontale view, telecamera posteriore viewo visualizzazione a schermo diviso.
- Swipe Up/Down (on camera view): Regola la verticale viewangolo di ripresa della telecamera selezionata.
- Tocca le icone: Access settings, playback, lock video, or take a photo.
G-Sensor (registrazione di emergenza)
Il sensore G integrato rileva impatti o collisioni improvvisi. Quando attivato, blocca automaticamente il video corrente. file, impedendo che venga sovrascritto dalla registrazione in loop. Questi files are stored in a separate "Event" folder on the SD card.

Immagine: An illustration showing a car accident with a prominent padlock icon, indicating the G-Sensor's function to automatically lock and protect video footage durante un impatto.
Monitor di parcheggio
When enabled, the Parking Monitor function uses the G-Sensor to detect impacts while your vehicle is parked. If an impact is detected, the dash cam will automatically power on and record a short video, then power off. This requires a continuous power supply (e.g., hardwire kit, sold separately).
Reverse Assist / Parking Guidelines
When the vehicle is put into reverse (and the rear camera's red wire is connected to the reverse light), the display will automatically switch to the rear camera view with parking guidelines. These guidelines assist in safe parking.
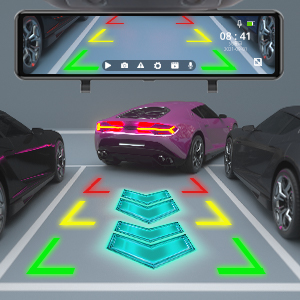
Immagine: The dash cam screen displaying the rear camera view with dynamic parking guidelines, assisting the driver in safely maneuvering into a parking space.
Funzionalità GPS
With the GPS module connected, the dash cam will record your vehicle's speed, location, and driving route. This data can be viewed using a dedicated GPS player software on a computer (software typically available for download from the manufacturer's webposto).
Riproduzione
Access recorded videos directly on the dash cam's screen by tapping the playback icon. You can browse through front and rear camera footage. Alternatively, remove the Micro SD card and view files su un computer.
Manutenzione
- Pulizia lenti e schermo: Use a soft, lint-free cloth to gently wipe the camera lenses and the display screen. Avoid abrasive materials or chemical cleaners.
- Gestione della scheda Micro SD:
- Format the Micro SD card regularly (e.g., once a month) within the dash cam's settings to ensure optimal performance and prevent data corruption.
- Replace the Micro SD card if it shows signs of wear, errors, or reduced performance.
- Aggiornamenti del firmware: Check the AKASO official website periodically for firmware updates. Follow the provided instructions carefully to update the device.
Risoluzione dei problemi
Se riscontri problemi con la tua dash cam, fai riferimento ai seguenti problemi comuni e alle relative soluzioni:
- La dash cam non si accende.
- Assicurarsi che il caricabatteria per auto sia collegato saldamente sia alla dash cam sia alla presa accendisigari del veicolo.
- Controllare se la presa accendisigari del veicolo è alimentata.
- Provare un caricabatterie per auto o un cavo USB diverso, se disponibile.
- Dash cam stops recording or shows "Card Error".
- Formattare la scheda Micro SD tramite le impostazioni della dash cam.
- Ensure the Micro SD card is Class 10 or higher and supports up to 128GB.
- Replace the Micro SD card if the issue persists, as it may be faulty.
- Scarsa qualità video o immagini sfocate.
- Clean the front and rear camera lenses with a soft cloth.
- Assicurarsi che la pellicola protettiva (se presente) sia stata rimossa dalle lenti.
- Adjust the camera angle to avoid glare from the windshield or dashboard reflections.
- For night vision, ensure the windshield is clean.
- Rear camera not displaying or showing "No Signal".
- Controllare il collegamento del cavo della telecamera posteriore all'unità principale.
- Assicurarsi che il cavo della telecamera posteriore non sia danneggiato.
- Verify the rear camera itself is properly installed and connected.
- Il segnale GPS è debole o non è stato acquisito.
- Assicurarsi che il modulo GPS sia collegato e montato in una posizione con una vista libera view del cielo (ad esempio, cruscotto, parte superiore del parabrezza).
- Avoid placing the GPS module under metallic objects or tinted areas that might block the signal.
- Mirror unit shakes or vibrates.
- Ensure the mounting straps are securely tightened around your vehicle's original rearview specchio.
- Adjust the position to ensure a snug fit.
Specifiche
| Caratteristica | Dettaglio |
|---|---|
| Dimensioni del prodotto | 10.04 x 2.76 x 1.5 pollici |
| Peso dell'articolo | 2.33 libbre |
| Numero modello articolo | 13 |
| Batterie | 1 batteria agli ioni di litio (inclusa) |
| Marca | AKASO |
| Nome del modello | AKASO Mirror Dash Cam 2K |
| Tipo di servizio del veicolo | Auto |
| Tecnologia di connettività | USB |
| Caratteristica speciale | Sensore G |
| Risoluzione di acquisizione video | 1080p (anteriore e posteriore) |
| Tipo di montaggio | Posterioreview Supporto per specchio |
| Colore | Nero |
| campo di View | 170 gradi (anteriore e posteriore) |
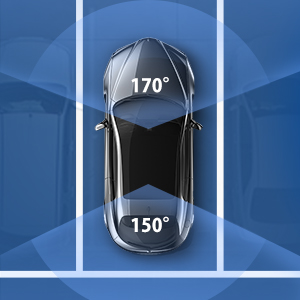
Immagine: An overhead diagram of a car illustrating the wide field of view provided by the dash cam system, covering 170 degrees at the front and 150 degrees at the rear for comprehensive coverage.

Immagine: A visual representation of the dash cam's ability to operate in various environmental conditions, depicted by a split image showing a snowy landscape with a snowflake and a desert scene with a sun icon.
Garanzia e supporto
AKASO products come with a standard warranty. For specific warranty terms, technical support, or customer service inquiries, please refer to the warranty card included in your package or visit the official AKASO website. You can also contact AKASO customer support directly for assistance.
Official AKASO Websito: Negozio AKASO su Amazon
Informazioni importanti sulla sicurezza
- Non utilizzare la dash cam né accedere alle sue impostazioni durante la guida.
- Assicurarsi che la dash cam sia installata in una posizione che non ostruisca la visuale del conducente view o interferire con le funzioni di sicurezza del veicolo.
- Use only the original car charger provided or a certified replacement.
- Non esporre il dispositivo a temperature estreme, alla luce solare diretta per periodi prolungati o all'umidità.
- Tenere il dispositivo lontano dalla portata dei bambini.