1. Introduzione
The PROEL MQ6 is a compact 6-channel mixer designed for various sound reinforcement applications. It offers a high input density, essential features, and superior audio quality in a durable, ultra-rugged case. This manual provides detailed instructions for the proper setup, operation, and maintenance of your MQ6 mixer.
2. Informazioni sulla sicurezza
- Alimentazione elettrica: Utilizzare solo l'adattatore di alimentazione specificato. Assicurarsi che il volumetage corrisponde all'alimentazione elettrica locale.
- Umidità: Do not expose the unit to rain or moisture. Avoid placing liquids near the mixer.
- Ventilazione: Assicurare una ventilazione adeguata. Non ostruire le aperture di ventilazione.
- Calore: Tenere l'unità lontana da fonti di calore quali termosifoni, bocchette di ventilazione, stufe o altri apparecchi che producono calore.
- Manutenzione: Non tentare di riparare questo prodotto da soli. Affidare tutte le operazioni di manutenzione a personale di assistenza qualificato.
- cavi: Proteggere i cavi di alimentazione per evitare che vengano calpestati o schiacciati, in particolare in corrispondenza delle spine, delle prese di corrente e del punto in cui escono dall'apparecchio.
- Pulizia: Pulire solo con un panno asciutto.
3. Prodotto finitoview
The PROEL MQ6 is a 6-channel compact mixer featuring 2 mono MIC/LINE inputs, 2 stereo LINE inputs, 3-band EQ on mono channels, 2-band EQ on stereo channels, and electronically balanced main outputs.

Figura 3.1: in alto view of the PROEL MQ6 Compact 6-Channel Mixer, showing all controls and inputs.

Figura 3.2: Angolato view of the PROEL MQ6 mixer, highlighting the compact design and control layout.
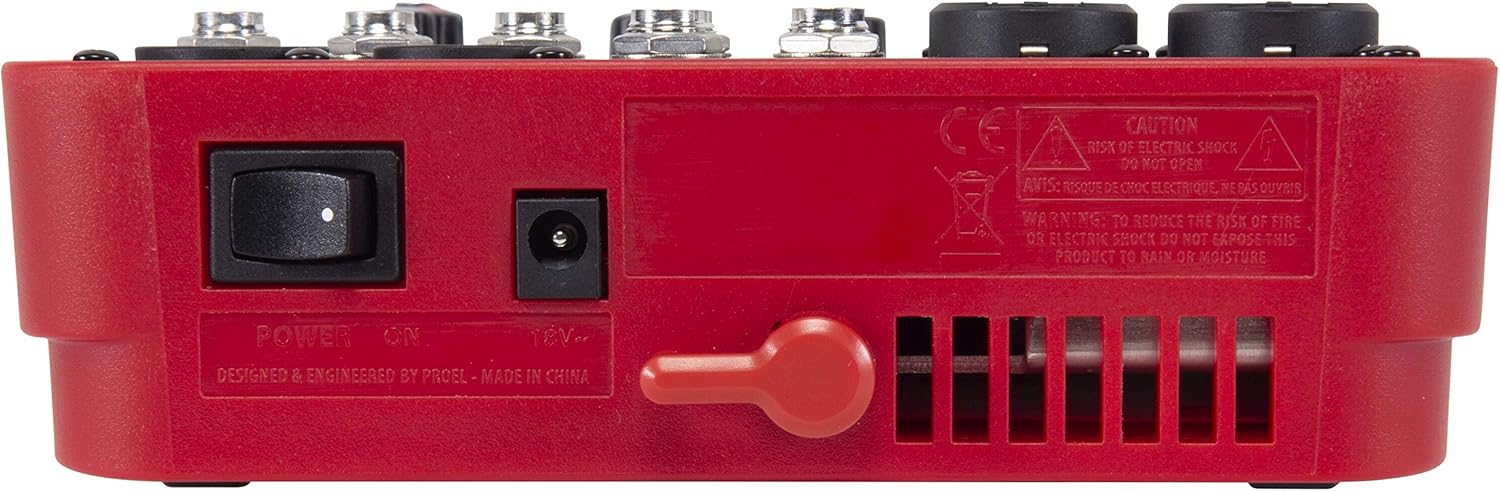
Figura 3.3: Posteriore view of the PROEL MQ6 mixer, showing the power switch and DC input.
Caratteristiche del prodotto:
- 2 Mono MIC/LINE inputs with XLR/TRS combo jacks.
- 2 Stereo LINE inputs (3/4, 5/6) with TRS jacks.
- 3-Band EQ on mono channels for precise tone shaping.
- 2-Band EQ on stereo channels.
- Low-noise, high-headroom microphone preamps.
- Electronically balanced XLR MAIN MIX outputs.
- Phantom Power (+48V) for condenser microphones.
- Uscita cuffie con controllo di livello dedicato.
PROEL MQ Series Overview Video
Questo video fornisce un overview of the PROEL MQ Series compact mixers. Please note that some features shown, such as digital effects, compressors, and USB connectivity, are available on other models within the MQ series (e.g., MQ6FX, MQ12USB, MQ16USB) and not on the MQ6 model specifically.
4. Impostazione
4.1 Disimballaggio e ispezione
Carefully unpack the mixer and check for any signs of damage. Ensure all components listed in the packaging are present. If any items are missing or damaged, contact your dealer immediately.
4.2 Collegamento di alimentazione
- Assicurarsi che l'interruttore di alimentazione del mixer sia in posizione OFF.
- Connect the provided power adapter to the DC input jack on the rear of the mixer.
- Collegare l'adattatore di alimentazione a una presa di corrente CA adatta.
4.3 Collegamenti di ingresso
The MQ6 features two types of input channels:
- Mono MIC/LINE Inputs (Channels 1-2): Use XLR cables for microphones or 1/4" TRS cables for line-level instruments (e.g., keyboards, guitars with preampS).
- Stereo LINE Inputs (Channels 3/4, 5/6): Use 1/4" TRS cables for stereo line-level sources. If connecting a mono source, use the L/MONO input.
4.4 Collegamenti di uscita
- MAIN MIX Outputs: Collega i tuoi altoparlanti principali o l'alimentazione amplifier to the XLR MAIN MIX L and R outputs. These outputs are electronically balanced.
- Uscita TELEFONI: Connect your headphones to the 1/4" PHONES jack for monitoring.
5. Istruzioni per l'uso
5.1 Accensione/Spegnimento
- Before powering on, ensure all channel GAIN and MIX level knobs are set to their minimum position.
- Turn on the mixer using the power switch on the rear panel.
- When powering off, first turn down all output levels, then switch off the mixer.
5.2 Channel Controls (Mono Channels 1-2)
- Ingresso MIC/LINEA: Combo jack for XLR microphones or 1/4" TRS line-level sources.
- LO CUT (75 Hz): Engages a high-pass filter at 75 Hz to remove unwanted low-frequency rumble.
- GUADAGNO: Adjusts the input sensitivity for the connected microphone or line source. Set this to achieve a strong signal without clipping (indicated by the PEAK LED).
- HI (12 kHz): Regola il contenuto ad alta frequenza (acuti) del canale.
- LOW (80 Hz): Regola il contenuto di bassa frequenza (bassi) del canale.
- LED DI PICCO: Si accende quando il segnale di ingresso è troppo alto, indicando un potenziale clipping. Ridurre il GAIN se questo LED si accende frequentemente.
- Manopola di livello: Controls the channel's contribution to the main mix.
5.3 Channel Controls (Stereo Channels 3/4, 5/6)
- L/MONO, R LINE Inputs: 1/4" TRS jacks for stereo line-level sources. Use L/MONO for mono sources.
- HI (12 kHz): Regola il contenuto ad alta frequenza (acuti) del canale.
- LOW (80 Hz): Regola il contenuto di bassa frequenza (bassi) del canale.
- Manopola di livello: Controls the channel's contribution to the main mix.
5.4 Main Mix Section
- PHANTOM POWER ON/OFF: Activates +48V phantom power for condenser microphones connected to the XLR inputs. Ensure condenser microphones are connected before activating phantom power.
- Misuratori di livello: Displays the output level of the main mix. Aim for levels around 0 dB to avoid clipping.
- MIX Level Knob: Controlla il volume di uscita complessivo del mix principale.
- PHONES Level Knob: Regola il volume dell'uscita cuffie.
6. Manutenzione
- Pulizia: Utilizzare un panno morbido e asciutto per pulire la superficie del mixer. Non utilizzare detergenti abrasivi, solventi o cere.
- Magazzinaggio: When not in use for extended periods, store the mixer in a dry, dust-free environment.
- Cura del cavo: Regularly inspect all cables for damage. Replace frayed or damaged cables to prevent electrical hazards and ensure optimal performance.
- Ventilazione: Assicurarsi che le fessure di ventilazione siano libere da polvere e detriti per evitare il surriscaldamento.
7. Risoluzione Dei Problemi
| Problema | Possibile causa | Soluzione |
|---|---|---|
| Nessuna uscita audio |
|
|
| Suono distorto |
|
|
| Nessun segnale del microfono |
|
|
| Ronzio o rumore |
|
|
8. Specifiche
| Caratteristica | Dettaglio |
|---|---|
| Marca | PROEL |
| Modello | MQ6 |
| Numero di canali | 6 |
| Ingressi audio | 2 x MIC/LINE (XLR/TRS Combo), 2 x Stereo LINE (TRS) |
| Tecnologia di connettività | XLR, TRS |
| EQ (canali mono) | 3-Band (HI, LOW, LO CUT) |
| EQ (canali stereo) | 2-Band (HI, LOW) |
| Potenza fantasma | +48V |
| Uscite principali | XLR (Electronically Balanced) |
| Uscita cuffie | 1/4" TRS |
9. Garanzia
PROEL offers its customers a minimum of 24 (twenty-four) months warranty from the date of purchase for sound systems products. Please retain your proof of purchase for warranty claims. For detailed warranty terms and conditions, please refer to the official PROEL websito o contattare il servizio clienti.
10. Supporto
For technical assistance, product inquiries, or service requests, please visit the official PROEL website or contact your authorized PROEL dealer. You may also find additional resources and FAQs on their support pages.