
1. Introduzione
This manual provides essential instructions for the safe and efficient use of your ACOPOWER 35W 5A 12V Polycrystalline Solar Charge Kit. This kit is designed for off-grid applications, offering a reliable power source for RVs, trailers, boats, sheds, and camping setups. Please read this manual thoroughly before installation and operation to ensure proper functionality and longevity of your solar kit.
The kit includes a 35W polycrystalline solar panel and a 5A PWM charge controller, along with necessary cables and connectors for a basic setup.

Immagine 1.1: Passoview of the ACOPOWER 35W 5A 12V Solar Charge Kit, showing the solar panel, charge controller, and connection cables with alligator clips.
2. Prodotto finitoview
2.1 Componenti inclusi
- 1 x 35W Polycrystalline Solar Panel (Model: HY035-12P)
- 1 x 5A PWM Solar Charge Controller (Model: LS0512EU)
- 1 x 15ft Cable with SAE adapter and Alligator Clips
- 1 fusibili da 5 A
- Manuali d'uso
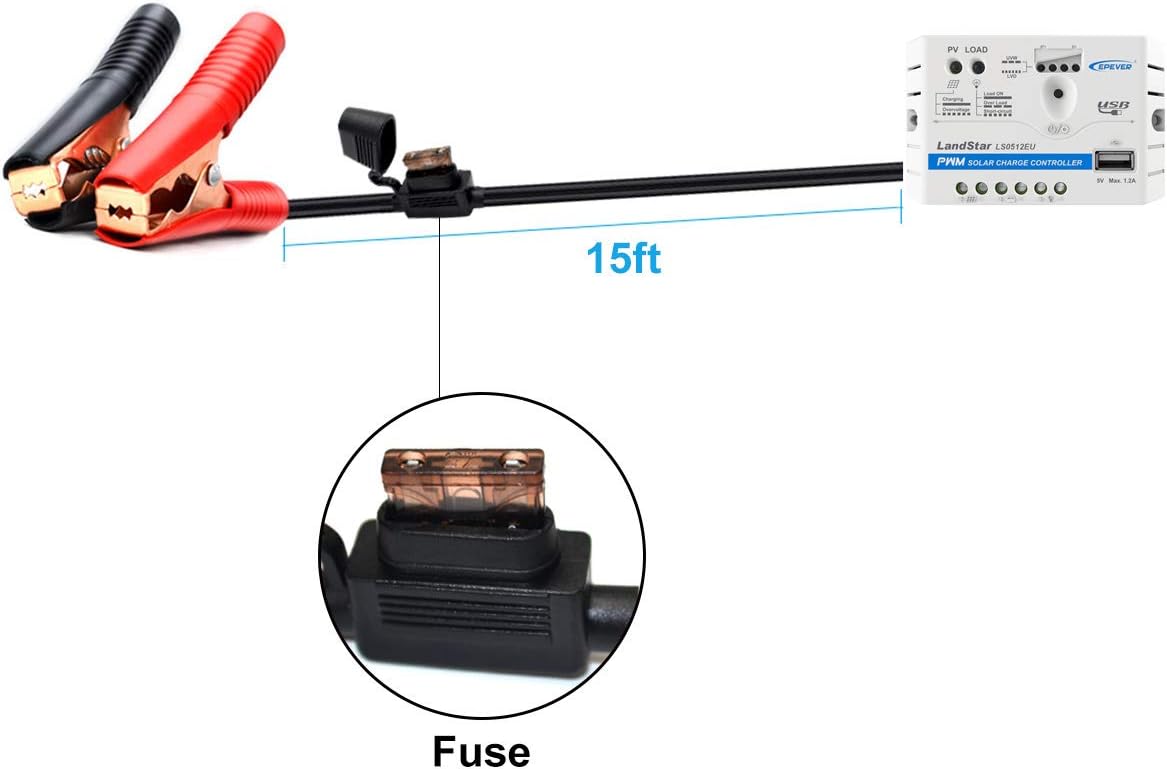
Image 2.1: The 15-foot cable assembly, featuring an inline 5A fuse and alligator clips for secure battery connection.
2.2 Caratteristiche del pannello solare
The 35W polycrystalline solar panel is designed for high conversion efficiency and durability. It features a lightweight anodized aluminum frame and reinforced safety glass, making it suitable for various outdoor conditions.

Image 2.2: Diagram showing the multi-layered construction of the solar panel, highlighting its weather-proof design and high efficiency.

Image 2.3: Visual representation of the solar panel's key attributes, including its polycrystalline cell type, ease of installation, high conversion efficiency, and lightweight anodized aluminum frame.
2.3 Charge Controller Features
The 5A PWM charge controller manages the power flow from the solar panel to the battery, preventing overcharging and ensuring battery protection. It includes a 5V/1.2A USB output for charging small electronic devices.
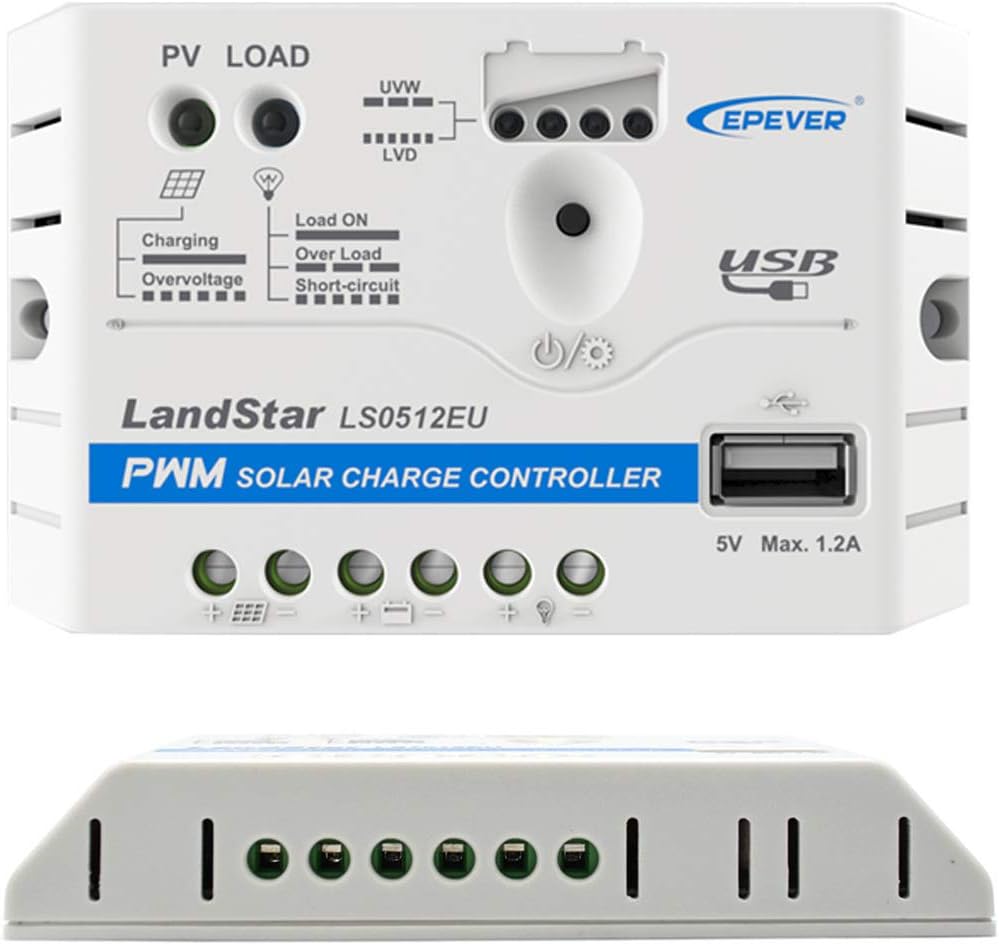
Immagine 2.4: Dettagliata view of the LandStar LS0512EU PWM Solar Charge Controller, showing its input/output terminals, indicator lights, and USB charging port.
3. Configurazione e installazione
3.1 Precauzioni di sicurezza
- Always connect the charge controller to the battery Primo.
- Ensure all connections are secure and correct polarity is observed (positive to positive, negative to negative).
- Avoid touching exposed wires or terminals when the solar panel is exposed to sunlight.
- L'alligatore clamps are designed to prevent voltage and current until a proper battery connection is made, minimizing accidental contact risks.
3.2 Fasi di connessione
- Collegamento alla batteria: Connect the positive (+) and negative (-) terminals of the charge controller to your 12V lead-acid battery (Sealed, Gel, Flooded, or AGM). Use the provided cable with alligator clips.
- Collegamento al pannello solare: Connect the positive (+) and negative (-) terminals of the solar panel to the corresponding solar input terminals on the charge controller.
- Connect to Load (Optional): If you have a 12V DC load (e.g., a light bulb), connect its positive (+) and negative (-) terminals to the load output terminals on the charge controller.
Once all connections are made, the charge controller will automatically begin managing the charging process.

Image 3.1: Diagram illustrating the correct wiring sequence: solar panel connects to the charge controller, which then connects to the battery. Optional load and USB device connections are also shown.
4. Istruzioni per l'uso
4.1 Processo di ricarica
The 5A PWM charge controller automatically regulates the charging of your 12V lead-acid battery. It will stop charging once the battery is full and resume when the voltage drops, ensuring optimal battery health.
4.2 Uscita USB
The charge controller features a 5V/1.2A USB terminal output, allowing you to charge compatible USB-powered devices such as smartphones or tablets directly from the controller.
5. Manutenzione
5.1 Pulizia dei pannelli solari
Regularly clean the surface of the solar panel to remove dust, dirt, leaves, or other debris that may reduce its efficiency. Use a soft cloth and mild, non-abrasive cleaning solution with water. Avoid harsh chemicals or abrasive materials that could scratch the panel surface.
5.2 Controlli di connessione
Periodically inspect all electrical connections for tightness and corrosion. Loose or corroded connections can lead to power loss or system malfunction. Ensure the fuse is intact and functional.
5.3 Stato della batteria
Monitor your battery's condition according to its manufacturer's guidelines. The charge controller helps maintain battery health, but regular checks are recommended, especially for flooded batteries that may require water level maintenance.
6. Risoluzione Dei Problemi
6.1 No Charging Indication
- Controlla la luce solare: Ensure the solar panel is receiving direct, unobstructed sunlight.
- Verifica connessioni: Confirm all connections between the solar panel, charge controller, and battery are secure and correctly polarized.
- Ispezionare il fusibile: Check the inline 5A fuse on the battery cable for continuity. Replace if blown.
- Volume batteriatage: Assicurarsi che la batteria abbia una carica sufficientetage for the controller to recognize it. The controller may not initiate charging if the battery is completely depleted.
6.2 Bassa potenza in uscita
- Pulizia del pannello: Pulire la superficie del pannello solare come descritto nella sezione Manutenzione.
- Ombreggiatura: Even partial shading can significantly reduce solar panel output. Reposition the panel if possible.
- Lunghezza/misura del cavo: While the provided cable is suitable, excessively long or thin cables in other parts of your system can cause voltage goccia.
6.3 USB Device Not Charging
- Livello di carica della batteria: Ensure the battery connected to the controller has sufficient charge.
- USB Cable/Device: Test with a different USB cable or device to rule out issues with the peripheral.
7. Specifiche
7.1 ACOPOWER 35W Polycrystalline Solar Panel (HY035-12P)
| Parametro | Valore |
|---|---|
| Potenza di picco (Pmax) | 35W |
| Peak Circuit voltage (voce) | 22V |
| Potenza massima Voltage(Vmp) | 17.5V |
| Corrente di cortocircuito (Isc) | 2.15A |
| Massima corrente di alimentazione (Imp) | 2.00A |
| Volume massimo del sistematage CC | 1000V |
| Classe di applicazione | Classe A |
| Materiale | Silicio policristallino |

Image 7.1: Detailed dimensions of the 35W solar panel, showing measurements in inches for length, width, and frame thickness.
7.2 5A PWM Charge Controller (LS0512EU)
| Parametro | Valore |
|---|---|
| Volume di lavorotage | 12V |
| Corrente di lavoro | 5A |
| Modalità di lavoro | Ricarica PWM |
| USB Terminal Output | 5V/1.2A |
| Opzioni tipo batteria | Sigillato, Gel, Allagato |
| Caratteristica speciale | Positive Grounding Controller |
8. Garanzia e supporto
8.1 Garanzia del prodotto
- Pannelli solari: 5 years material and workmanship warranty, and 25 years power output warranty.
- Accessories (Charge Controller, Cables, etc.): 1 year material and workmanship warranty.
Conservare la prova d'acquisto per eventuali richieste di garanzia.
8.2 Assistenza clienti
For technical support, troubleshooting assistance, or warranty inquiries, please contact ACOPOWER customer service. Refer to the contact information provided with your product packaging or visit the official ACOPOWER websito per i dettagli di supporto più aggiornati.