Introduzione
This manual provides detailed instructions for the installation, operation, and maintenance of your Pioneer GM-D9705 GM Series 5-Channel Class D Amplifier. The GM-D9705 is a powerful 2,000-watt amplifier designed for automotive audio systems, featuring a robust design and flexible crossover networks for enhanced sound control. It delivers 75 watts x 4 (RMS) for A/B channels and 500 watts (RMS) for the subwoofer output at 2 ohms. For optimal performance and safety, please read this manual thoroughly before use.
Caratteristiche principali
- A/B channels: 75W RMS x 4 @ 4Ω
- A/B channels: 100W RMS x 4 @ 2Ω
- SW channels: 350W RMS x 1 @ 4Ω
- SW channels: 600W RMS x 1 @ 2Ω
- A/B channel frequency response: 10Hz–50kHz
- Variable crossover networks for enhanced audio control.
- Wired bass boost knob (0 to 18 dB).
- Block terminals for secure wiring.
Informazioni sulla sicurezza
Always prioritize safety during installation and operation. Professional installation is highly recommended. Disconnect the vehicle's negative battery terminal before making any electrical connections. Avoid exposing the amplifier to moisture, water, or extreme temperatures. Ensure the amplifier is mounted in a location with adequate ventilation to prevent overheating. Failure to follow these safety guidelines may result in damage to the amplificatore, veicolo o lesioni personali.
Configurazione e installazione
Disimballaggio
Rimuovere con attenzione tutti i componenti dall'imballaggio. Verificare che siano presenti tutti gli articoli inclusi: amplifier unit, wired bass boost remote, and instruction manual.
Montaggio del Amppiù vivace
Selezionare un luogo sicuro e ben ventilato per il montaggio del amplifier, away from direct sunlight, heat sources, and moisture. Ensure adequate airflow around the unit. Use appropriate hardware to secure the amplifier firmly to a stable surface.
Collegamenti elettrici
Before making any connections, disconnect the vehicle's negative battery terminal to prevent electrical shorts. Refer to the wiring diagrams for proper connection of power, ground, remote turn-on, speaker outputs, and RCA inputs. Ensure all connections are secure and insulated.
- Collegamento elettrico: Connect the main power cable (minimum 4-gauge recommended) directly to the positive terminal of the vehicle's battery, with an inline fuse installed within 18 inches of the battery.
- Collegamento a terra: Connect the ground cable (same gauge as power) to a clean, unpainted metal surface of the vehicle chassis, ensuring a solid electrical contact.
- Accensione remota: Connect the remote turn-on wire to the remote output of your head unit.
- Ingresso RCA: Collegare i cavi RCA dalle uscite pre-out dell'unità principale al ampjack di ingresso RCA del convertitore.
- Uscita altoparlante: Collega i tuoi altoparlanti a amplifier's speaker terminals, observing correct polarity. For subwoofer channels, ensure proper impedance matching (2 ohms or 4 ohms).
Istruzioni per l'uso
Accensione iniziale
Dopo aver effettuato e verificato tutti i collegamenti, ricollegare il terminale negativo della batteria del veicolo. Accendere l'unità principale. amplifier should power on, indicated by an illuminated power indicator.
Regolazione del guadagno
Adjust the gain controls on the amplifier to match the output level of your head unit. Start with the gain set to minimum, then slowly increase it until the desired volume is achieved without distortion. Avoid setting the gain too high, as this can lead to clipping and speaker damage.
Impostazioni crossover
Utilize the variable crossover networks (LPF, HPF) to optimize sound reproduction for your specific speaker setup. High-Pass Filter (HPF) is typically used for full-range speakers, and Low-Pass Filter (LPF) for subwoofers. Adjust the frequency and slope settings as needed.
Controllo dell'aumento dei bassi
Use the wired bass boost knob to adjust the low-frequency output (0 to 18 dB) to your preference. Use this feature moderately to avoid distortion.
Manutenzione
The Pioneer GM-D9705 amplifier requires minimal maintenance. Keep the unit clean and free from dust and debris. Ensure proper ventilation to prevent overheating. Periodically check all wiring connections for tightness and corrosion.
Pulizia
Utilizzare un panno morbido e asciutto per pulire il ampl'esterno del filtro. Non utilizzare prodotti chimici aggressivi o detergenti abrasivi.
Risoluzione dei problemi
Nessun potere
- Check the inline fuse on the power cable.
- Verify power and ground connections are secure.
- Ensure the remote turn-on wire is receiving 12V from the head unit.
Nessun suono
- Check all RCA and speaker connections.
- Verify head unit output and amplifier input settings.
- Ensure speakers are properly connected and not damaged.
Suono distorto
- Ridurre il ampimpostazione del guadagno del generatore.
- Check for proper crossover settings.
- Inspect speaker wiring for shorts or incorrect polarity.
Amplifier si surriscalda
- Assicurare una ventilazione adeguata attorno all' amppiù vivace.
- Controllare l'impedenza dell'altoparlante per assicurarsi che corrisponda ampspecifiche di lifier.
- Reduce gain settings if consistently running at maximum output.
Specifiche
| Caratteristica | Valore |
|---|---|
| Modello | GM-D9705 |
| Marca | PIONEER |
| Dimensioni (L x P x A) | 14.9 x 10.7 x 4.4 pollici |
| Produttore | Pioniere |
| Volume massimo di fornituratage | 6.5 Volt |
| Tipo di montaggio | Montaggio in superficie |
| Numero di canali | 5 |
| Potenza massima in uscita | 2000 Watt |
| RMS Output Power (A/B Channels) | 75W x 4 @ 4Ω / 100W x 4 @ 2Ω |
| RMS Output Power (SW Channel) | 350W x 1 @ 4Ω / 600W x 1 @ 2Ω |
| Peso dell'articolo | 10 libbre |
| Conteggio unità | 1.0 Conteggio |
Informazioni sulla garanzia
The Pioneer GM-D9705 amplifier comes with a 1-year manufacturer's warranty. For detailed terms and conditions, please refer to the warranty card included with your product or visit the official Pioneer websito.
Assistenza clienti
For technical assistance, troubleshooting, or warranty claims, please contact Pioneer customer support. You can find contact information on the official Pioneer website or through your authorized dealer. Visit the official Negozio Pioneer per ulteriori informazioni sul prodotto.
Immagini del prodotto

Image showing the Pioneer GM-D9705 5-channel amplifier from the top, alongside its wired remote bass boost knob.

Posteriore view del amplifier, detailing the power input, ground, remote turn-on, and speaker output terminals, along with the fuses.
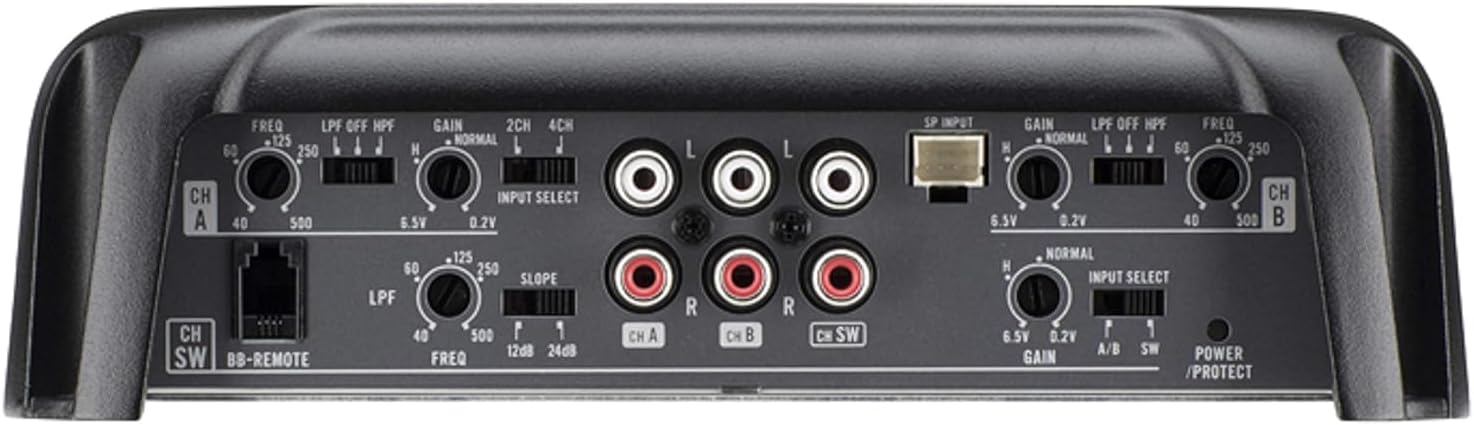
Superiore view del amplifier's control panel, displaying the RCA input jacks, gain adjustments, and crossover frequency knobs for channels A, B, and the subwoofer channel.
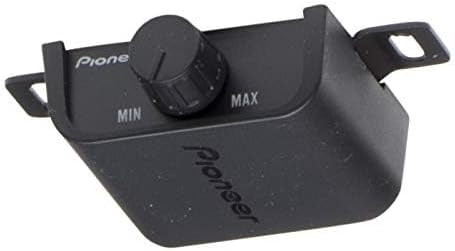
A close-up image of the wired bass boost remote control, featuring a rotary knob for adjusting bass levels from minimum to maximum.
Video del prodotto
No official seller-provided product videos are available for embedding in this manual. For additional product demonstrations or user reviews, please refer to the product page or official brand channels.