1. Introduzione
This manual provides detailed instructions for the installation, operation, and maintenance of your ASRock B365 PRO4 ATX Motherboard. Please read this manual thoroughly before proceeding with installation to ensure correct setup and to prevent damage to the components.
The ASRock B365 PRO4 motherboard supports 9th and 8th Generation Intel Core Processors, offering a robust platform for personal computing. It features a Digi Power Design with an 8 Power Phase Design, ensuring stable power delivery to the CPU.
2. Informazioni sulla sicurezza
- Scollegare sempre l'alimentazione prima di installare o rimuovere qualsiasi componente.
- Indossare un braccialetto antistatico per evitare danni causati dalle scariche elettrostatiche (ESD) ai componenti sensibili.
- Maneggiare la scheda madre tenendola per i bordi per evitare di toccare i componenti sensibili.
- Assicurare una corretta ventilazione all'interno del case del PC per evitare il surriscaldamento.
- Tenere la scheda madre lontana dall'umidità e dalle temperature estreme.
3. Configurazione e installazione
3.1 Contenuto della confezione
Verificare che tutti gli articoli siano presenti nel pacco:
- ASRock B365 PRO4 Motherboard
- Guida di installazione rapida
- CD di supporto
- Schermo I / O
- 2 cavi dati SATA
- 3 viti per prese M.2
- 1 x distanziatore per socket M.2

Image: ASRock B365 PRO4 Motherboard and its included accessories, including the quick installation guide, support CD, I/O shield, SATA cables, and M.2 screws/standoff.
3.2 Layout della scheda madre
Familiarize yourself with the key components and connectors on the motherboard.

Immagine: dall'alto verso il basso view of the ASRock B365 PRO4 Motherboard, highlighting the CPU socket, RAM slots, PCIe slots, and M.2 slots.

Immagine: Angolata view of the ASRock B365 PRO4 Motherboard, showing the heatsinks and various connectors.
3.3 Installazione CPU (LGA1151)
- Aprire la leva del socket della CPU e sollevare la piastra di carico.
- Allineare con attenzione la CPU con il socket, assicurandosi che il triangolo dorato sulla CPU corrisponda al triangolo sul socket.
- Inserire delicatamente la CPU nel socket senza forzarla.
- Chiudere la piastra di carico e fissarla con la leva.
3.4 Installazione della memoria (RAM)
The motherboard features 4 DDR4 DIMM slots, supporting dual-channel memory up to 64GB.
- Aprire le clip su entrambe le estremità dello slot DIMM.
- Allineare la tacca sul modulo RAM con la chiave nello slot DIMM.
- Insert the RAM module firmly until the clips snap into place.
3.5 Installazione del dispositivo di archiviazione
The motherboard supports 6 SATA3 ports and 2 Ultra M.2 ports.
- Unità SATA: Connect SATA data cables to the SATA ports on the motherboard and to your storage devices (HDDs/SSDs). Connect power cables from your power supply to the devices.
- SSD M.2: Locate the M.2 slots. Insert the M.2 SSD into the slot at an angle, then gently push it down and secure it with the provided screw and standoff.
3.6 Installazione della scheda di espansione (PCIe)
The motherboard has 2 PCI-Express 3.0 x16 slots and 2 PCI-Express 3.0 x1 slots.
- Select an appropriate PCIe slot for your expansion card (e.g., graphics card).
- Remove the corresponding metal bracket from your PC case.
- Allineare la scheda allo slot e premere con decisione finché non è posizionata correttamente.
- Fissare la scheda al case del PC con una vite.
3.7 Connecting Peripherals to the I/O Panel
Il pannello I/O posteriore è dotato di varie porte per il collegamento di dispositivi esterni.
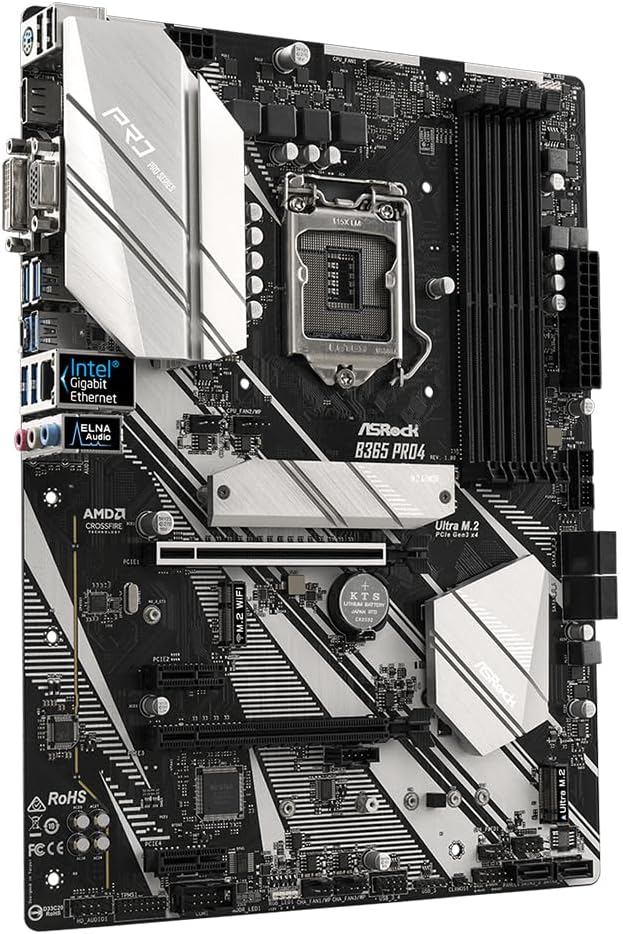
Immagine: Primo piano view of the ASRock B365 PRO4 Motherboard's rear I/O panel, showing ports for PS/2, USB 2.0, USB 3.1 Gen 1, VGA, DVI-D, HDMI, LAN, and audio jacks.
- Porte USB: Connect USB devices (keyboard, mouse, external drives) to the available USB 2.0 (5 ports) and USB 3.1 Gen 1 (8 ports, including 1 Type-C rear) ports.
- Uscite video: Connect your monitor to the VGA, DVI-D, or HDMI port.
- Porta LAN: Collegare un cavo Ethernet per l'accesso alla rete.
- Jack audio: Connect speakers, headphones, or microphones to the audio jacks.
- Porta PS/2: Connect a PS/2 keyboard or mouse.
4. Istruzioni per l'uso
4.1 Primo avvio e configurazione del BIOS
- After assembling all components, connect the power supply and monitor.
- Accendi il tuo sistema. Premi Del or F2 durante l'avvio per accedere all'utilità di configurazione BIOS/UEFI.
- Configure boot order, system time, and other necessary settings. Save changes and exit.
- Installa il sistema operativo da un'unità USB avviabile o da un supporto ottico.
4.2 Installazione del driver
After installing the operating system, install the necessary drivers from the provided Support CD or download the latest versions from the ASRock websito. I fattori chiave includono:
- Driver del chipset
- Driver audio (Realtek ALC892)
- LAN Drivers (Intel I219V Gigabit Ethernet)
- Driver grafici (per grafica integrata o GPU discreta)
5. Manutenzione
- Rimozione della polvere: Regularly clean dust from the motherboard and case fans using compressed air. Ensure the system is powered off and unplugged before cleaning.
- Aggiornamenti del BIOS: Controlla ASRock website periodically for BIOS updates. Updates can improve system stability and compatibility. Follow the instructions carefully when updating the BIOS.
- Gestione dei cavi: Assicurarsi che i cavi siano disposti in modo ordinato per migliorare il flusso d'aria ed evitare interferenze.
6. Risoluzione Dei Problemi
- Nessun potere:
- Check all power connections, including the 24-pin ATX and 8-pin 12V CPU power connectors.
- Assicurarsi che l'interruttore di alimentazione sia in posizione ON.
- Nessuna visualizzazione:
- Verify that the monitor is connected to the correct video output (either integrated graphics or discrete GPU).
- Reinstallare la scheda grafica e i moduli RAM.
- Instabilità/arresti anomali del sistema:
- Controllare che i moduli RAM siano posizionati correttamente.
- Assicurarsi che il dissipatore della CPU sia installato correttamente e che faccia un buon contatto.
- Aggiornare i driver e il BIOS alle versioni più recenti.
- SSD M.2 non rilevato:
- Assicurarsi che l'SSD M.2 sia correttamente inserito e fissato.
- Check BIOS settings to ensure M.2 slots are enabled and configured correctly (SATA vs. PCIe mode).
7. Specifiche
| Caratteristica | Dettaglio |
|---|---|
| Presa CPU | LGA1151 |
| Processori compatibili | 9th/8th Generation Intel Core Processors (up to 95W) |
| Chipset | Intel B365 |
| Memoria | 4 x DDR4 DIMM slots, Dual Channel, Non-ECC, Buffered, Max 64GB (2666/2400/2133 MHz) |
| Slot di espansione | 2 x PCIe 3.0 x16, 2 x PCIe 3.0 x1 |
| Supporto multi-grafica | AMD Quad CrossFireX and CrossFire Technology |
| Magazzinaggio | 6 x SATA3 ports (RAID 0, 1, 5, 10), 2 x Ultra M.2 ports (PCIe Gen3 x4 & SATA3) |
| Audio | Realtek ALC892 7.1-Channel HD Audio |
| Rete locale | Intel I219V Gigabit Ethernet |
| Porte USB | 8 x USB 3.1 Gen1 (1 Type-C rear, 5 rear, 2 via header), 5 x USB 2.0 (2 rear, 3 via header) |
| Uscite video | 1 x VGA, 1 x DVI-D, 1 x HDMI |
| Fattore di forma | ATX (12.0 x 9.0 inch / 30.5 x 22.9 cm) |
8. Garanzia e supporto
8.1 Informazioni sulla garanzia
The ASRock B365 PRO4 Motherboard comes with a Garanzia limitata di 1 anno. This warranty covers defects in materials and workmanship under normal use. For specific terms and conditions, please refer to the warranty card included with your product or visit the official ASRock websito.
Note: Damage caused by improper installation, misuse, unauthorized modifications, or natural disasters is not covered under warranty.
8.2 Supporto tecnico
For technical assistance, driver downloads, BIOS updates, or further troubleshooting, please visit the official ASRock support websito:
Puoi anche contattare direttamente il servizio clienti ASRock tramite il loro websito per supporto personalizzato.