1. Introduzione
This manual provides essential instructions for the safe operation, assembly, maintenance, and troubleshooting of your Evolution Power Tools Rage 5-S Multi-Material Table Saw. Please read this manual thoroughly before initial use to ensure proper function and to prevent injury or damage to the tool.
The Rage 5-S table saw is designed for cutting various materials including steel, aluminum, wood (even with embedded nails), and plastic, utilizing a single 10-inch TCT blade. Its portable design with a folding stand and wheels enhances convenience for transport and storage.

Figure 1.1: Evolution Rage 5-S Multi-Material Table Saw
2. Istruzioni di sicurezza
Dare sempre priorità alla sicurezza quando si utilizzano utensili elettrici. Il mancato rispetto di queste istruzioni può causare gravi lesioni o danni materiali.
- Dispositivi di protezione individuale: Always wear safety glasses, hearing protection, and a dust mask. Use appropriate clothing; avoid loose clothing or jewelry that could get caught in moving parts.
- Area di lavoro: Ensure your work area is clean, well-lit, and free from obstructions. Do not operate the saw in damp o in condizioni di umidità. Tenere lontani bambini e astanti.
- Sicurezza elettrica: Ensure the power supply matches the saw's requirements (120V). Do not use the saw with a damaged cord or plug. Avoid using extension cords unless absolutely necessary, and ensure they are rated for outdoor use and heavy-duty applications.
- Sicurezza della lama: Always ensure the blade is sharp and correctly installed. Never attempt to cut material without the blade guard in place. Disconnect power before changing blades or performing maintenance.
- Movimentazione dei materiali: Securely support all workpieces. Use the push stick for narrow cuts. Never reach over or behind the spinning blade.
- Avvertenza sulla Proposta 65: Questo prodotto potrebbe esporvi a sostanze chimiche che lo Stato della California ritiene possano causare cancro, malformazioni congenite o altri danni riproduttivi. Lavarsi le mani dopo l'uso.
3. Componenti finitiview
The Evolution Rage 5-S table saw includes the following main components:
- Table Saw Unit
- Folding Stand with Wheels
- 10-inch 28T Multi-Material TCT Blade
- Gruppo protezione lama
- Rip Fence with Measuring Rail Guide
- Mitre Gauge
- Spingere il bastone
- Tubo di aspirazione della polvere
- Table Extensions (Left and Right)

Figure 3.1: The Rage 5-S table saw is capable of cutting wood, wood with nails, composite decking, ferrous metals, non-ferrous metals, laminates, and plastics.
4. Installazione e assemblaggio
Assembly is required before first use. Refer to the visual diagrams provided in the original manual for detailed steps. General assembly involves:
- Montaggio dello stand: Unfold the stand and secure its locking mechanisms. The integrated wheels facilitate movement.
- Fissaggio dell'unità sega: Mount the table saw unit securely onto the assembled stand.
- Installazione lama: Ensure the saw is unplugged. Install the 10-inch TCT blade, ensuring it is oriented correctly for cutting.
- Protezione della lama e coltello divisore: Install the blade guard and riving knife assembly. The blade guard is crucial for safety and dust collection.
- Guida parallela e goniometro: Attach the rip fence to the table and ensure it slides smoothly. The miter gauge can be inserted into the table slots.
- Tubo flessibile di aspirazione della polvere: Connect the supplied dust extraction hose to the saw's dust port.
- Estensioni della tabella: Extend the left and right table extensions as needed for larger workpieces.

Figure 4.1: The collapsible frame and wheels allow for easy transport and upright storage of the table saw.
5. Istruzioni per l'uso
5.1 Accensione/Spegnimento
To power on the saw, press the green 'ON' button. To power off, press the red 'OFF' button. Always ensure the saw is off and unplugged before making adjustments or performing maintenance.
5.2 Regolazione dell'altezza della lama
The blade height can be adjusted to suit the thickness of your material or for trench cuts. Use the blade height adjustment wheel located on the front of the saw to raise or lower the blade. Ensure the blade is set to cut approximately 1/8 inch above the workpiece for through cuts.

Figure 5.1: Blade height adjustment mechanism. The saw achieves a 3-1/4 inch depth of cut at 90 degrees.

Figure 5.2: Maximum depth of cut through wood is 3-1/4 inches.
5.3 Bevel and Miter Angle Adjustment
The saw allows for precise angle adjustments for both bevel and miter cuts.
- Regolazione smusso: The blade can be tilted up to 45 degrees for bevel cuts. Use the bevel adjustment lever and scale to set the desired angle. The maximum depth of cut at 45 degrees bevel is 2-1/4 inches.
- Miter Adjustment: The miter gauge allows for angle cuts up to 60 degrees. Adjust the miter gauge to the required angle and secure it before making the cut.

Figure 5.3: Clear and precise angle settings for miter and bevel cutting.
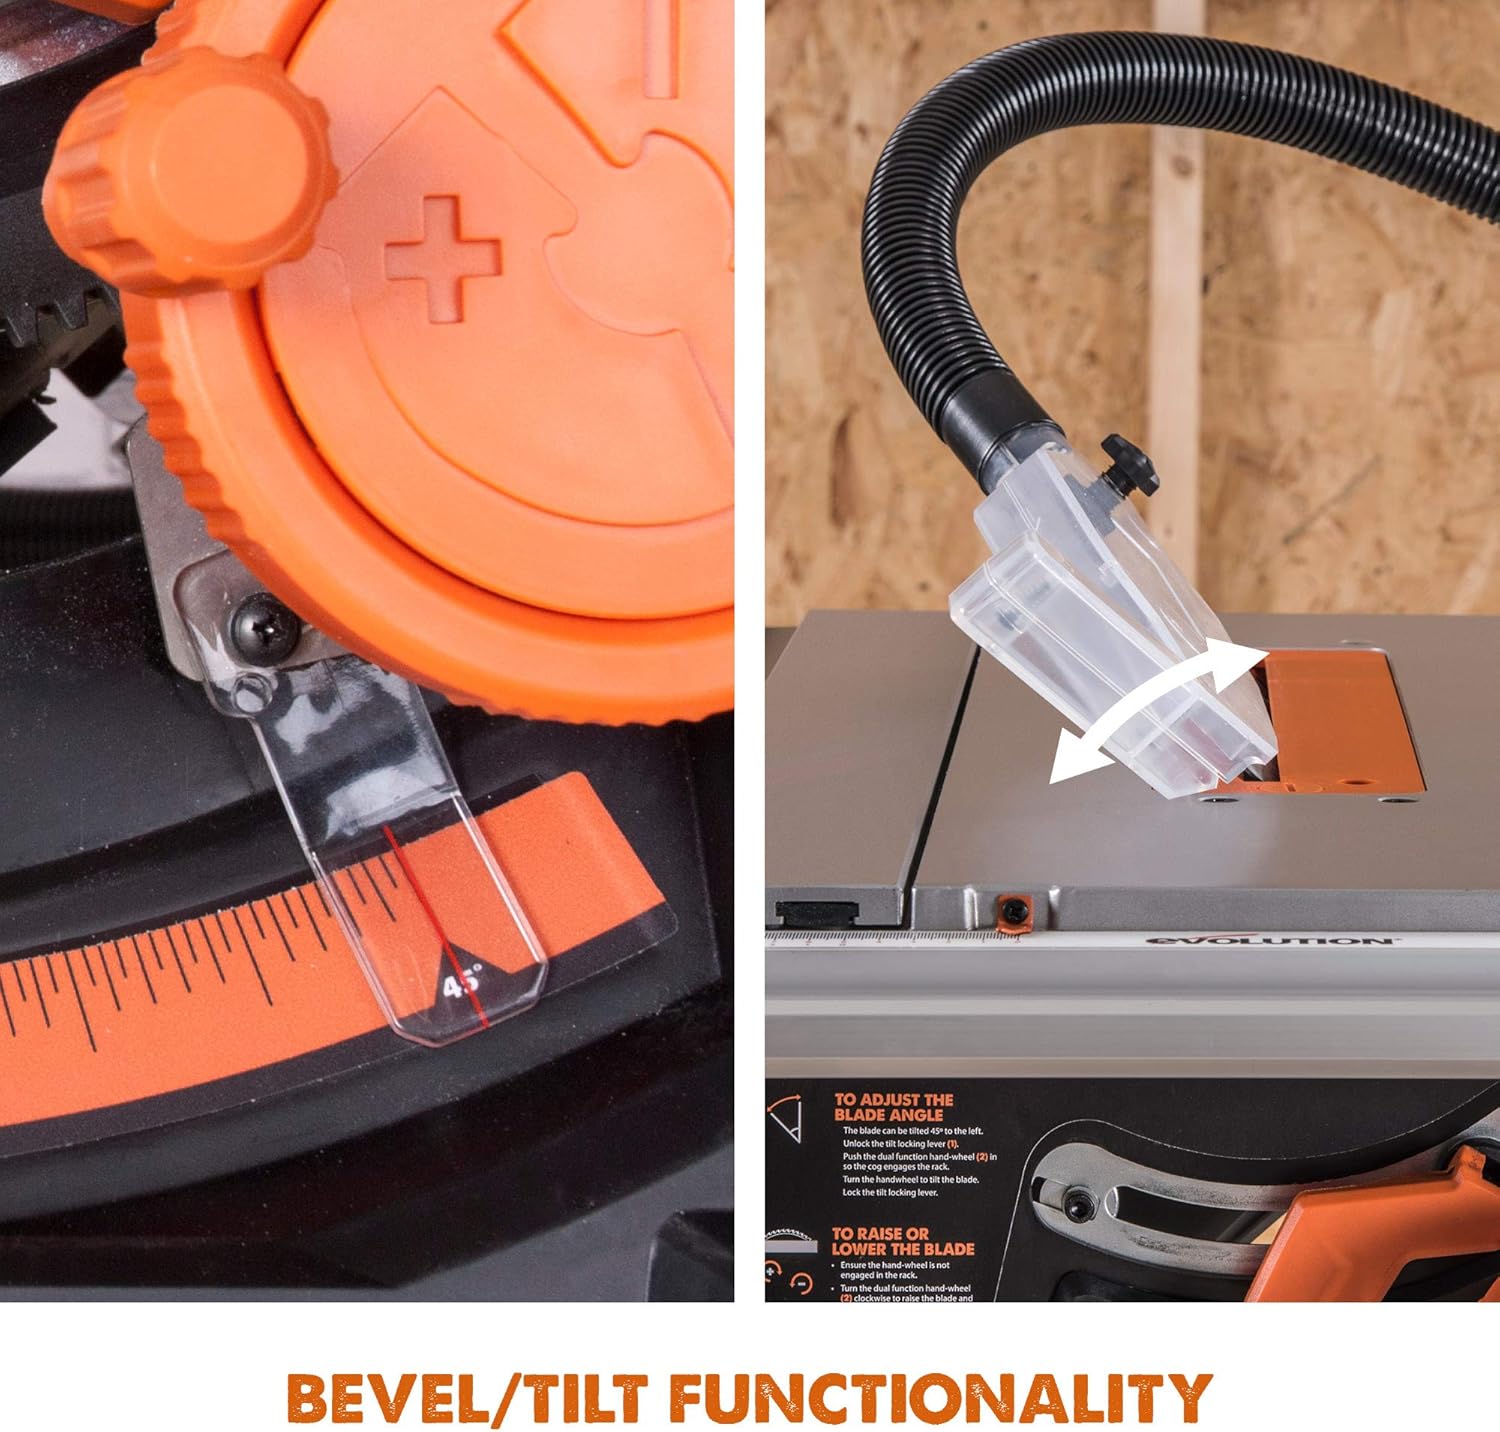
Figure 5.4: Bevel/tilt functionality allows for angled cuts.

Figure 5.5: Accurate cutting from 90 degrees to 45 degrees left bevel.
5.4 Rip Cutting
For rip cuts (cutting along the grain), use the adjustable, full-length parallel fence. Position the fence according to the desired width using the measuring rail guide. Ensure the workpiece is firmly against the fence and use the push stick for the final portion of the cut, especially for narrow pieces. The saw offers a 25-1/2 inch rip capacity to the right of the blade.
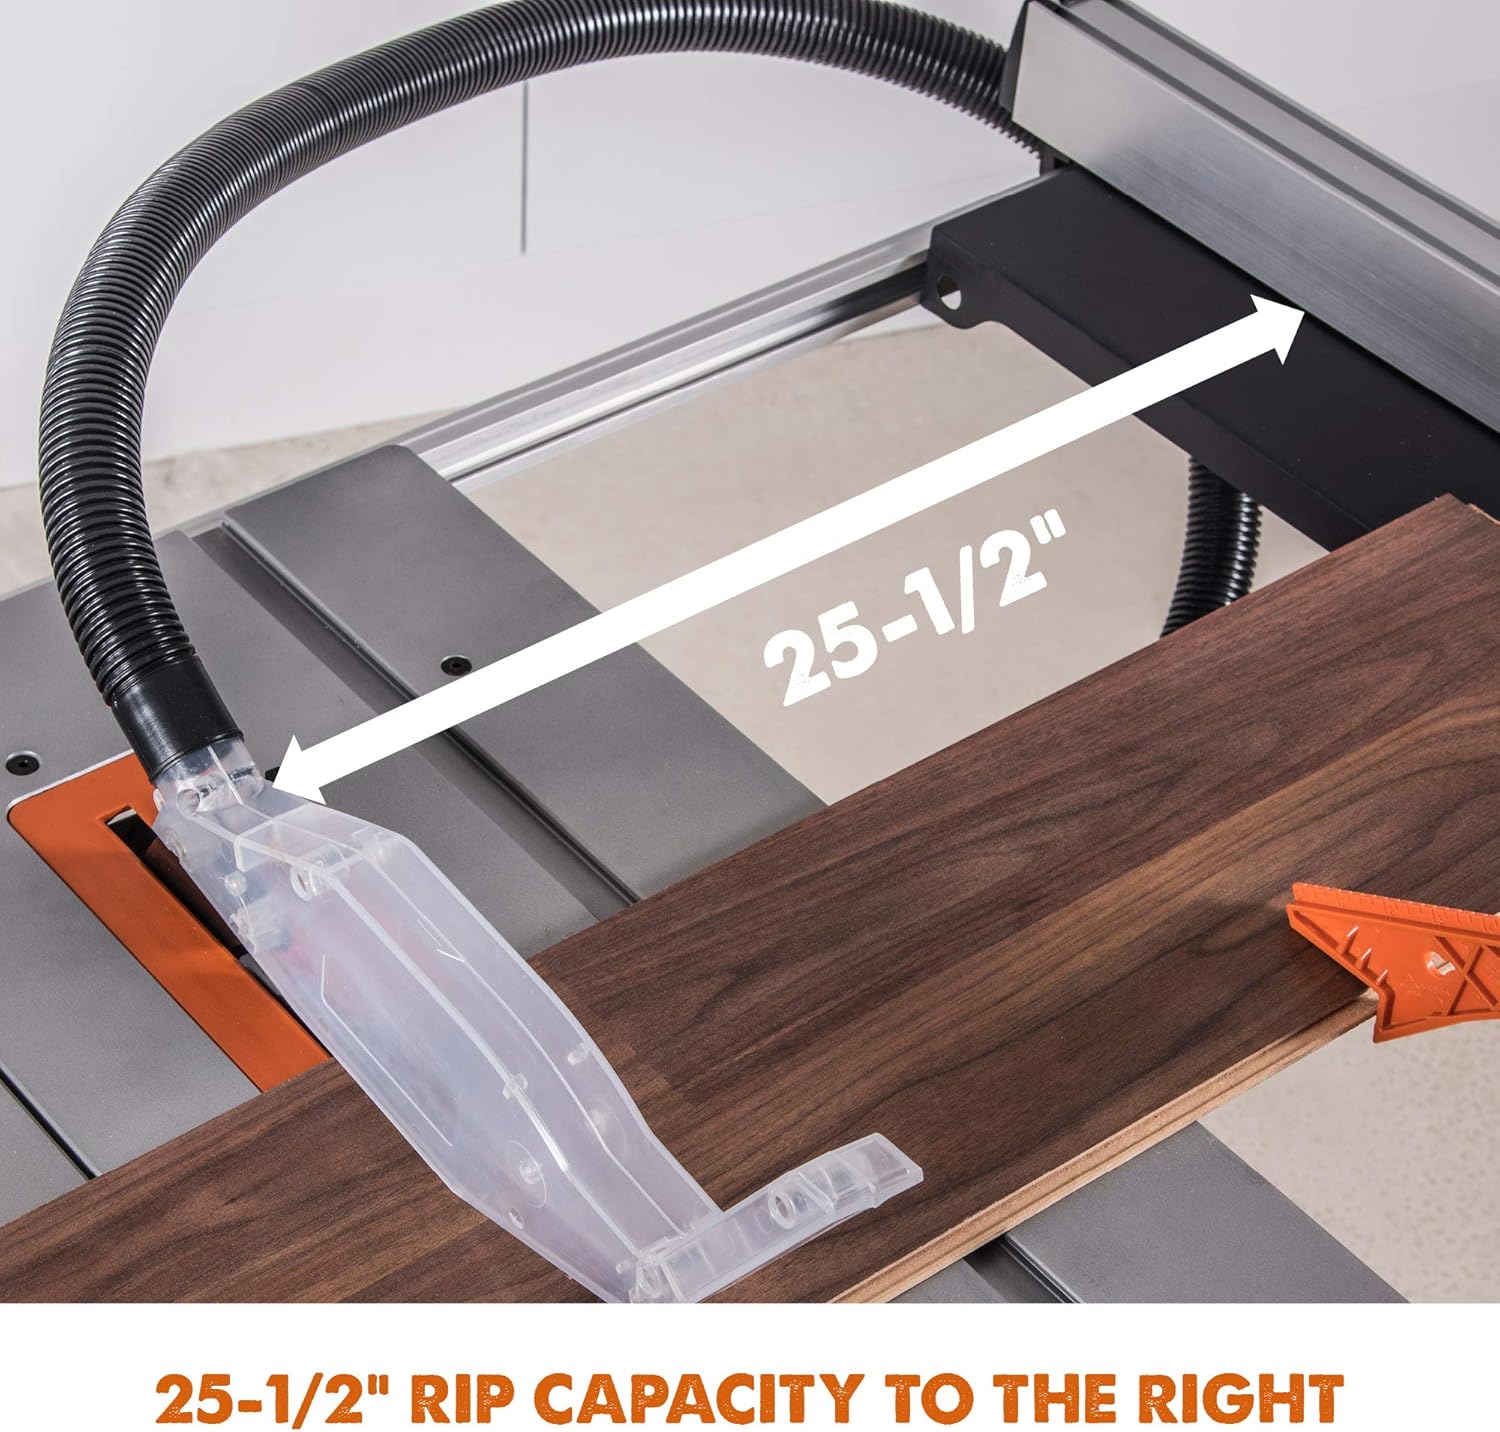
Figure 5.6: The saw provides a 25-1/2 inch rip capacity to the right of the blade.

Figure 5.7: The sliding table and anti-vibration device assist in smooth and stable cuts.
5.5 Cross Cutting
For cross cuts (cutting across the grain), use the miter gauge. Set the miter gauge to the desired angle and slide it in the table slot. Hold the workpiece firmly against the miter gauge and feed it slowly through the blade.
5.6 Aspirazione della polvere
The saw features an effective dust extraction system to maintain a cleaner work environment. Connect the supplied 70-14/16 inch hose to the dust port on the saw and to a suitable dust collector or shop vacuum. This helps reduce airborne dust and keeps the cutting line visible.

Figure 5.8: Effective dust extraction with the supplied hose.
5.7 Table Extensions
The built-in left and right table extensions can be deployed to support larger workpieces, providing a total surface area of 47-1/4 x 25-3/16 inches. Ensure extensions are locked in place before use.

Figure 5.9: Built-in table extensions capable of cutting large sheet material.
6. Manutenzione
Una manutenzione regolare garantisce la longevità e il funzionamento sicuro della sega circolare.
- Pulizia: After each use, disconnect the power and clean the saw table, blade guard, and dust ports. Remove sawdust and debris from the motor ventilation openings.
- Ispezione della lama: Regularly inspect the blade for sharpness, damage, or missing teeth. Replace dull or damaged blades immediately.
- Parti mobili: Check all moving parts for proper function and lubrication. Ensure all fasteners are tight.
- Ispezione del cavo: Controllare che il cavo di alimentazione non presenti segni di danneggiamento. Non utilizzare la sega se il cavo è danneggiato.
7. Risoluzione Dei Problemi
If you encounter issues with your Rage 5-S table saw, refer to the following common problems and solutions:
- La sega non si avvia: Check if the power cord is securely plugged in. Verify the power outlet is functional. Ensure the 'ON' button is fully depressed.
- Poor Cut Quality (Tear-out, Burning): The blade may be dull or dirty. Replace or clean the blade. Ensure the blade is correctly installed and aligned. Reduce feed rate.
- Vibrazione eccessiva: Check if the blade is properly installed and tightened. Ensure the saw is securely mounted to the stand and the stand is stable on a level surface.
- Dust Collection Ineffective: Check for clogs in the dust extraction hose or dust port. Ensure the hose is properly connected to a functioning dust collector.
For issues not resolved by these steps, contact Evolution Power Tools customer support.
8. Specifiche
| Caratteristica | Specificazione |
|---|---|
| Marca | EVOLUZIONE |
| Numero di modello | RAGE5-S |
| Fonte di alimentazione | Elettrico con cavo |
| Voltage | 120 Volt |
| Cosatage | 1800 Watt |
| Velocità | 2500 giri al minuto |
| Diametro lama | 10 pollici (255 mm) |
| Numero di denti | 28T (TCT) |
| Profondità massima di taglio (90°) | 3-1/4 pollici |
| Max Depth of Cut (45° Bevel) | 2-1/4 pollici |
| Max Rip Capacity (Right) | 25-1/2 pollici |
| Table Surface Area (Extended) | 47-1/4 x 25-3/16 pollici |
| Peso dell'articolo | 65 libbre |
| Lunghezza del cavo | 64 pollici |
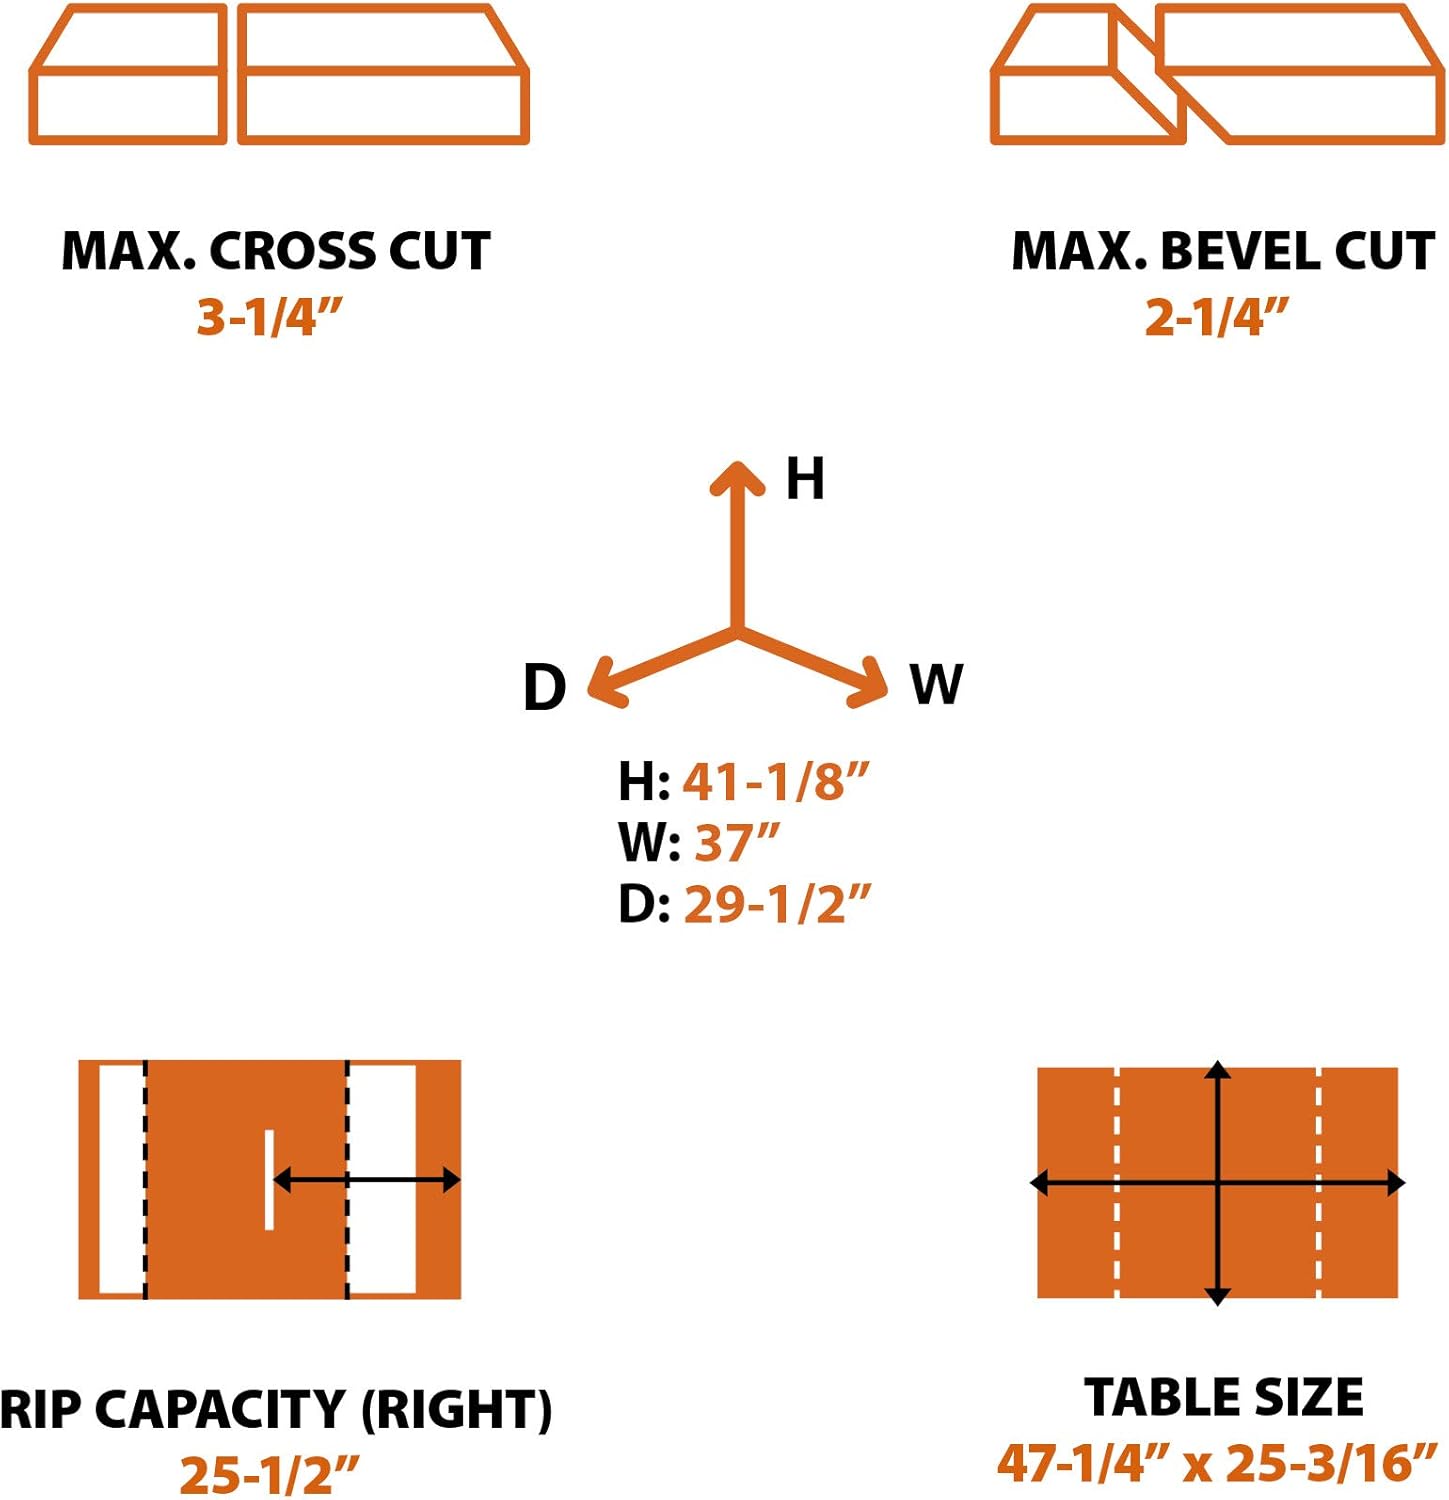
Figure 8.1: Key cutting capacities and dimensions of the Rage 5-S table saw.
9. Garanzia e supporto
The Evolution Power Tools Rage 5-S Table Saw comes with a Garanzia limitata di 3 annoLa presente garanzia copre i difetti di materiali e fabbricazione in condizioni di normale utilizzo. Si prega di conservare la prova d'acquisto per eventuali reclami in garanzia.
For technical assistance, warranty service, or to order replacement parts, please contact Evolution Power Tools customer support. Refer to the official Evolution Power Tools websito per informazioni di contatto aggiornate.