
1. Introduzione
This manual provides detailed instructions for the Jensen PSVCJWM60A Service Pack, designed for use with the JWM60A or JWM62A Wall Mount Stereo systems. This service pack includes essential components to maintain or replace parts of your stereo system, ensuring continued functionality and connectivity.

Figura 1.1: Oltreview of the Jensen JWM60A Service Pack components.
The service pack contains the following key components:
- Cablaggio di alimentazione/altoparlanti: Essential wiring for power supply and speaker connections.
- 3.5mm A/V Cable: Per connessioni di ingresso/uscita audio e video.
- Remote with Battery: A replacement remote control for convenient operation of your stereo.
2. Componenti finitiview
2.1. Cablaggio alimentazione/altoparlante
The power/speaker harness is a critical component for supplying power to your Jensen stereo and connecting it to your speakers. Each wire is color-coded and labeled for correct identification and connection.

Figura 2.1: dettagliata view of the power/speaker harness wires.
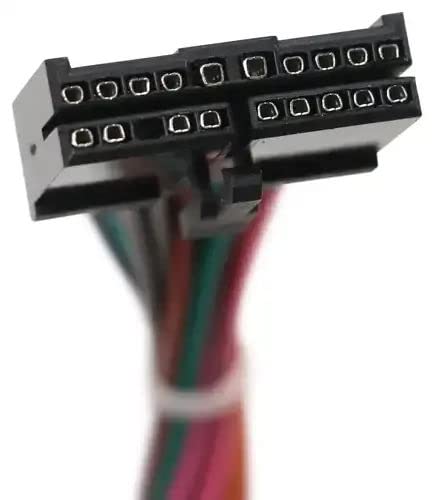
Figure 2.2: The connector plug of the power/speaker harness.
2.2. 3.5mm A/V Cable
This cable facilitates audio and video connections, typically used for auxiliary input or output. It features a 3.5mm jack on one end and standard RCA connectors (red, white, yellow) on the other.
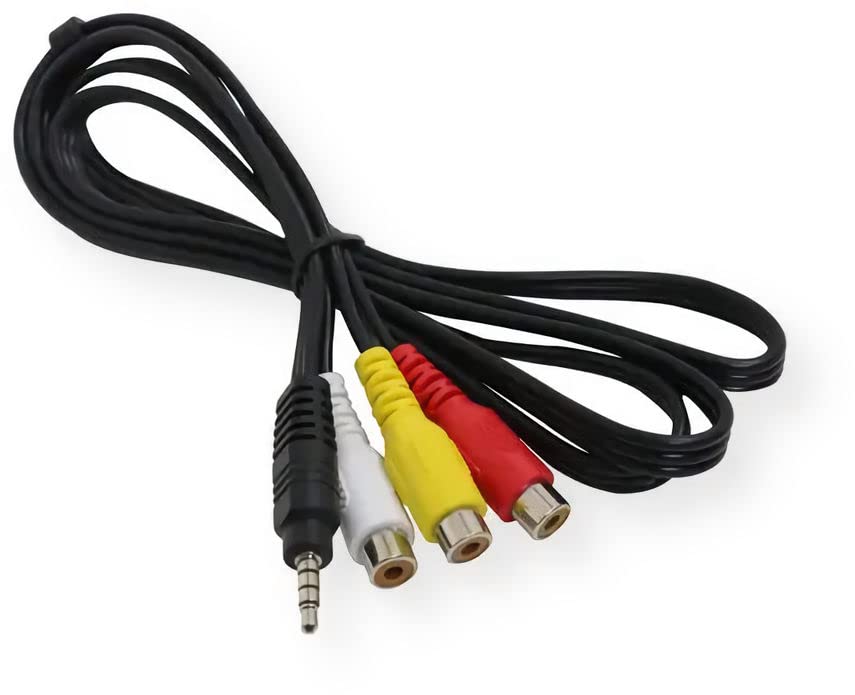
Figure 2.3: The 3.5mm A/V cable.
2.3. Controllo remoto
The remote control allows for convenient wireless operation of your Jensen stereo, providing access to various functions from a distance.
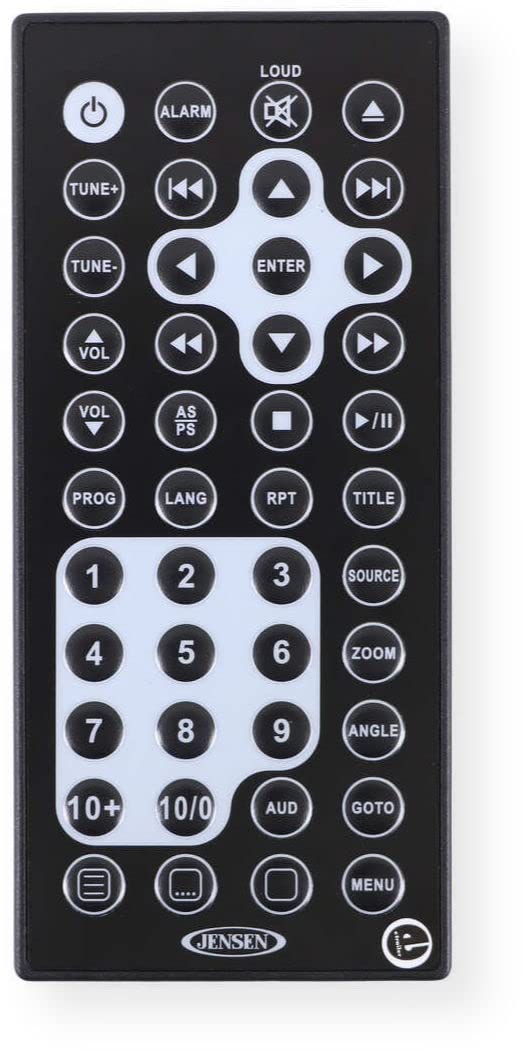
Figura 2.4: Fronte view del telecomando.
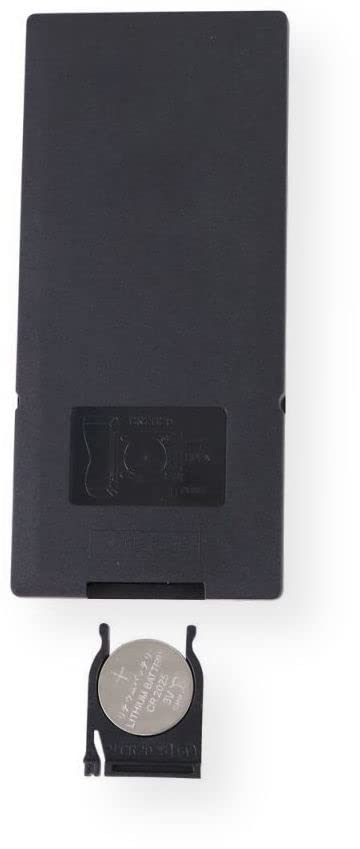
Figura 2.5: Indietro view del telecomando con il vano batterie aperto.
3. Configurazione e installazione
This service pack is intended for replacement or repair of existing Jensen JWM60A or JWM62A Wall Mount Stereo components. Refer to your original stereo's user manual for detailed installation instructions for the main unit.
3.1. Power/Speaker Harness Installation
- Scollegare l'alimentazione: Before beginning any installation, ensure the main power to your stereo system is completely disconnected to prevent electrical shock or damage.
- Identificare le connessioni: Carefully match the wires of the new harness to the corresponding connections on your stereo unit and speakers. Refer to the wiring diagram provided with your original stereo or consult a professional if unsure.
- Connessioni sicure: Assicurarsi che tutti i collegamenti dei cavi siano sicuri e adeguatamente isolati per evitare cortocircuiti.
- Collegare il cablaggio: Plug the harness connector firmly into the designated port on the back of your Jensen stereo.
3.2. 3.5mm A/V Cable Connection
- Identificare le porte: Locate the 3.5mm auxiliary input/output jack and the corresponding RCA input/output ports on your stereo or connected devices.
- Collegare il cavo: Insert the 3.5mm jack into the stereo's auxiliary port and connect the red, white, and yellow RCA plugs to their respective audio (red for right, white for left) and video (yellow) ports on the external device.
3.3. Installazione della batteria del telecomando
The remote control typically comes with a pre-installed battery or a battery included separately. If the remote is not functioning, or if replacing the battery:
- Aprire il vano batteria: On the back of the remote, locate the battery compartment cover. Slide or unclip the cover to open it.
- Inserire la batteria: Insert the provided CR2025 lithium coin cell battery (or equivalent) with the positive (+) side facing upwards, as indicated inside the compartment.
- Chiudi scomparto: Richiudere il coperchio del vano batteria, assicurandosi che scatti saldamente in posizione.
4. Utilizzo del telecomando
The remote control provides full functionality for your Jensen JWM60A or JWM62A stereo. Point the remote directly at the stereo's IR receiver for optimal performance.
- Pulsante di accensione (⏻): Turns the stereo on or off.
- Pulsanti del volume (VOL +/-): Regola il volume di uscita audio.
- Tune/Track Buttons (⏮ / ⏭): Changes radio stations or skips tracks during media playback.
- Play pausa (⏸): Avvia o mette in pausa la riproduzione multimediale.
- Pulsante sorgente: Cycles through available audio/video sources (e.g., Radio, CD, USB, AUX).
- Numeric Keypad (0-9, 10+, 10/0): Per l'inserimento diretto di frequenze radio o numeri di traccia.
- Pulsanti Menu/Configurazione: Accesses system settings and configuration options.
For a comprehensive list of remote functions and their specific uses, refer to the original user manual for your Jensen JWM60A or JWM62A stereo.
5. Manutenzione
Proper maintenance ensures the longevity and optimal performance of your service pack components.
- Pulizia: Use a soft, dry cloth to clean the remote control and cables. Avoid abrasive cleaners or solvents.
- Magazzinaggio: Store components in a cool, dry place away from direct sunlight and extreme temperatures when not in use.
- Sostituzione della batteria: Replace the remote control battery (CR2025) annually or when the remote's range decreases or it stops responding. Dispose of old batteries responsibly.
- Cura del cavo: Avoid bending or crimping cables excessively, as this can damage internal wiring.
6. Risoluzione Dei Problemi
If you encounter issues with your Jensen JWM60A Service Pack, consider the following troubleshooting steps:
| Problema | Possibile causa | Soluzione |
|---|---|---|
| Il telecomando non risponde. | Dead or low battery. Obstruction between remote and stereo. Remote not pointed correctly. | Replace the CR2025 battery. Ensure clear line of sight to the stereo's IR receiver. Point the remote directly at the stereo. |
| No power to stereo after harness replacement. | Incorrect wiring connections. Blown fuse in vehicle/power supply. | Double-check all harness connections against the stereo's wiring diagram. Inspect and replace any blown fuses. |
| No audio/video from A/V cable. | Cable not fully inserted. Incorrect source selected on stereo. Faulty external device. | Ensure the 3.5mm jack and RCA plugs are fully inserted. Select the correct auxiliary or A/V input source on your stereo. Test with another external device. |
If issues persist after attempting these steps, it is recommended to consult a qualified technician or contact Jensen customer support.
7. Specifiche
| Caratteristica | Dettaglio |
|---|---|
| Numero di modello | PSVCJWM60A |
| Compatibilità | Jensen JWM60A, JWM62A Wall Mount Stereo |
| Dimensioni del pacco | 9.25 x 5.75 x 1.22 pollici |
| Peso dell'articolo | 5.29 once |
| Materiale | Copper, PVC or TPE (for cables) |
| Tipo di cavo | Ausiliario |
| Tipo di connettore | 3.5mm Jack (for A/V cable) |
| Tipo di batteria remota | CR2025 (incluso) |
8. Garanzia e supporto
For information regarding product warranty, please refer to the warranty documentation included with your original Jensen stereo system or visit the official Jensen websito. I termini e le condizioni della garanzia possono variare.
For technical support, replacement parts, or further assistance, please contact Jensen customer service. Contact information can typically be found on the manufacturer's websito o nella documentazione originale del prodotto.
Risorse online: Puoi trovare ulteriore supporto e FAQ su Negozio Jensen su Amazon or the official Jensen brand websito.