
1. Introduzione
Thank you for choosing the SEBSON IR_OUT_D Outdoor Motion Detector. This device is designed to provide reliable motion detection for outdoor lighting applications, offering enhanced security and convenience. This manual provides essential information for the safe installation, operation, and maintenance of your motion detector. Please read these instructions carefully before installation and retain them for future reference.
2. Istruzioni di sicurezza
- L'installazione deve essere eseguita da un elettricista qualificato, in conformità con le normative nazionali in materia di cablaggio.
- Prima di procedere all'installazione, alla manutenzione o alla riparazione, assicurarsi che l'alimentazione sia scollegata.
- Do not open or modify the device. Unauthorized modifications may compromise safety and void the warranty.
- This product is designed for outdoor use with an IP65 rating, protecting against dust and water jets. Ensure proper sealing during installation.
- Avoid installing the detector near heat sources, air conditioning units, or objects that may cause rapid temperature changes, as this can lead to false triggers.
- Do not point the sensor directly at sunlight or reflective surfaces.
3. Prodotto finitoview
3.1 Caratteristiche principali
- Integrated infrared sensor for targeted detection of people, large animals, and vehicles.
- IP65 protection rating for outdoor use.
- Ceiling surface mount design.
- Adjustable ambient brightness (LUX) and lighting duration (TIME).
- Wide detection area of 20x4m with a 360° angle.
- Compatibile con LED lamps and other energy-saving bulbs up to 1000W, and incandescent lampfino a 2000 W.
3.2 Componenti del prodotto
The SEBSON IR_OUT_D motion detector consists of a main housing, an infrared sensor dome, and internal wiring terminals. Adjustment dials for TIME and LUX settings are located on the unit.

Immagine 1: Davanti view of the SEBSON IR_OUT_D motion detector, highlighting its 360° detection, IP65 rating, LED compatibility up to 1000W, 10 sec - 30 min time setting, 3-2000 LUX brightness range, and 230V operation.

Immagine 2: The motion detector showing its maximum detection range of 20m and maximum detection height of 4m. The image also indicates the location of the TIME and LUX adjustment dials.
4. Specifiche
| Numero di modello | IR_OUT_D |
| Dimensioni (L x P x A) | Dimensioni: 10.1 x 10.1 x 5.5 cm |
| Peso | 170 grammi |
| Colore | Bianco |
| Materiale | Plastica |
| Tipo di alimentazione | AC |
| Voltage | 230 Volt |
| Carico massimo (incandescente) | 2000 Watt |
| Carico massimo (LED/risparmio energetico) | 1000 Watt |
| Metodo di installazione | Montaggio a soffitto |
| Copertura del rilevamento | max. 20x4m / 360° |
| Altezza di installazione | 4m (min) to 10m (max) |
| Impostazione dell'ora | Da 10 secondi a 30 minuti |
| Brightness Setting (LUX) | 3-2000 LUX |
| Grado di protezione | Grado di protezione IP65 |
| Temperatura di esercizio | Fino a 40°C |

Immagine 3: Technical drawing showing the dimensions of the motion detector: 101mm x 101mm x 55mm.
5. Installazione
5.1 Posizione di montaggio
The motion detector is designed for ceiling surface mounting. Choose a location that provides the desired detection coverage and is free from obstructions. The optimal installation height is between 4 meters and 10 meters to achieve the specified 20x4m detection area.
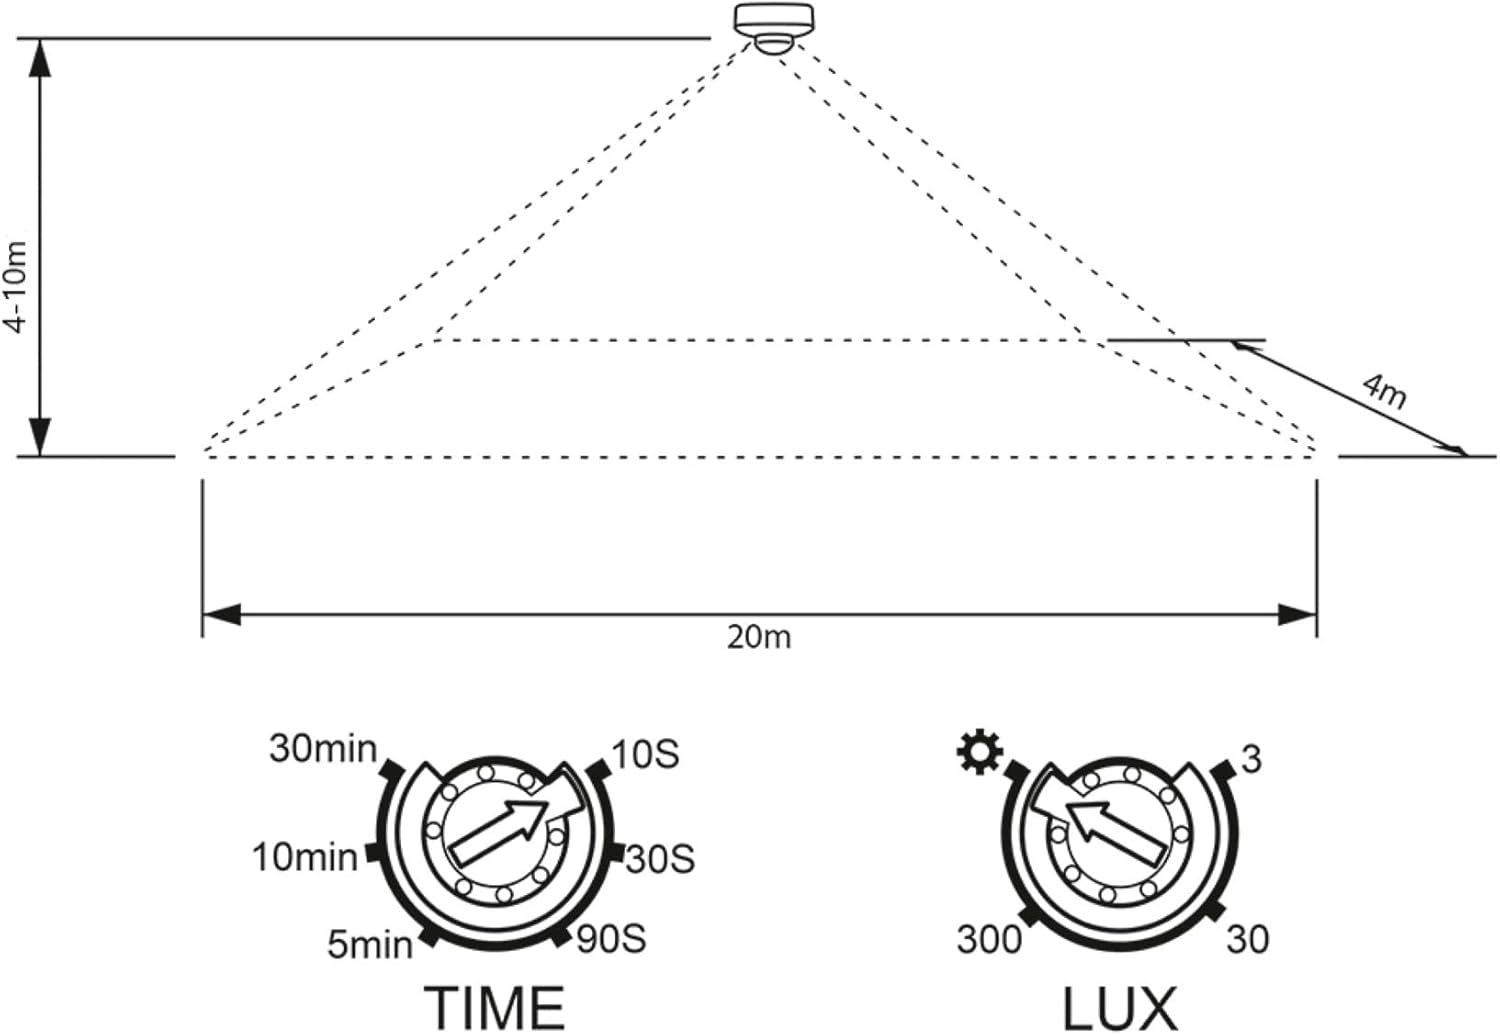
Immagine 4: Diagram showing the recommended installation height of 4-10m and the detection area of 20m width and 4m depth from the sensor.
5.2 Cablaggio
AVVERTIMENTO: Ensure the main power supply is switched off before commencing any wiring work.
- Open the housing of the motion detector carefully.
- Connect the power supply wires to the appropriate terminals as shown in the wiring diagram below.
- Connect the load (e.g., light fixture) wires to the designated output terminals.
- Assicurarsi che tutti i collegamenti siano sicuri e adeguatamente isolati.
- Close the housing, ensuring a tight seal to maintain the IP65 rating.

Immagine 5: Posteriore view of the motion detector, illustrating the wiring terminals for power input and load output. Typically, blue is neutral, brown is live, and red is the switched live to the load.
6. Funzionamento e impostazioni
After successful installation and power-up, the motion detector will enter a warm-up phase for approximately 30-60 seconds. During this time, it may trigger randomly. Once the warm-up is complete, you can adjust the settings using the two dials:
6.1 TIME Setting (Lighting Duration)
IL TEMPO dial controls how long the connected light remains on after motion is detected and no further motion is sensed. You can adjust it from approximately 10 seconds to 30 minutes.
- Turn the dial clockwise for a longer duration.
- Turn the dial counter-clockwise for a shorter duration.
6.2 LUX Setting (Ambient Brightness)
IL LUSSO dial determines the ambient light level at which the detector will activate the connected light. This setting allows the light to only turn on when it's dark enough. The range is from 3 LUX (darkness) to 2000 LUX (daylight).
- Turn the dial towards the simbolo della luna (lower LUX value) for activation only in darker conditions.
- Turn the dial towards the simbolo del sole (higher LUX value) for activation even in brighter conditions (e.g., during the day for testing).
7. Manutenzione
The SEBSON motion detector requires minimal maintenance. To ensure optimal performance:
- Pulire regolarmente la lente del sensore con un panno morbido eamp panno per rimuovere polvere, sporco o ragnowebs that may obstruct detection. Do not use abrasive cleaners.
- Periodically check the mounting and wiring connections for any signs of wear or damage.
- Ensure the area around the sensor remains clear of moving objects (e.g., tree branches) that could cause false triggers.
8. Risoluzione Dei Problemi
| Problema | Possibile causa | Soluzione |
|---|---|---|
| La luce non si accende quando viene rilevato un movimento. |
|
|
| La luce rimane costantemente accesa. |
|
|
| False triggers (light turns on without apparent motion). |
|
|
9. Garanzia e supporto
Information regarding specific warranty terms and customer support contact details was not available in the provided product data. For warranty claims or technical assistance, please refer to the product packaging or contact your retailer or the manufacturer directly via their official websito.
