1. Prodotto finitoview
The Dieffematic KV6 230V Sliding Gate Motor Kit is a professional-grade automation solution designed for sliding gates up to 600 kg. This robust electromechanical motor features all-metal gears for reliable performance and durability. Its die-cast aluminum body with an ABS protective casing ensures solid and secure operation. Key features include an innovative magnetic limit switch system for easy and repeatable positioning, especially beneficial in snowy conditions, and a personalized key release system for manual gate operation during power outages. The control unit, housed in a sealed enclosure, offers automatic course programming, motor torque adjustment, speed reduction, and multiple operating logics, including pedestrian access and safety features like photocell input and surge limiters.
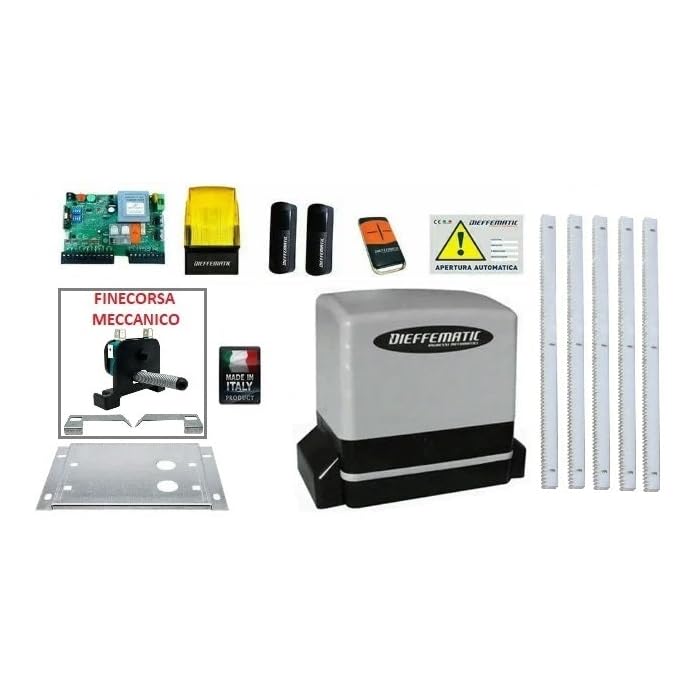
Figure 1: Dieffematic KV6 230V Sliding Gate Motor Kit
2. Componenti del kit
Il kit completo comprende i seguenti componenti:
- 1x Electromechanical Motor (600 kg, 220V power supply, with key release)
- 1x Galvanized Foundation Plate
- 1x Control Unit (integrated into the motor housing, with motor power adjustment trimmers, obstacle detector, opening/closing speed reduction, 4 operating logics: step-by-step, semi-automatic 1 & 2, automatic condominium)
- 1x Single-channel Radio Receiver (integrated into the control unit, 433.9 MHz)
- 1x Integrated Antenna (20-meter range)
- Magnetic Limit Switch System
- Pedestrian input, courtesy light, surge limiters, photocell input, and safety costs.
Video 1: Oltreview of Dieffematic KV6 Kit Components and Basic Motor Functionality.
3. Configurazione e installazione
Proper installation is crucial for the safe and efficient operation of your sliding gate motor. Please follow these steps carefully. It is recommended to consult a qualified technician for electrical connections.
3.1. Installazione della piastra di fondazione
- Preparare la base: Ensure a stable, level concrete base for the motor.
- Position the Foundation Plate: Place the galvanized foundation plate on the prepared base. Mark the drilling points according to the plate's holes.
- Fori di perforazione: Drill holes in the concrete base at the marked positions.
- Fissare la piastra: Insert anchor bolts into the drilled holes and secure the foundation plate firmly.
3.2. Motor Mounting
- Posizionare il motore: Carefully place the motor unit onto the secured foundation plate, aligning the motor's gear with the gate's rack.
- Fissare il motore: Fasten the motor to the foundation plate using the provided bolts, washers, and nuts. Ensure it is securely tightened.
3.3. Installazione del rack
The kit includes 5 meters of galvanized rack. Install the rack segments along the gate, ensuring proper alignment with the motor's gear.
- Align the Rack: Temporarily position the first rack segment, ensuring its teeth mesh correctly with the motor's gear. Maintain a small clearance (approx. 1-2mm) between the rack and the gear to allow for smooth movement.
- Segna e fora: Mark the drilling points on the gate for the rack brackets. Drill holes and attach the rack segments using the provided fasteners.
- Extend the Rack: Continue adding rack segments, ensuring they are perfectly aligned and maintain the correct clearance with the motor gear along the entire length of the gate.
- Secure All Segments: Once all rack segments are in place and aligned, tighten all fasteners securely.
3.4. Collegamenti elettrici
All electrical connections should be performed by a qualified electrician. Refer to the wiring diagram provided in the full manual for detailed instructions.
- Alimentazione elettrica: Connect the 220V power supply to the designated terminals on the control unit. Ensure proper grounding.
- Accessori: Connect any optional accessories such as photocells, keypads, or additional safety devices to their respective terminals on the control unit.
3.5. Magnetic Limit Switch Installation
The magnetic limit switches define the gate's open and closed positions.
- Open Position Limit Switch: Manually move the gate to its fully open position. Install the "open" magnetic limit switch on the rack so that it activates the motor's internal sensor at this position.
- Closed Position Limit Switch: Manually move the gate to its fully closed position. Install the "closed" magnetic limit switch on the rack so that it activates the motor's internal sensor at this position.
- Prova e regola: Run the gate through a full open/close cycle to verify that the limit switches stop the gate at the desired positions. Adjust as necessary.
Video 2: Detailed installation guide for the sliding gate motor, including rack and limit switch setup.
4. Istruzioni per l'uso
The Dieffematic KV6 motor offers various operating modes and features for convenient and safe use.
4.1. Funzionamento del telecomando
- Abbinamento: The radio receiver is integrated into the control unit. Follow the instructions in the full manual to pair your remote controls with the system.
- Aperto chiuso: Premere il pulsante designato sul telecomando per aprire o chiudere il cancello.
- Stop: Press the button again during operation to stop the gate.
4.2. Programmazione automatica
The intelligent control unit features automatic course programming, adjusting motor torque and speed reduction for optimal performance. Refer to the control unit's specific programming guide for detailed setup of operating logics (step-by-step, semi-automatic, automatic condominium).
4.3. Rilascio manuale
In caso di mancanza di correntetage or system malfunction, the gate can be operated manually using the personalized key release system. Insert the key into the lock and turn it to disengage the motor, allowing you to move the gate by hand.
4.4. Caratteristiche di sicurezza
- Rilevamento degli ostacoli: The motor is equipped with an obstacle detector that reverses the gate's movement if an obstruction is encountered during closing.
- Photocell Input: Connect optional photocells to enhance safety, preventing the gate from closing if an object or person is in its path.
- Surge Limiters: Integrated surge limiters protect the system from electrical spikes.
Video 3: Demonstration of remote control operation and safety features like obstacle detection.
5. Manutenzione
Regular maintenance ensures the longevity and optimal performance of your Dieffematic KV6 sliding gate motor.
- Pulizia: Keep the motor unit, rack, and gate tracks clean from debris, leaves, and snow.
- Lubrificazione: Periodically lubricate the gate wheels and hinges as recommended by the gate manufacturer.
- Ispezione: Regularly inspect all components for wear and tear, loose connections, or damage. Pay close attention to the rack, motor gear, and limit switches.
- Dispositivi di sicurezza: Test photocells and obstacle detection features regularly to ensure they are functioning correctly.
- Collegamenti elettrici: Assicurarsi che tutti i collegamenti elettrici siano sicuri e privi di corrosione.
6. Risoluzione Dei Problemi
If you encounter issues with your gate motor, refer to the following common problems and solutions:
| Problema | Possibile causa | Soluzione |
|---|---|---|
| Il motore non risponde al telecomando. |
|
|
| Il cancello si ferma inaspettatamente o inverte la marcia. |
|
|
| Il cancello funziona lentamente o con difficoltà. |
|
|
For more complex issues, please consult the complete product manual or contact customer support.
7. Specifiche
| Caratteristica | Specificazione |
|---|---|
| Modello | KV6 230V |
| Peso massimo del cancello | 600 kg |
| Alimentazione elettrica | 220V |
| Tipo di motore | Electromechanical, irreversible |
| Materiale dell'ingranaggio | Tutto in metallo |
| Materiale del corpo | Die-cast aluminum with ABS casing |
| Tipo di finecorsa | Magnetico |
| Rilascio manuale | Personalized key system |
| Caratteristiche dell'unità di controllo | Automatic course programming, torque adjustment, speed reduction, obstacle detection, 4 operating logics (step-by-step, semi-automatic 1 & 2, automatic condominium), pedestrian input, courtesy light, surge limiters, photocell input. |
| Radio Receiver Frequency | 433.9 MHz |
| Portata dell'antenna | 20 metri |
| Dimensioni (H x L x P) | Dimensioni: 270 x 230 x 210 mm |
| Peso | 8 kg |
8. Informazioni sulla garanzia
This product is covered by a standard manufacturer's warranty against defects in materials and workmanship. Please retain your proof of purchase for warranty claims. The warranty period typically begins from the date of purchase. For specific terms and conditions, refer to the warranty card included with your product or contact Dieffematic customer service.
9. Assistenza clienti
For technical assistance, troubleshooting, or spare parts, please contact Dieffematic customer support. When contacting support, please have your product model number (KV6 230V) and proof of purchase ready.
- Produttore: Dieffematico
- Websito: www.dieffematic.com (Example, attuale website not provided in JSON)
- E-mail: support@dieffematic.com (Example)
- Telefono: +39 0123 456789 (Example)