
1. Introduzione
This manual provides detailed instructions for the installation, operation, and maintenance of your Lorex D841A82B Series 8 Channel 4K HD Digital Video Recorder (DVR). This DVR is designed to provide high-resolution surveillance with advanced features such as 4K recording, person/vehicle detection, and smart home integration. Please read this manual thoroughly before using the product to ensure proper setup and functionality.
2. Contenuto della confezione
Verify that all items listed below are included in your product packaging. If any items are missing or damaged, please contact Lorex customer support.
- Lorex D841A82B Series DVR
- Cavo HDMI
- Adattatore di alimentazione
- Cavo Ethernet
- Mouse USB
- Guida rapida (questo manuale)
3. Prodotto finitoview

Figure 3.1: Front Panel of the Lorex D841A82B DVR. This image displays the front of the DVR unit, featuring the "4K Ultra HD DVR" label, a central circular button, and a USB port for connecting a mouse or other peripherals.

Figure 3.2: Side Panel with Ventilation. This image shows the side of the DVR, highlighting the ventilation grilles designed for heat dissipation, crucial for continuous operation.
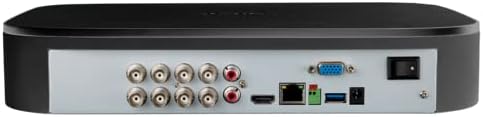
Figura 3.3: Collegamenti del pannello posteriore. This image illustrates the rear panel of the DVR, displaying various input/output ports including BNC connectors for cameras, audio inputs/outputs, HDMI, VGA, Ethernet, USB ports, and the power input with an on/off switch.
4. Caratteristiche principali
- Registrazione 4K Ultra HD: Capable of recording up to 4K (8MP) resolution on all channels, providing detailed video footage.
- Rilevamento avanzato del movimento: Reduces false alarms with intelligent person and vehicle detection, sending push notifications when relevant motion is detected (available on up to 4 channels).
- Compatibilità con la casa intelligente: Integrates with Amazon Alexa and Google Assistant for hands-free voice control, and Chromecast for viewing live or recorded video on your TV.
- Lorex Home Mobile Application: Consente il controllo remoto viewing and control of active deterrence features from a smartphone or tablet.
- Archiviazione locale: Equipped with a pre-installed 2TB security-grade hard drive, ensuring secure local storage without monthly cloud fees. Expandable up to 10TB.
- Ricerca intelligente: Filter motion events to quickly review pippotage.
- Pulsante antipanico: Located on the DVR, activates lights and sirens on connected cameras for immediate response.
- Monitoraggio 24/7: Designed for continuous operation and reliable surveillance.
5. Guida all'installazione
5.1 Connessioni iniziali
- Collega le telecamere: Connect your analog HD security cameras to the BNC video input ports on the rear of the DVR. Ensure connections are secure.
- Connetti al monitor: Use the provided HDMI cable to connect the DVR's HDMI output port to an HDMI input on your TV or monitor. Alternatively, use a VGA cable for VGA monitors.
- Collegare il mouse USB: Collegare il mouse USB in dotazione a una delle porte USB del DVR (anteriore o posteriore).
- Connettiti alla rete (facoltativo ma consigliato): Per telecomando viewing and smart features, connect the DVR to your router using the supplied Ethernet cable.
- Connetti alimentazione: Connect the power adapter to the DVR's power input and then plug it into a power outlet. Turn on the DVR using the power switch on the rear panel.
5.2 Procedura guidata di configurazione iniziale
Upon first power-up, the DVR will guide you through a setup wizard. Follow the on-screen prompts to:
- Crea una password sicura.
- Configurare le impostazioni di data e ora.
- Set up network parameters (if not automatically detected).
- Adjust recording preferences.
It is crucial to complete these steps to ensure your system is secure and functioning correctly.
6. Istruzioni per l'uso
6.1 Vivere View
Dopo la configurazione iniziale, il DVR visualizzerà le immagini in diretta view from all connected cameras on your monitor.
- Telecamera singola View: Fare doppio clic su qualsiasi feed della telecamera per view a schermo intero. Fare doppio clic di nuovo per tornare alla modalità multi-camera view.
- Zoom digitale: A schermo intero view, use the digital zoom function to magnify specific areas of interest.
6.2 Registrazione e riproduzione
The DVR is configured for continuous recording by default. You can adjust recording schedules and motion detection settings via the main menu.
- Accesso alla riproduzione: Fare clic con il tasto destro del mouse sulla diretta view screen and select "Playback" from the menu.
- Search Footage: Use the date and time filters to locate specific recordings. The Smart Search feature allows filtering by motion events.
- Esporta Footage: Connect a USB flash drive to a USB port on the DVR to export selected video clips.
6.3 Lorex Home Mobile Application
Download the Lorex Home app from your smartphone's app store.
- Crea un account e accedi.
- Add your DVR by scanning the QR code displayed on the DVR's monitor (found in the network settings) or by manually entering the device ID.
- Una volta connesso, puoi view live feeds, play back recordings, receive push notifications, and control active deterrence features remotely.
6.4 Integrazione della casa intelligente
The Lorex D841A82B DVR supports integration with Amazon Alexa, Google Assistant, and Chromecast.
- Controllo vocale: Enable the Lorex skill/action in your smart home app (Alexa or Google Home). Use voice commands to view camera feeds on compatible smart displays or TVs (e.g., "Alexa, show me the front door camera").
- Chromecast: Link your Lorex account to Google Home and cast live or recorded video directly to a Chromecast-enabled display.
7. Manutenzione
7.1 Gestione del disco rigido
The DVR's hard drive is designed for continuous operation. When the hard drive is full, the system will automatically overwrite the oldest recordings.
- Eseguire regolarmente il backup dei dati importantitage su un dispositivo di archiviazione esterno.
- Controllare periodicamente lo stato del disco rigido tramite le impostazioni di sistema del DVR per garantire prestazioni ottimali.
7.2 Pulizia
To maintain the DVR's performance and longevity:
- Wipe the exterior of the DVR with a soft, dry cloth.
- Ensure ventilation openings are clear of dust and debris to prevent overheating. Do not use liquid cleaners or aerosol sprays directly on the unit.
7.3 Aggiornamenti firmware
Lorex periodically releases firmware updates to improve performance and add new features. Check the Lorex support website for the latest firmware for your model and follow the provided instructions for updating.
8. Risoluzione Dei Problemi
If you encounter issues with your Lorex D841A82B DVR, refer to the following common troubleshooting steps.
| Problema | Possibile causa | Soluzione |
|---|---|---|
| Nessuna uscita video sul monitor. | Loose HDMI/VGA cable, incorrect monitor input, DVR not powered on. | Check cable connections. Ensure monitor is set to the correct input source. Verify DVR power. |
| Nessuna immagine dalla telecamera. | Loose BNC cable, camera power issue, camera malfunction. | Check BNC connections. Ensure cameras are receiving power. Test camera with another channel or DVR if possible. |
| Cannot connect to Lorex Home app. | No network connection, incorrect device ID, firewall settings. | Verify DVR is connected to the internet. Double-check device ID. Ensure router/firewall allows DVR access. |
| Gli avvisi di rilevamento del movimento sono troppo frequenti o non funzionano. | Sensitivity settings, detection zone configuration. | Adjust motion detection sensitivity and detection zones in the DVR settings. Ensure person/vehicle detection is enabled for relevant channels. |
For further assistance, please contact Lorex customer support.
9. Specifiche
| Caratteristica | Dettaglio |
|---|---|
| Numero di modello | Codice articolo: D841A82B |
| Canali video | 8 canali |
| Risoluzione di registrazione | Up to 4K (8MP) Ultra HD |
| Dimensioni del disco rigido | 2 TB (preinstallato), espandibile fino a 10 TB |
| Tecnologia di connettività | Ethernet, HDMI |
| Dispositivi compatibili | Cameras, Smartphone, Tablet, Television |
| Dimensioni del prodotto | 13.25 x 16 x 5.5 pollici |
| Peso dell'articolo | 6.41 libbre |
10. Fotocamere compatibili
The D841B series DVR is compatible with a wide range of Lorex cameras. Below is a list of compatible camera models:
- LW2287, LW2297, LW4211B
- C841CA, LAB243
- LBV1511, LBV1521B, LBV2521, LBV2531, LBV2561U, LBV2711, LBV2723, LBV4711, LBV8531B, LBV8451XB, LBV8721AB
- LEV2750AB, LEV4712
- LZV2722, LZV2925
- C241XC-E, C241DA-E, C581CB, C581CD, C581DA, C861CF, C861CH, C861XC-E, C881DA, C882DA
11. Supporto e garanzia
For technical support, product registration, and warranty information, please visit the official Lorex website or contact Lorex customer service directly. Keeping your product registered helps ensure you receive timely updates and support.
Lorex Websito: www.lorex.com