
1. Introduzione
Grazie per l'acquistoasing the Nobsound Mini EL34 Tube Integrated Amplifier. This Class A, single-ended Hi-Fi amplifier is designed to deliver warm and rich audio performance. This manual provides essential information for the safe and optimal use of your amplificatore, inclusi installazione, funzionamento, manutenzione e risoluzione dei problemi.
2. Istruzioni di sicurezza
- Alimentazione elettrica: Assicurare il amplifier is connected to a 100V AC power supply. Using an incorrect voltagpotrebbe danneggiare l'unità e invalidare la garanzia.
- Ventilazione: Do not block the ventilation holes on the amplifier. Ensure adequate airflow around the unit to prevent overheating.
- Umidità: Mantieni il amplificatore lontano da acqua, umidità e ambienti ad alta umidità.
- Fonti di calore: Evitare di posizionare il amplificatore vicino a fonti di calore come termosifoni, bocchette di riscaldamento, stufe o altri apparecchi che producono calore.
- Movimentazione dei tubi: Le valvole termoioniche possono raggiungere temperature molto elevate durante il funzionamento. Evitare di toccarle direttamente. Lasciare raffreddare le valvole per un tempo sufficiente prima di maneggiarle o sostituirle.
- Manutenzione: Non tentare di riparare questo prodotto da soli. Affidare tutte le operazioni di manutenzione a personale di assistenza qualificato.
- Pulizia: Scollegare il cavo di alimentazione prima della pulizia. Utilizzare un panno morbido e asciutto. Non utilizzare detergenti liquidi o spray.
3. Contenuto della confezione
Verificare che tutti gli articoli siano presenti nel pacco:
- Nobsound Mini EL34 Tube Integrated Amplificatore (x1)
- Cavo di alimentazione (x1)
- Vacuum Tubes: 5Z2P (x1), EL34 (x2), 6N1 (x1)

Description: This image displays the Nobsound Mini EL34 Tube Integrated Amplifier along with its accessories. The amplifier unit is shown with its dimensions (260W x 230D x 175H mm). Also included are the power cord and the four vacuum tubes (one 5Z2P, two EL34, and one 6N1) that come with the amppiù vivace.
4. Prodotto finitoview
4.1 Pannello frontale
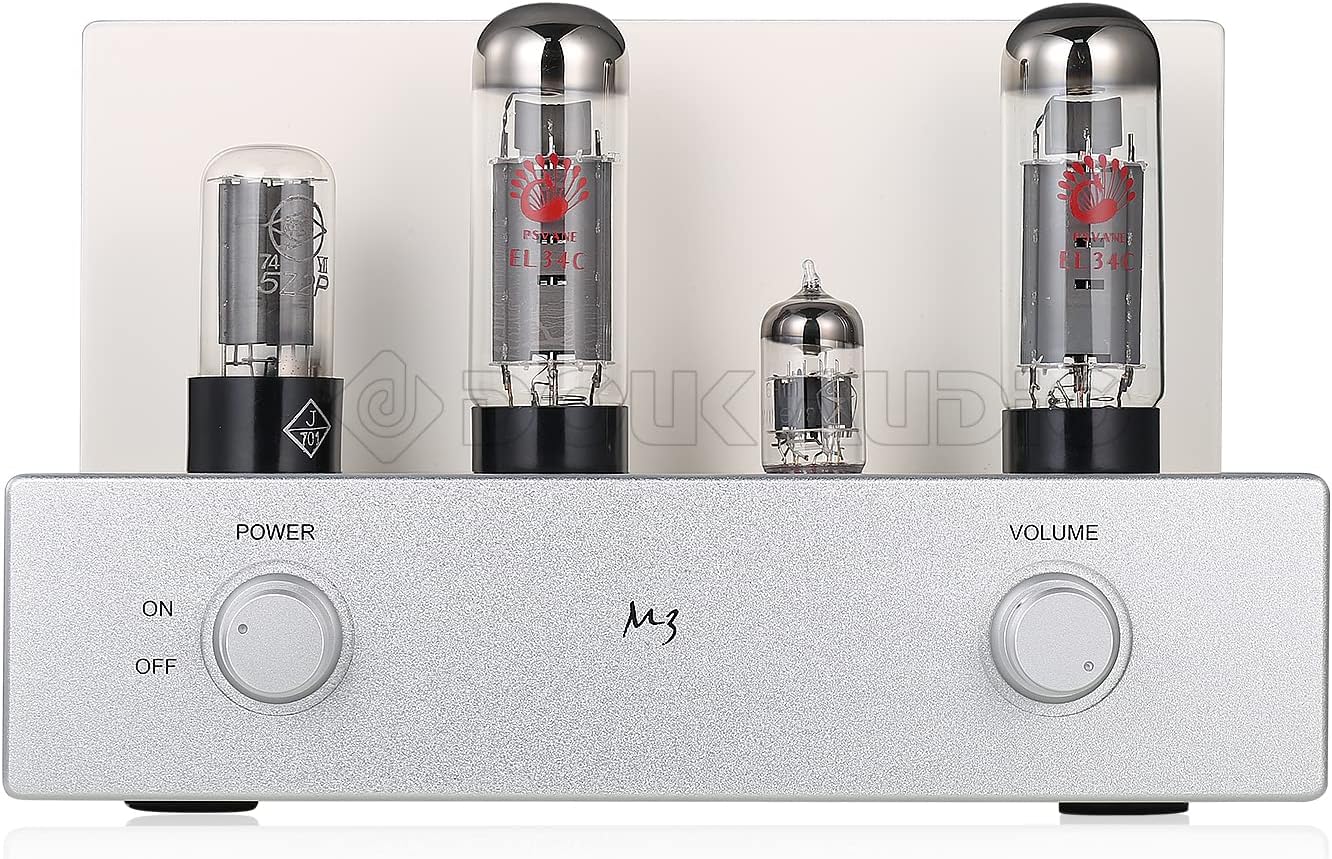
Description: This image shows the front panel of the Nobsound Mini EL34 Tube Integrated Amplifier. On the left, there is a rotary power switch with 'ON' and 'OFF' positions. On the right, a rotary volume control knob is visible. The vacuum tubes are prominently displayed on top of the unit.
- Interruttore di alimentazione: Gira il amplificatore acceso o spento.
- Controllo del volume: Regola il volume di uscita complessivo.
4.2 Pannello posteriore

Description: This image displays the rear panel of the Nobsound Mini EL34 Tube Integrated Amplifier. From left to right, it features two sets of RCA audio inputs labeled 'PC' and 'CD', with a selector switch to choose between them. To the right are the speaker output terminals, supporting both 4Ω and 8Ω impedance connections via banana plugs or bare wire. On the far right is the AC power input socket.
- PC Input (RCA L/R): Audio input for connecting devices like computers.
- CD Input (RCA L/R): Audio input for connecting devices like CD players.
- Selettore di ingresso: Toggles between PC and CD audio inputs.
- Terminali di uscita degli altoparlanti: Connect your passive speakers. Supports 4Ω and 8Ω impedance.
- Potenza in ingresso: Collegare qui il cavo di alimentazione in dotazione.
5. Impostazione
5.1 Installazione del tubo (se non preinstallato)
If the vacuum tubes are not pre-installed, follow these steps:
- Carefully remove the tubes from their packaging.
- Identify the correct sockets for each tube type (5Z2P, EL34, 6N1). Refer to the markings on the amptelaio lifier.
- Align the pins of each tube with the corresponding holes in the socket. Gently push the tube straight down until it is firmly seated. Do not force it.

Description: This image provides a close-up view of the four vacuum tubes used in the Nobsound Mini EL34 Tube Integrated Amplifier. From left to right, they are one 5Z2P rectifier tube, two EL34 power tubes, and one 6N1 pre-amplifier tube.
5.2 Collegamento degli altoparlanti
- Assicurare il amplifier è spento e scollegato dalla presa di corrente.
- Connect your passive speakers to the speaker output terminals on the rear panel.
- Match the speaker impedance (4Ω or 8Ω) to the corresponding terminals on the amppiù vivace.
- Connect the positive (+) terminal of the speaker to the positive (+) terminal of the amplifier, e il terminale negativo (-) dell'altoparlante al terminale negativo (-) del amplifier. Ensure secure connections.
5.3 Collegamento delle sorgenti audio
- Connect your audio source (e.g., CD player, PC, streamer) to either the 'CD' or 'PC' RCA input jacks on the rear panel using appropriate RCA cables.
- Ensure left (L) and right (R) channels are correctly connected.
5.4 Collegamento di alimentazione
- After all audio and speaker connections are made, connect the supplied power cord to the power input socket on the rear panel.
- Collegare l'altra estremità del cavo di alimentazione a una presa di corrente CA da 100 V.
6. Istruzioni per l'uso
- Accensione: Turn the Power Switch on the front panel to the 'ON' position. The tubes will begin to glow, indicating the amplifier is warming up. Allow a few moments for the tubes to stabilize before playing audio.
- Seleziona ingresso: Use the Input Selector Switch on the rear panel to choose between the 'PC' or 'CD' audio input, corresponding to your connected source.
- Regola volume: Start with the Volume Control knob at its minimum setting. Begin playing audio from your source, then slowly turn the Volume Control clockwise to achieve your desired listening level.
- Spegni: Per disattivare il amplifier, turn the Power Switch to the 'OFF' position.
7. Manutenzione
- Pulizia: Pulisci regolarmente il amplifier's exterior with a soft, dry cloth to remove dust. Do not use abrasive cleaners or solvents.
- Sostituzione del tubo: Vacuum tubes have a finite lifespan. If you notice a degradation in sound quality or a tube fails, it may need replacement. Ensure the amplifier is OFF and unplugged, and the tubes have cooled completely before attempting replacement. Gently pull the old tube straight out and insert the new tube, aligning the pins carefully.
- Ventilazione: Ensure the ventilation holes remain unobstructed to prevent overheating.
8. Risoluzione Dei Problemi
| Problema | Possibile causa | Soluzione |
|---|---|---|
| Nessuna uscita audio |
|
|
| Suono distorto |
|
|
| Rumore di ronzio o ronzio |
|
|
9. Specifiche
- Tipo: Tubo a vuoto integrato Amppiù vivace
- Modello: Single-ended Class A
- Canali: 2.0
- Sensibilità di ingresso: 550mV
- Potenza in uscita: 2 × 8W (Ultralinear connection)
- Rapporto segnale/rumore: 85 dB
- Impedenza di ingresso: Potenza assorbita
- Impedenza di uscita: 4Ω, 8Ω
- Alimentazione elettrica: 100 V CA
- Consumo energetico: 76W
- Risposta in frequenza: 30Hz ~ 38KHz
- Tubi a vuoto: 5Z2P (x1), EL34 (x2), 6N1 (x1)
- Ingresso audio: Stereo L/R RCA (CD / AUX, PC)
- Uscita audio: Jack per altoparlanti a banana
- Dimensioni (L×P×A): 260 mm × 230 mm × 175 mm
- Peso: 7.5 kg
10. Garanzia e supporto
Nobsound products are designed for reliability and performance. For warranty information or technical support, please refer to the documentation provided with your purchase or contact your retailer. Keep your purchase receipt as proof of purchase.
For further assistance, you may visit the official Nobsound websito o contattare il loro servizio clienti.