Introduzione
The Perel EDIN305N is a 230V 16A 3600W DIN-rail mount digital weekly timer designed for indoor use. This device allows for precise, programmable control of electrical circuits, enabling automatic switching ON and OFF of connected appliances or lighting systems over a weekly cycle. It features a clear digital display and multiple programming options to suit various scheduling needs.
Precauzioni di sicurezza
AVVERTIMENTO: Electrical installation should only be performed by a qualified electrician. Incorrect wiring can lead to electric shock, fire, or damage to the device and connected equipment. Always disconnect power at the main circuit breaker before installation or maintenance.
- Ensure the power supply matches the device's specifications (230V~50Hz).
- Non superare la capacità di carico massima di 16A / 3600W.
- Questo dispositivo è progettato esclusivamente per uso interno. Evitare l'esposizione a umidità, polvere o temperature estreme.
- Non tentare di aprire o riparare il dispositivo da soli. Per qualsiasi intervento di assistenza, rivolgersi a personale qualificato.
- Tenere fuori dalla portata dei bambini.
Prodotto finitoview
The Perel EDIN305N digital timer consists of a main body with a digital display, control buttons, and terminal blocks for electrical connections. A transparent cover protects the display and buttons.
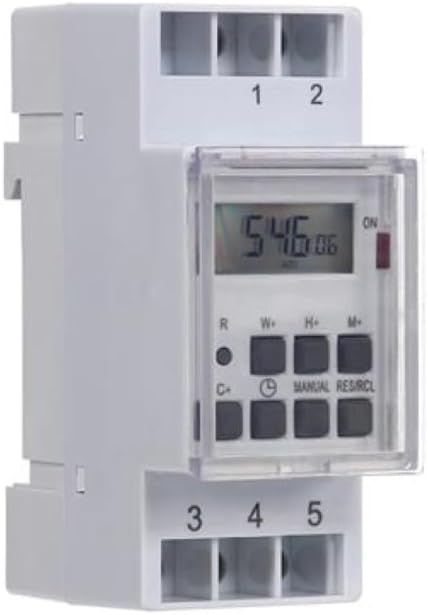
Figura 1: Davanti view of the Perel EDIN305N Digital Weekly Timer. The image displays the LCD screen, control buttons (R, W+, H+, M+, C+, Clock, Manual, RES/RCL), and numbered terminal blocks (1, 2 at the top, 3, 4, 5 at the bottom).
Pulsanti di controllo:
- R: Reset button (recessed).
- W+: Weekday setting.
- H+: Impostazione dell'ora.
- M+: Minute setting.
- C+: Clear program.
- Icona dell'orologio: Used to set current time and day, and to exit programming mode.
- MANUALE: Manual override for ON/AUTO/OFF modes.
- RES/RCL: Reset/Recall program.
Morsettiere:
- 1, 2: Power supply input (N, L).
- 3 aprile, 4 aprile, 5 aprile: Output terminals for controlled circuit (Common, Normally Open, Normally Closed).
Specifiche tecniche
| Parametro | Valore |
|---|---|
| Numero di modello | EDIN305N |
| Voltage | 230V~50Hz |
| Corrente massima | 16A |
| Potenza massima | 3600W |
| Numero di impostazioni | 7 (Programmi ON/OFF) |
| Tipo di montaggio | DIN-Rail |
| Dimensioni (L x P x A) | 2.36 x 3.54 x 1.57 pollici (60 x 90 x 40 mm) |
| Peso | 0.12 kg (4.2 once) |
| Materiale | Plastica |
| Colore | Bianco |
| Batterie richieste | No (internal battery for memory backup) |
Installazione
1. Montaggio
The Perel EDIN305N is designed for DIN-rail mounting. Securely attach the timer to a standard 35mm DIN-rail within an electrical enclosure. Ensure sufficient space for wiring and ventilation.
2. Cablaggio
IMPORTANTE: Ensure power is disconnected at the main circuit breaker before proceeding with wiring. Follow local electrical codes and regulations.
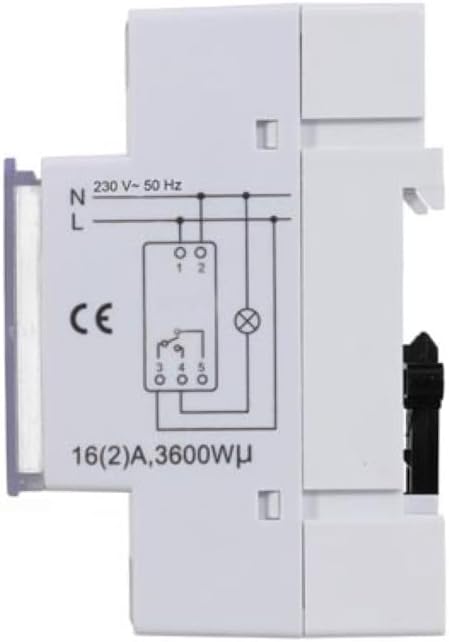
Figura 2: Lato view of the Perel EDIN305N Digital Weekly Timer showing the electrical wiring diagram. It illustrates connections for Neutral (N), Live (L), and the output contacts (1, 2, 3, 4, 5) for controlling a load.
Refer to the wiring diagram (Figure 2) and the terminal block labels on the device:
- Connect the Neutral (N) wire of your 230V AC supply to terminal 1.
- Connect the Live (L) wire of your 230V AC supply to terminal 2.
- For the controlled circuit:
- Terminal 3: Common contact for the relay output.
- Terminal 4: Normally Open (NO) contact. The circuit connected here will be ON when the timer is active.
- Terminal 5: Normally Closed (NC) contact. The circuit connected here will be OFF when the timer is active.
- Connect the load (e.g., light, appliance) between the Live (L) supply and either terminal 4 (for NO operation) or terminal 5 (for NC operation), with terminal 3 connected to the Live (L) supply. Alternatively, connect the load between terminal 4 or 5 and the Neutral (N) supply, with terminal 3 connected to the Live (L) supply. Consult a qualified electrician for specific load wiring configurations.
Configurazione e funzionamento iniziali
1. Accensione e ripristino
After wiring and restoring power, the display will illuminate. If the display is blank or shows erratic characters, press the recessed R (Reset) button using a pointed non-metallic object (e.g., a pen tip). This will clear all settings and restore default values.
2. Impostazione dell'ora e del giorno correnti
- Premere e tenere premuto il tasto Icona dell'orologio pulsante.
- Mentre si tiene premuto il Icona dell'orologio pulsante, premere W+ to set the current day of the week (1=Monday, 7=Sunday).
- Mentre si tiene premuto il Icona dell'orologio pulsante, premere H+ per impostare l'ora corrente (0-23).
- Mentre si tiene premuto il Icona dell'orologio pulsante, premere M+ per impostare i minuti correnti (0-59).
- Rilasciare il Icona dell'orologio pulsante. Ora l'ora e il giorno sono impostati.
3. Programmazione dei cicli di accensione/spegnimento
Il timer supporta fino a 7 programmi di accensione/spegnimento. Ogni programma è composto da un orario di accensione e uno di spegnimento.
- Premere il tasto Icona dell'orologio una volta per entrare in modalità programmazione. Il display mostrerà "1 ON".
- Premere W+ per selezionare il/i giorno/i per questo programma. Puoi scegliere un singolo giorno, un blocco di giorni (ad esempio, da lunedì a venerdì) o tutti i giorni.
- Premere H+ to set the ON hour for program 1.
- Premere M+ to set the ON minute for program 1.
- Premere il tasto Icona dell'orologio nuovamente il pulsante. Il display mostrerà "1 OFF".
- Repeat steps 2-4 to set the OFF day(s), hour, and minute for program 1.
- To set additional programs (2-7), press the Icona dell'orologio button to cycle through "2 ON", "2 OFF", etc., and repeat the setting process.
- Dopo aver impostato tutti i programmi desiderati, premere il tasto MANUALE pulsante per uscire dalla modalità di programmazione e tornare alla visualizzazione dell'ora corrente.
4. Azionamento manuale
Premere il tasto MANUALE ripetutamente il pulsante per scorrere le modalità operative:
- SOPRA: L'uscita è sempre attiva, ignorando tutti i programmi.
- AUTO: Il timer funziona in base ai cicli di accensione/spegnimento programmati.
- OFF: L'uscita è sempre disattivata, ignorando tutti i programmi.
Assicurarsi che il timer sia impostato su AUTO for programmed operation.
5. Clearing Programs
To clear a specific program:
- Enter programming mode by pressing the Icona dell'orologio button until the desired program number (e.g., "3 ON") is displayed.
- Premere il tasto C+ button. This will clear both the ON and OFF times for that specific program.
- Ripetere l'operazione per altri programmi, se necessario.
- Premere MANUALE per uscire dalla modalità di programmazione.
To clear all programs and reset the device, use the recessed R Pulsante (Reset).
Manutenzione
- Pulire il dispositivo con un panno morbido e asciutto. Non utilizzare detergenti abrasivi o solventi.
- Ensure the transparent cover is closed to protect the display and buttons from dust and splashes.
- Regularly check electrical connections for tightness, especially in high-vibration environments.
Risoluzione dei problemi
| Problema | Possibile causa | Soluzione |
|---|---|---|
| Il display è vuoto. | Nessuna alimentazione; batteria interna scarica. | Check power connections (terminals 1 & 2). Ensure main power is ON. If power is present, press the R (Reset) button. The internal battery recharges when connected to power. |
| Il timer non si accende/spegne come programmato. | Incorrect program settings; timer in manual ON/OFF mode. | Verify program settings (time, day, ON/OFF). Ensure the timer is in AUTO modalità premendo il tasto MANUALE pulsante. |
| Connected appliance not receiving power. | Incorrect wiring; appliance fault; timer fault. | Check wiring according to Figure 2. Test the appliance directly. If wiring and appliance are fine, the timer may be faulty. |
| Buttons unresponsive or display erratic. | Software glitch; low internal battery. | Premere il tasto incassato R (Reset) button. Ensure the timer has been connected to power for at least 24 hours to fully charge the internal battery. |
Disposizione
Do not dispose of this product with general household waste. This electronic device contains materials that can be recycled. Please dispose of it at a designated collection point for electrical and electronic equipment waste, in accordance with local regulations.
Garanzia e supporto
Perel products are manufactured to high quality standards. For warranty information, technical support, or service inquiries, please refer to the documentation provided with your purchase or contact your local Perel distributor or retailer. Please have your model number (EDIN305N) and purchase details ready when contacting support.