
1. Introduzione
The EPEVER Tracer 3215BN is a 30A Maximum Power Point Tracking (MPPT) solar charge controller designed for 12V/24V battery systems. It efficiently converts solar energy to charge various battery types, including Sealed, Gel, and Flooded lead-acid batteries. This controller features an integrated LCD display for system monitoring and configuration, along with advanced protection functions to ensure system reliability.
2. Caratteristiche del prodotto
- Tecnologia MPPT avanzata: Ensures maximum power point tracking with an efficiency of no less than 99.5%, optimizing solar energy harvesting.
- Alta efficienza di conversione: Achieves a maximum conversion efficiency of 98%.
- Velocità di tracciamento rapida: Ultra-fast tracking and accurate recognition of multiple power points.
- Design robusto: Features a common negative design and die-cast aluminum construction for effective heat dissipation.
- Protezione completa: Includes all-round electronic fault self-test and enhanced electronic protection functions to prevent system damage.
- Interfaccia di comunicazione: Equipped with an RS-485 communication bus interface and Modbus communication protocol for expanded applications and monitoring via PC or external display units like MT52.
- Software Upgrade Support: Allows for future software enhancements.
- Indicatori di facile utilizzo: LED indicators provide clear system status.
- Flexible Load Control: Offers multiple load control modes including manual control, light ON/OFF, light On+Timer, and time control.
- Compatibilità della batteria: Supports Sealed, Gel, Flooded, and User-defined battery types.
- Compensazione della temperatura: Includes a battery temperature compensation function.
- Statistiche energetiche: Provides real-time energy statistics.
3. Configurazione e installazione
Proper installation is crucial for the safe and efficient operation of your EPEVER Tracer 3215BN controller. Follow these steps carefully.
3.1 Identificazione dei componenti

This image illustrates the various components and ports of the Tracer 3215BN controller, including the Heat Sink, RTS Port, Charging LED indicator, Solar Terminal, Battery LED indicator, Button, RS-485 Port, Battery Terminal, and Load Terminal.
3.2 Schema elettrico
Connect the components in the specified order to prevent damage to the controller and other system components.

This diagram shows the connection sequence: Solar Panel (PV) to the controller, controller to Battery, and controller to Load (e.g., lights, fan, TV, computer via inverter). Ensure correct polarity for all connections.
- Collegare la batteria: First, connect the battery to the controller's battery terminals. Ensure correct polarity (+ to + and - to -). The controller requires battery power to operate.
- Collegare i pannelli solari: Next, connect the solar panels to the controller's PV terminals. Verify correct polarity.
- Collegare il carico: Finally, connect your DC loads to the controller's load terminals. If using AC loads, connect them through an inverter, which is then connected to the battery.
Nota importante sulla sicurezza: Always disconnect power from solar panels and battery before making or breaking any connections to the controller. Ensure all connections are tight to prevent loose contacts and overheating.
3.3 Porte di comunicazione

This image highlights the RTS (Remote Temperature Sensor) Port and the RS-485 Port, used for external temperature sensing and communication respectively.
- Porta RTS: Connect the optional Remote Temperature Sensor (RTS) here for accurate battery temperature compensation.
- Porta RS-485: Use this port for connecting to a PC, MT52 remote meter, or other monitoring devices via Modbus protocol.
4. Istruzioni per l'uso
Once installed, the controller will automatically begin charging the battery from the solar panels. The LCD display provides real-time information about the system status.
Display LCD e pulsanti 4.1
The integrated LCD display shows various parameters such as battery voltage, charging current, load status, and error codes. Use the buttons adjacent to the display to navigate through menus and adjust settings.
4.2 Modalità di controllo del carico
The controller offers several load control modes:
- Controllo manuale: Accendere o spegnere manualmente il carico.
- Luce accesa/spenta: Il carico si accende al tramonto e si spegne all'alba.
- Accensione luce+Timer: Il carico si accende al tramonto e rimane acceso per un periodo di tempo impostato.
- Controllo del tempo: Load operates during specific programmed times.
4.3 Remote Monitoring and Settings
The Tracer 3215BN supports remote monitoring and parameter adjustment through various accessories.
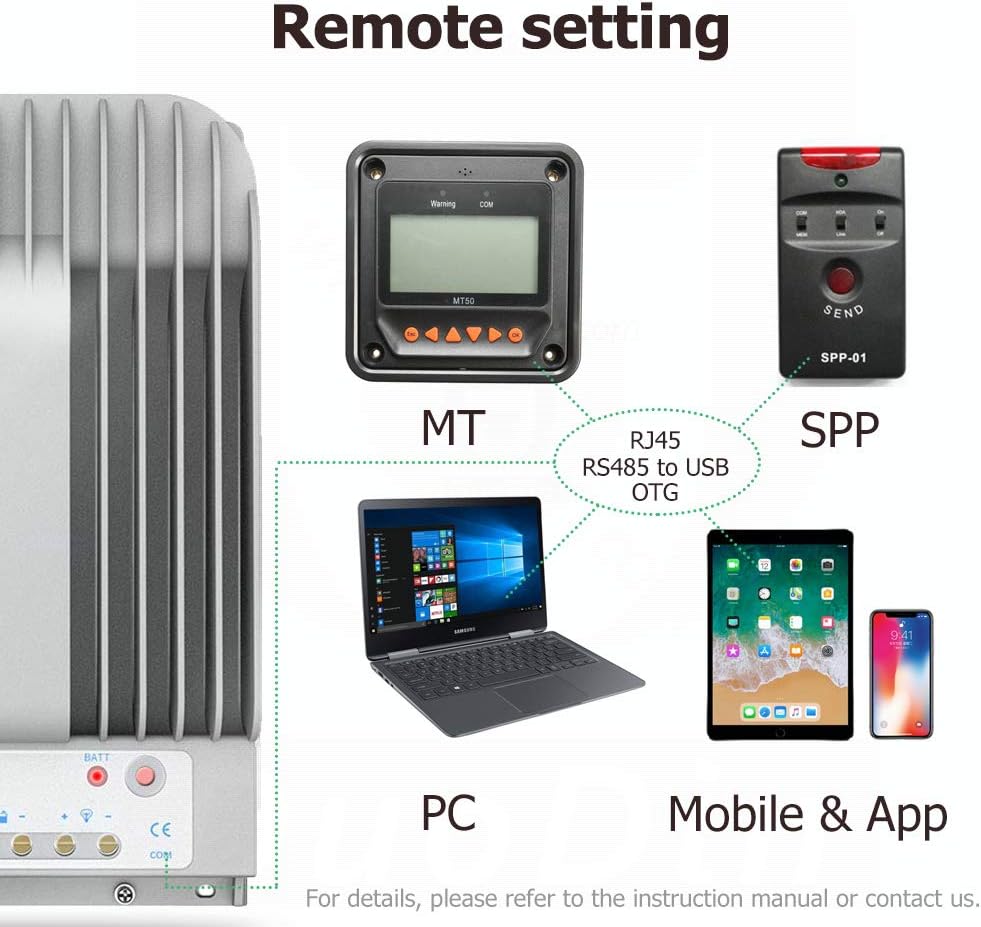
This image illustrates how the controller can be connected to an MT (remote meter), SPP (wireless module), PC, or mobile application for remote monitoring and configuration.
- MT Remote Meter: Connect an EPEVER MT series remote meter (e.g., MT52) to view real-time data and modify parameters from a distance.
- Software per PC: Use EPEVER PC software by connecting the controller via an RS-485 to USB adapter for detailed monitoring, data logging, and advanced settings.
- Applicazione mobile: Connect a compatible wireless module (e.g., Bluetooth or WiFi) to use the EPEVER mobile application for convenient monitoring and control via smartphone or tablet.
5. Manutenzione
Una manutenzione regolare garantisce la longevità e le prestazioni ottimali del regolatore di carica solare.
- Ispezionare le connessioni: Controllare periodicamente tutti i collegamenti elettrici per verificarne la tenuta e la corrosione. I collegamenti allentati possono causare voltagcadute e surriscaldamento.
- Pulisci il controller: Keep the controller clean and free from dust and debris. Ensure the heat sink fins are not obstructed to allow for proper heat dissipation.
- Controlla lo stato della batteria: Monitorare il voltage and health regularly. Ensure the battery type setting in the controller matches your installed battery.
- Condizioni ambientali: Assicurarsi che il controller sia installato in un luogo asciutto e ben ventilato, lontano dalla luce solare diretta e da temperature estreme.
6. Risoluzione Dei Problemi
This section addresses common issues you might encounter with your Tracer 3215BN controller.
6.1 Controller Not Powering On
- Controllare la connessione della batteria: The controller requires a minimum battery voltage to power on. Ensure the battery is properly connected and has sufficient charge. If the battery is completely discharged, the controller may not power on until an external 12V source or sufficient solar input is provided to raise the battery voltage.
- Verificare la polarità: Confirm that the battery connections are made with correct polarity.
- Inspect Fuses/Breakers: Check any inline fuses or circuit breakers between the battery and the controller.
6.2 No Charging Indication
- Controllare il collegamento del pannello solare: Ensure solar panels are correctly connected to the PV terminals with proper polarity.
- Verify Solar Input Voltage: Misurare il vol. a circuito apertotage of your solar panels to ensure it is within the controller's acceptable range (Max 150V).
- Condizioni di luce solare: Ensure there is adequate sunlight reaching the solar panels.
6.3 Load Not Working
- Controllare la connessione del carico: Verify that the load is correctly connected to the load terminals.
- Modalità di controllo del carico: Ensure the load control mode is set appropriately (e.g., manual ON, or correct timer settings).
- Volume batteriatage: Se la batteria voltage is too low, the controller may disconnect the load to protect the battery.
- Protezione da sovraccarico: Check if the load current exceeds the controller's rated load current, triggering overload protection.
7. Specifiche
Key technical specifications for the EPEVER Tracer 3215BN MPPT Solar Charge Controller:
| Parametro | Valore |
|---|---|
| Modello | Tracciante3215BN |
| Vol. nominale sistematage | 12V / 24V Auto Work |
| Corrente di carica nominale | 30A |
| Corrente di carico nominale | 30A |
| Massimo Circuito aperto fotovoltaico voltage | 150 V (alla temperatura minima dell'ambiente operativo) 138V (a 25°C di temperatura ambiente) |
| Potenza massima in ingresso FV | 390 W (12 V) / 780 W (24 V) |
| Volume MPPtage Gamma | Volume della batteriatage +2V ~ 108V |
| Tipo di batteria | Sealed, Gel, Flooded, User |
| Efficienza di conversione | ≤98% |
| Efficienza di tracciamento | ≥99.5% |
| Comunicazione | RS-485 (RJ45 interface) |
| Intervallo di temperatura di esercizio | da -35°C a +55°C |
| Intervallo di temperatura di conservazione | da -35°C a +80°C |
| Dimensioni (L x P x A) | Dimensioni: 281 mm x 160 mm x 60 mm |

This table provides a comparison of key specifications between the Tracer-AN and Tracer-BN series, highlighting the superior heat dissipation and voltage ranges of the BN series.

This image details the physical dimensions of the Tracer 3215BN controller.
8. Informazioni sulla garanzia
Warranty terms and conditions for EPEVER products can vary. It is recommended to confirm the specific warranty period and coverage directly with your seller (SolaMr) or the manufacturer (EPEVER) at the time of purchase. Keep your proof of purchase for any warranty claims.
9. Supporto
For technical assistance, troubleshooting beyond this manual, or inquiries regarding product functionality, please contact the following:
- Supporto al venditore: Contact SolaMr for assistance related to your purchase.
- Supporto del produttore: Visit the official EPEVER website for product documentation, FAQs, and contact information for direct manufacturer support.