1. Introduzione
This manual provides detailed instructions for the installation, operation, and maintenance of your POPP THC15A Digital Programmable Weekly Timer Switch. This device is designed to automatically control the power supply to electrical appliances based on programmed schedules, offering convenience and energy efficiency. Please read this manual thoroughly before use to ensure proper function and safety.
2. Informazioni sulla sicurezza
Per evitare lesioni o danni al dispositivo, osservare sempre le seguenti precauzioni di sicurezza:
- L'installazione deve essere eseguita solo da un elettricista qualificato.
- Assicurarsi che l'alimentazione sia scollegata prima dell'installazione o della manutenzione.
- Non superare il carico massimo nominale di 16 A / 3500 W.
- Non esporre il dispositivo a umidità o temperature estreme.
- Questo dispositivo è destinato esclusivamente all'uso in ambienti interni.
3. Prodotto finitoview
3.1 Caratteristiche
- Advanced pre-setting one week before.
- Digital electronic timer switch with daily and weekly programs.
- Repeat programs with up to 17 ON/OFF settings.
- Funzione di override manuale.
- Lithium battery power reserve for memory backup during power outages.
- Ideal for household use on DB panels, rated for 3500W/16A.
- Programmabile 24 ore su 24, 7 giorni su 7.
- Automatic time error correction of +/- 30 seconds weekly.
3.2 Componenti
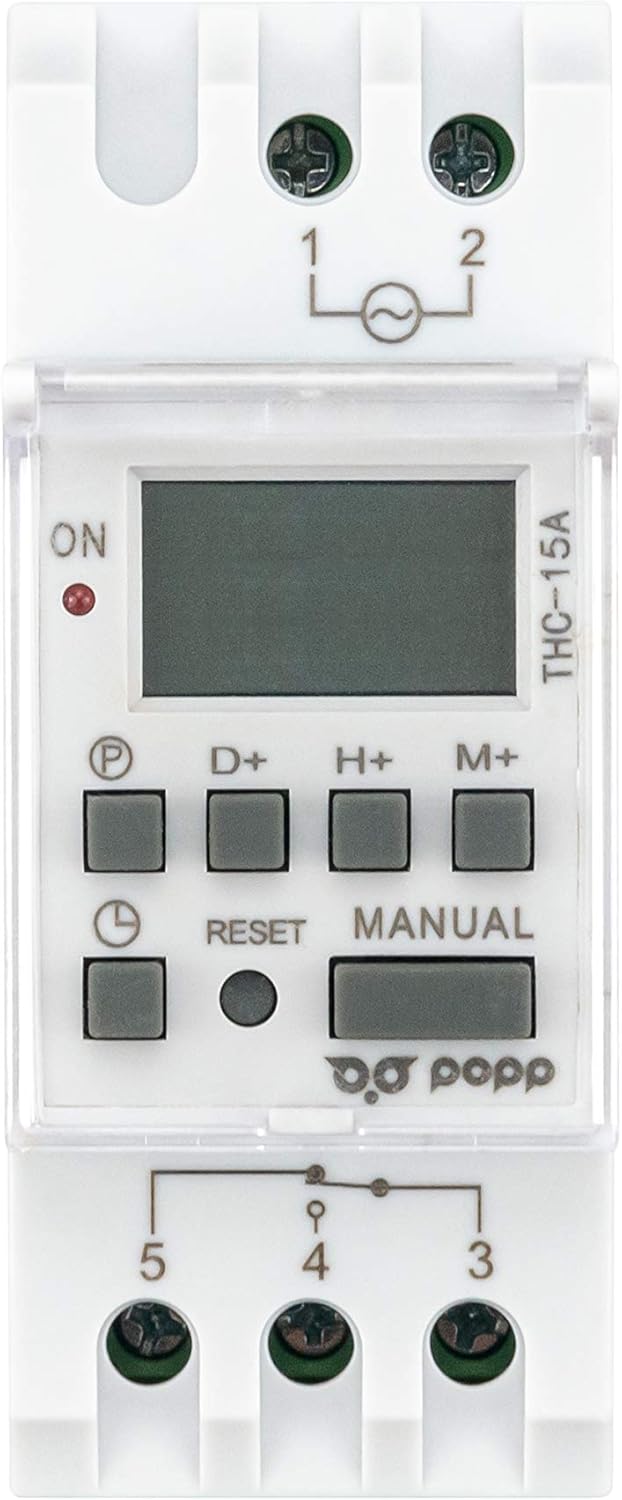
Figura 1: Fronte View of POPP THC15A Timer Switch. This image shows the front panel of the timer switch, featuring the LCD display, programming buttons (P, D+, H+, M+), Reset button, Manual button, and the ON indicator light.

Figura 2: Angolato View of POPP THC15A Timer Switch. This image provides an angled perspective of the timer, highlighting its compact design and the protective clear cover over the display and buttons.
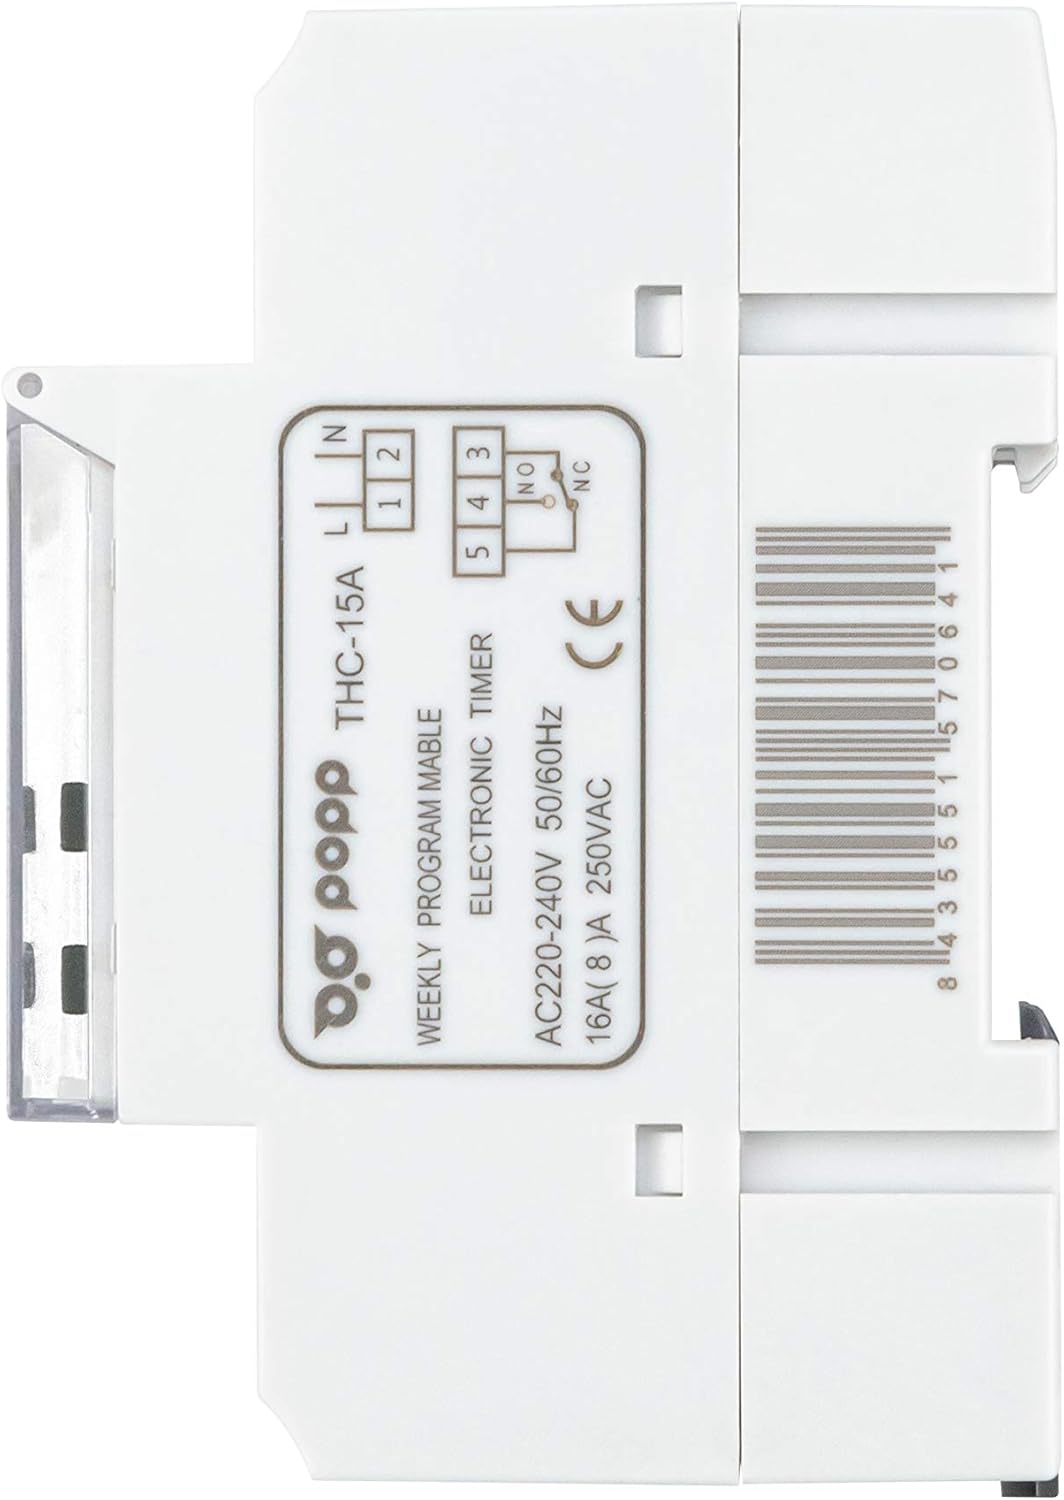
Figura 3: lato View of POPP THC15A Timer Switch. Questa immagine mostra il lato profile of the timer switch, showing its depth and DIN rail mounting clips.

Figura 4: Indietro View con schema elettrico. This image shows the rear of the timer switch, including the terminal block for electrical connections and the printed wiring diagram for input (L, N) and output (NO, NC, COM).
4. Impostazione
4.1 Installazione
The THC15A timer switch is designed for DIN rail mounting. Follow these steps for installation:
- Scollegare l'alimentazione: Ensure the main power supply to the installation area is completely switched off before proceeding.
- Montaggio: Clip the timer switch onto a standard 35mm DIN rail within your electrical panel.
- Cablaggio: Refer to the wiring diagram on the back of the device (Figure 4) and the instructions below for correct connections.
- Ingresso alimentazione (220 V CA): Collegare il filo sotto tensione (L) al terminale 1 e il filo neutro (N) al terminale 2.
- Uscita di carico: Connect the Live wire from the load to terminal 4 (Common). Connect the Live wire to be switched to terminal 3 (Normally Open, NO) for standard operation (power ON when timer is active). If a Normally Closed (NC) connection is required, use terminal 5.
- Collegamento: For typical applications, a bridge wire is required between terminal 1 (Input Live) and terminal 4 (Output Common) if the load is to be powered by the same source as the timer.
- Connessioni sicure: Assicurarsi che tutti i collegamenti dei cavi siano ben saldi e sicuri.
- Ripristina alimentazione: Una volta completata e verificata l'installazione, ripristinare l'alimentazione principale.
4.2 Accensione iniziale e ripristino
All'accensione iniziale o dopo uno spegnimento prolungatotage, the display may be blank. The internal battery will charge, and the display should activate within a few minutes. If the display remains blank or shows erratic characters, perform a reset:
- Individuare il piccolo RESET button on the front panel (usually recessed).
- Use a pointed non-metallic object (e.g., a pen tip) to press the RESET pulsante.
- The display will clear, and the timer will return to its default settings (00:00, Monday).
5. Istruzioni per l'uso
5.1 Impostazione dell'ora e del giorno correnti
Before programming, set the current time and day:
- Premere e tenere premuto il tasto OROLOGIO button (often marked with a clock icon).
- Mentre si tiene OROLOGIO, premere D+ per impostare il giorno corrente (LU, TU, WE, TH, FR, SA, DO).
- Mentre si tiene OROLOGIO, premere H+ per impostare l'ora corrente (0-23).
- Mentre si tiene OROLOGIO, premere M+ per impostare i minuti correnti (0-59).
- Rilasciare il OROLOGIO pulsante. L'ora è ora impostata.
5.2 Programmazione dei cicli di accensione/spegnimento
The timer allows up to 17 ON/OFF programs. Follow these steps:
- Premere il tasto P button (Program). The display will show '1 ON'.
- Premere D+ to select the day(s) for this program. You can choose individual days, blocks of days (e.g., MO-FR, SA-SU), or all days (MO-SU).
- Premere H+ per impostare l'ora di accensione desiderata.
- Premere M+ per impostare il minuto di accensione desiderato.
- Premere P di nuovo. Il display mostrerà '1 OFF'.
- Ripetere i passaggi da 2 a 4 per impostare l'orario di spegnimento del primo programma.
- Premere P again to move to the next program ('2 ON'). Repeat the process for all desired programs (up to 17 ON/OFF pairs).
- Per uscire dalla modalità di programmazione, premere il tasto OROLOGIO button. The timer will return to displaying the current time.
5.3 Override manuale
IL MANUALE button allows you to temporarily override the programmed settings:
- Premere MANUALE ripetutamente per scorrere le modalità:
- AUTO ACCESO: The output is currently ON, but will follow the next programmed OFF event.
- SPEGNIMENTO AUTOMATICO: The output is currently OFF, but will follow the next programmed ON event.
- SOPRA: The output is forced ON, ignoring all programs.
- OFF: The output is forced OFF, ignoring all programs.
- To return to automatic operation, cycle through the modes until 'AUTO ON' or 'AUTO OFF' is displayed, depending on the current programmed state.
6. Manutenzione
The POPP THC15A Digital Programmable Weekly Timer Switch requires minimal maintenance. Keep the device clean and free from dust. Do not use abrasive cleaners or solvents. Ensure the ventilation slots (if any) are not obstructed. The internal battery is designed for long-term use and is not user-replaceable.
7. Risoluzione Dei Problemi
If you encounter issues with your timer switch, refer to the table below:
| Problema | Possibile causa | Soluzione |
|---|---|---|
| Il display è vuoto. | Nessuna alimentazione; batteria interna scarica. | Check power connections. Allow time for internal battery to charge (up to 15 minutes). If still blank, perform a reset. |
| Il timer non accende/spegne il carico. | Incorrect wiring; program error; manual override active; load exceeds capacity. | Verify wiring according to Figure 4. Check programmed ON/OFF times. Ensure timer is in 'AUTO' mode. Confirm load does not exceed 16A/3500W. |
| Il tempo è impreciso. | Initial setting error; significant power fluctuations. | Reset and re-set the current time and day. The device has automatic error correction of +/- 30 seconds weekly. |
| Impossibile accedere alla modalità di programmazione. | Buttons unresponsive; device malfunction. | Perform a reset. If the issue persists, contact customer support. |
8. Specifiche
| Marca | Poppa |
| Numero di modello | THC15A |
| Colore | Bianco |
| Dimensioni del prodotto (L x P x A) | 6.5 x 3.6 x 8.6 cm (65P x 36l x 86H millimetri) |
| Materiale | Plastica |
| Peso dell'articolo | 140 grammi |
| Produttore | POPP |
| Numero di impostazioni | Fino a 17 programmi ON/OFF |
| Codice articolo internazionale (UPC) | 08435551570641 |
| Dimensioni dello schermo | 2 pollici |
| Voltage | 220-240V AC |
| Valutazione attuale | 16A |
| Frequenza | Frequenza 50/60 Hz |
9. Garanzia e supporto
Specific warranty information for the POPP THC15A Digital Programmable Weekly Timer Switch is not provided in this document. For warranty details, technical support, or service inquiries, please refer to the product packaging or contact the manufacturer directly. Keep your purchase receipt as proof of purchase.