
1. Introduzione
The XTUGA XCM012 is a professional wireless photographic and recording microphone system designed for various applications including photography, video recording, news interviews, and classroom lectures. This system offers stable signal transmission over distances up to 50 meters (164 feet) and is compatible with medium to high-end DSLR cameras, camcorders, and other audio recording devices. It features a UHF frequency response band, interference-free circuitry, and a noise value control system to ensure clear audio capture.
2. Contenuto della confezione
Si prega di controllare attentamente il pacco per assicurarsi che siano presenti tutti gli articoli:
- 2 x trasmettitori
- 1 x Ricevitore
- 2 microfoni Lavalier
- 1 x Camera Shoe Mount
- 2 x 3.5mm Cables (TRS to TRS for cameras, TRRS to TRS for smartphones)
- 2 x Bodypack Clips
- 1 x Manuale utente

Image: All components included in the XTUGA XCM012 wireless microphone system package, including two transmitters, one receiver, two lavalier microphones, cables, and mounting accessories.
3. Prodotto finitoview
The XTUGA XCM012 system consists of two transmitters and one receiver, designed for dual-channel audio capture.
3.1 Caratteristiche principali
- High-Definition Lavalier Microphones: Designed for clear sound capture with lapel clips for easy attachment.
- Trasmissione wireless UHF: Operates within the UHF 519-551MHz frequency range, offering 16 selectable channels to avoid interference.
- Ampio raggio d'azione: Effective transmission distance of up to 50 meters (164 feet) in open environments.
- Schermo LCD: Transmitters feature an LCD screen to show battery status, selected channels, and other operational information.
- Connettività versatile: The receiver includes a 3.5mm interface, compatible with DSLR cameras, camcorders, smartphones, laptops, PCs, amplifiers, and mixers using the provided 3.5mm cables.
- Attacco per fotocamera: Allows direct attachment of the receiver to DSLR cameras and other shooting equipment.
3.2 Componenti

Immagine: Un overview of the XTUGA XCM012 system highlighting its features: 1-Trigger-2 functionality, 16 selectable channels, 164ft working distance, volume adjustment, UHF 519-551MHz, and information display.

Image: Close-up of the UHF wireless transmitter, showing the LCD display, antenna, lavalier microphone connection, and FM keys for channel selection. It emphasizes 16 frequency options.

Image: The receiver unit with its 3.5mm output interface and volume control. It illustrates connection to a lavalier microphone and mentions compatibility with various devices via the 3.5mm cable.
4. Impostazione
4.1 Installazione della batteria
Each transmitter and the receiver require two AA, 1.5V batteries for operation.
- Locate the battery compartment on the back of each transmitter and the receiver.
- Far scorrere per aprire il coperchio del vano batterie.
- Inserire due batterie AA, assicurandosi della corretta polarità (+/-).
- Chiudere saldamente il coperchio del vano batterie.
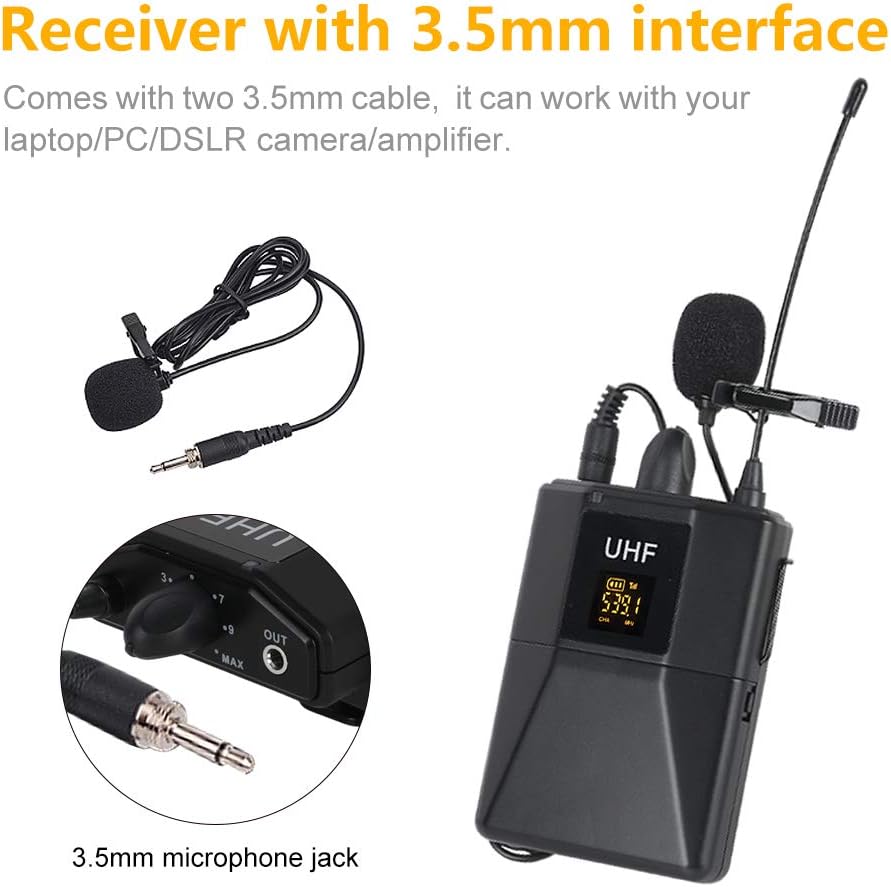
Image: Illustration of battery installation in the transmitter unit, showing the open battery compartment and the placement of two AA 1.5V batteries. The image also indicates an approximate working time of 5 hours.
4.2 Connecting the Lavalier Microphones
Connect each lavalier microphone to the 3.5mm mini jack input on the top of each transmitter. Ensure the connector is fully inserted.
4.3 Collegamento del ricevitore al dispositivo
Use the appropriate 3.5mm cable to connect the receiver's output to your recording device.
- For DSLR Cameras/Camcorders/Audio Recorders: Use the 3.5mm TRS to TRS cable. Connect one end to the receiver's "OUT" port and the other end to the microphone input of your camera or recorder.
- For Smartphones/Laptops: Use the 3.5mm TRRS to TRS cable (if provided, or ensure compatibility). Connect the TRS end to the receiver's "OUT" port and the TRRS end to your smartphone's headphone/microphone jack. Note: Some smartphones may require an additional adapter (not included).

Image: The XTUGA XCM012 receiver mounted on a DSLR camera via the hot shoe mount, with the audio cable connected to the camera's microphone input. Two transmitters are shown alongside.
4.4 Montaggio delle unità
- Attach the bodypack clips to the transmitters and receiver for wearing on clothing or belts.
- Use the camera shoe mount to attach the receiver to the hot shoe of your DSLR camera or camcorder.
5. Istruzioni per l'uso
5.1 Accensione/Spegnimento
Press and hold the power button on each transmitter and the receiver to turn them on or off. The LCD display on the transmitters will illuminate upon powering on.
5.2 Associazione automatica e selezione del canale
The XCM012 system features automatic pairing. When powered on, the transmitters and receiver should automatically connect. If interference occurs or you wish to change channels:
- On the transmitter, press the "FM keys" button (or similar channel selection button) to cycle through the 16 available frequencies.
- Observe the LCD display to confirm the channel change.
- Ensure the receiver also adjusts to the new channel automatically. If not, manually adjust the receiver's channel to match the transmitter.
Image: Close-up of the UHF wireless transmitter, showing the LCD display, antenna, lavalier microphone connection, and FM keys for channel selection. It emphasizes 16 frequency options.
5.3 Regolazione del volume
Adjust the output volume from the receiver using the dedicated volume control knob. It is recommended to start with a lower volume setting on the receiver and your recording device, then gradually increase to avoid audio clipping or distortion.
5.4 Optimal Sound Quality
The XCM012 system is designed to deliver clear vocal audio. For best results, ensure the lavalier microphone is positioned correctly, typically clipped to clothing about 6-8 inches from the speaker's mouth.
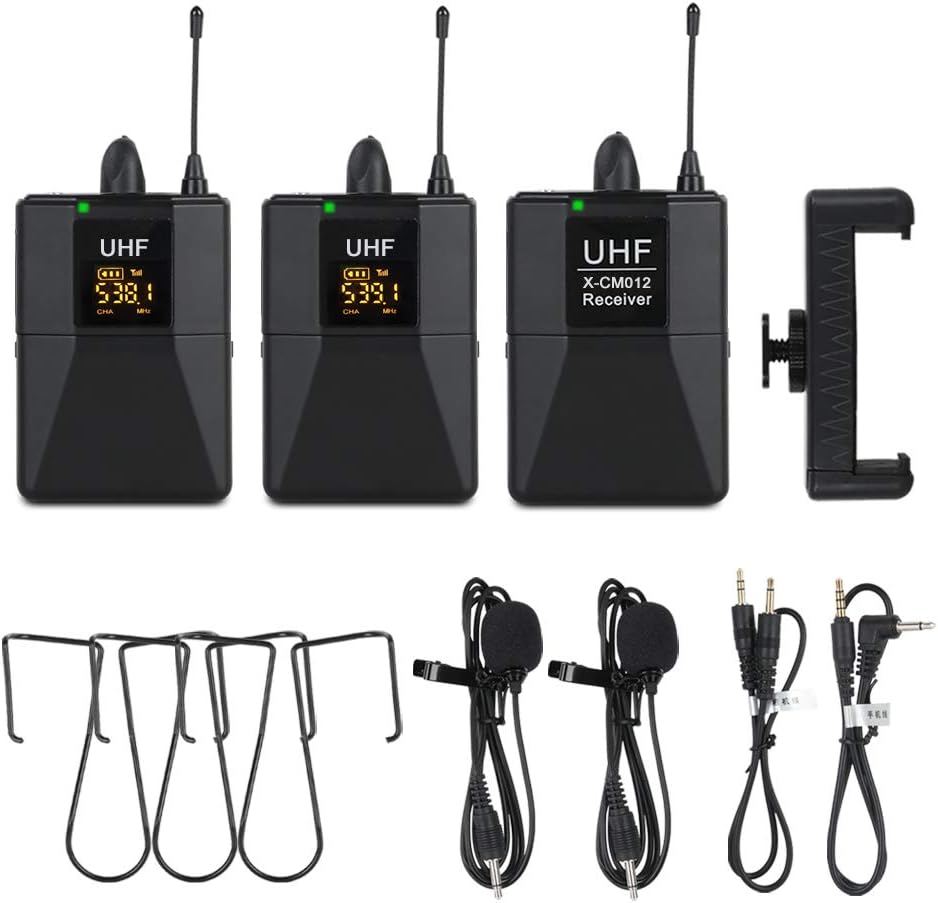
Image: A person giving a thumbs-up, with the XTUGA XCM012 receiver mounted on a DSLR camera in the foreground, illustrating the system's capability for pure and full vocal sound, suitable for interviews, outdoor recording, and teaching.

Image: Two XTUGA XCM012 transmitters shown with a graphic indicating a transmission distance of 50 meters in an open environment, highlighting the system's high-frequency ultra-long distance transmission capability.
6. Manutenzione
- Pulizia: Per pulire le unità, utilizzare un panno morbido e asciutto. Evitare l'uso di detergenti liquidi o solventi.
- Magazzinaggio: Store the microphone system in a dry, cool place away from direct sunlight and extreme temperatures.
- Cura della batteria: Remove batteries from the units if they will not be used for an extended period to prevent leakage.
- Cura del cavo: Maneggiare i cavi con cura. Evitare piegature brusche o trazioni eccessive per evitare danni.
7. Risoluzione Dei Problemi
7.1 Nessun suono o volume basso
- Controllare le batterie: Ensure all units have fresh batteries and are inserted with correct polarity.
- Accensione: Verify that both transmitters and the receiver are powered on.
- Connessione via cavo: Confirm that all 3.5mm cables are securely connected to the correct ports on the receiver and your recording device. Ensure you are using the correct cable type (TRS for cameras, TRRS for smartphones if applicable).
- Livelli del volume: Adjust the volume knob on the receiver and the input level on your recording device. Start low and increase gradually.
- Input dispositivo: Ensure your camera or recording device's audio input is set to external microphone.
7.2 Interference or Poor Sound Quality
- Cambia canale: If experiencing interference, try changing the operating channel on the transmitters using the "FM keys" button. Ensure the receiver syncs to the new channel.
- Distanza: Ensure the transmitters and receiver are within the effective operating range (up to 50 meters) and there are no major obstructions.
- Dispositivi esterni: Keep the system away from other wireless devices, Wi-Fi routers, or strong electromagnetic fields that might cause interference.
- Qualità del cavo: If experiencing persistent poor audio, consider testing with a different, high-quality 3.5mm audio cable.
7.3 Transmitters Not Pairing with Receiver
- Ciclo di alimentazione: Turn off all units, then power them back on, starting with the receiver, then the transmitters, to allow them to re-establish connection.
- Manual Channel Sync: If automatic pairing fails, manually cycle through channels on the transmitters and ensure the receiver is set to the same channel.
8. Specifiche
| Caratteristica | Dettaglio |
|---|---|
| Modalità di modulazione | modulazione di frequenza digitale |
| Gamma di frequenza | UHF 519-551MHz |
| Preset Frequency | 16 (accoppiamento automatico) |
| Risposta in frequenza | 75Hz-18kHz ± 3dB |
| massimo Intervallo di deviazione | 50kHz (with level limiting) |
| THD | <1% |
| Rapporto segnale/rumore | >98 dB |
| Campo di lavoro | Fino a 50 m (164 piedi) |
| Stabilità del vettore RF | 0.005% (-10℃-50℃) |
| Dimensioni del ricevitore | 110 x 65 x 25 mm |
| Alimentazione del ricevitore | 3 V (2 batterie AA) |
| Consumo energetico del ricevitore | 100mA |
| Durata della batteria del ricevitore | Circa 6 ore |
| Transmitter Carrier Frequency Power | 30mW |
| Tempo di funzionamento del trasmettitore | Circa 10 ore |
| Dimensioni del trasmettitore | 110 x 65 x 25 mm |
| Peso del trasmettitore | 50g |
| Antenna | Flessibile |
| Connettore di ingresso audio | Mini-jack da 3.5 mm |
| Dimensioni del prodotto (totale) | Dimensioni: 25 x 22 x 8 cm |
| Peso dell'articolo (totale) | 0.55 chilogrammi |
9. Garanzia e supporto
For warranty information and technical support, please refer to the documentation provided with your purchase or contact XTUGA customer service directly. Keep your purchase receipt as proof of purchase for any warranty claims.