Singer HD6335M
Manuale utente della macchina da cucire SINGER Heavy Duty 6335M
Modello: HD6335M
1. Introduzione
Thank you for choosing the SINGER Heavy Duty 6335M Sewing Machine. This machine is engineered for durability and performance, designed to handle a wide range of fabrics, including heavy materials like denim. With its robust construction and powerful motor, it provides reliable and efficient sewing for various projects. This manual provides essential information for the safe operation, setup, maintenance, and troubleshooting of your new sewing machine. Please read it thoroughly before use.
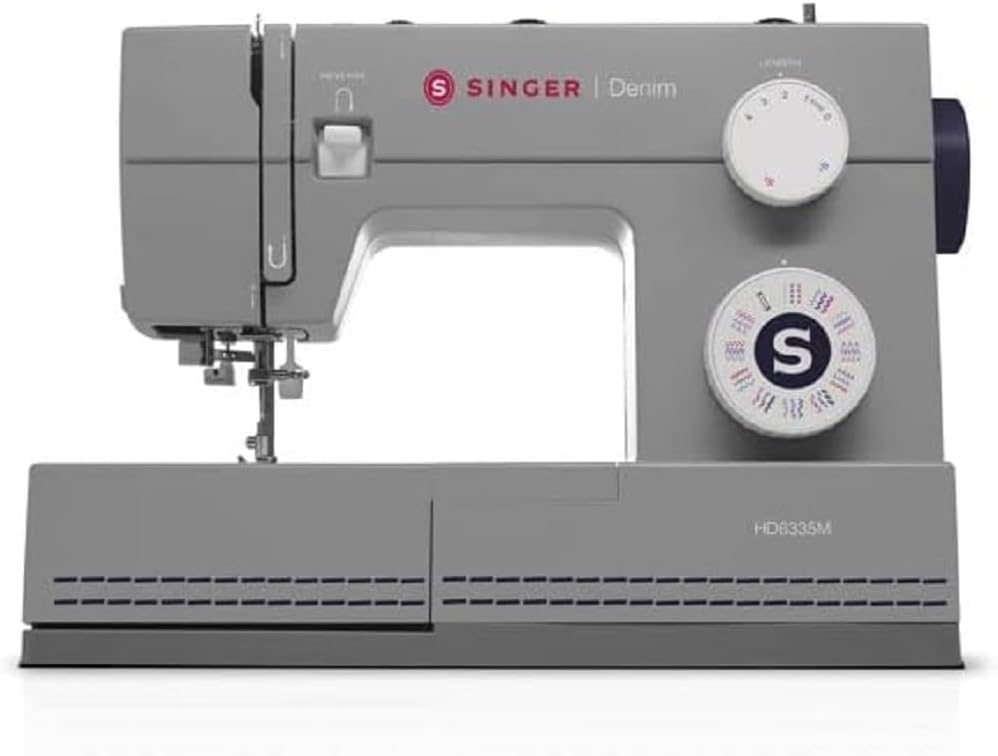
Figure 1: The SINGER Heavy Duty 6335M Sewing Machine. This image shows the overall design of the machine, highlighting its grey color and the prominent SINGER branding.
2. Istruzioni di sicurezza
Quando si utilizzano apparecchi elettrici, seguire sempre le precauzioni di sicurezza di base per ridurre il rischio di incendi, scosse elettriche o lesioni personali.
- Leggere tutte le istruzioni prima di utilizzare la macchina.
- Tenere le dita lontane da tutte le parti in movimento. È necessaria una cura speciale intorno all'ago della macchina per cucire.
- Scollegare sempre la macchina per cucire dalla presa elettrica quando si rimuovono i coperchi, si lubrifica o quando si effettuano altre regolazioni di manutenzione menzionate nel manuale di istruzioni.
- Never operate the sewing machine if it has a damaged cord or plug, if it is not working properly, if it has been dropped or damaged, or dropped into water.
- Non far cadere o inserire mai alcun oggetto in nessuna apertura.
- Non utilizzare all'aperto.
- Non operare in luoghi in cui vengono utilizzati prodotti aerosol (spray) o in cui viene somministrato ossigeno.
- Per scollegarlo, portare tutti i comandi in posizione off, quindi rimuovere la spina dalla presa.
- Non staccare la spina tirando il cavo. Per staccare la spina, afferrare la spina, non il cavo.
3. Contenuto della confezione
Upon unpacking your SINGER Heavy Duty 6335M, please verify that all components are present. The standard package typically includes:
- SINGER Heavy Duty 6335M Sewing Machine
- Controller a pedale
- Cavo di alimentazione
- Standard Accessories (e.g., various presser feet, needles, bobbins, seam ripper, lint brush, screwdriver)
- Copertura antipolvere morbida
- Manuale di istruzioni (questo documento)
Note: Specific accessories may vary by region or package. Refer to your product packaging list for exact contents.
4. Impostazione
4.1 Collegamento di alimentazione
- Posizionare la macchina su una superficie stabile e piana.
- Connect the foot controller plug to the machine's receptacle.
- Collegare il cavo di alimentazione all'ingresso di alimentazione della macchina e quindi a una presa elettrica idonea.
- Accendere l'interruttore di alimentazione, solitamente situato sul lato della macchina.
4.2 Avvolgimento della bobina
Proper bobbin winding ensures smooth stitching.
- Posizionare un rocchetto di filo sul portarocchetto.
- Far passare il filo attraverso la guida del filo superiore e attorno al disco di tensione dell'avvolgimento della bobina.
- Posizionare una bobina vuota sul perno dell'avvolgitore.
- Avvolgere il filo attorno alla bobina alcune volte, quindi spingere il perno dell'avvolgitore della bobina verso destra.
- Premere delicatamente il pedale per avviare l'avvolgimento. Fermarsi quando la bobina è piena.
- Tagliare il filo e rimuovere la bobina.
4.3 Inserimento della bobina
The SINGER Heavy Duty 6335M features a top drop-in bobbin system for easy access.
- Aprire la piastra di copertura della bobina.
- Insert the full bobbin into the bobbin case, ensuring the thread unwinds in the correct direction (usually counter-clockwise).
- Guide the thread through the tension spring and into the thread guide channel.
- Pull out about 6 inches of thread and close the bobbin cover.
4.4 Infilatura del filo superiore
Correct upper threading is crucial for balanced stitches.
- Sollevare l'alzapiedino.
- Posizionare un rocchetto di filo sul portarocchetto.
- Far passare il filo attraverso il guidafilo superiore.
- Bring the thread down the right channel, around the tension discs, and up the left channel.
- Agganciare il filo alla leva di avvolgimento da destra a sinistra.
- Bring the thread down through the guides to the needle.
- Use the built-in needle threader (if available) or manually thread the needle from front to back.

Figure 2: Threading the needle. This image illustrates the process of threading the needle, showing the thread being guided through the needle eye.
4.5 Drawing Up the Bobbin Thread
- Tenere delicatamente il filo superiore con la mano sinistra.
- Turn the handwheel towards you to lower the needle into the needle plate and then raise it.
- Il filo superiore catturerà il filo della bobina, formando un anello. Tirare l'anello verso l'alto attraverso l'apertura della placca ago.
- Tirare entrambi i fili (superiore e della bobina) sotto il piedino premistoffa e verso la parte posteriore della macchina.
5. Istruzioni per l'uso
5.1 Selezione del punto
Your SINGER Heavy Duty 6335M offers 32 built-in stitches. Use the stitch selector dial to choose the desired stitch pattern. Refer to the stitch chart on the machine for visual guidance.
5.2 Regolazione della lunghezza e della larghezza del punto
Adjust stitch length and width using the corresponding dials to suit your fabric and project needs. Longer stitches are generally for thicker fabrics, while shorter stitches are for finer details.
5.3 Sewing Speed Control
The sewing speed is controlled by the foot controller. Press gently for slower speeds and apply more pressure for higher speeds. The machine is capable of high-speed sewing for efficient work.
5.4 Sewing Heavy Fabrics
This machine is specifically designed for heavy-duty sewing, including multiple layers and denim fabrics.
- Use appropriate heavy-duty needles (e.g., denim needles) for thick materials.
- Adjust the presser foot pressure if your machine has this feature (refer to specific machine details).
- Ensure proper thread tension for heavy fabrics to prevent skipped stitches or thread breakage.
5.5 Cucitura a braccio libero
Remove the accessory storage compartment to reveal the free arm. This feature is ideal for sewing cylindrical items like cuffs, sleeves, and pant hems.
5.6 Cucitura dell'asola
The machine supports easy buttonhole creation.
- Attach the one-step buttonhole foot.
- Insert the button into the back of the buttonhole foot.
- Select the buttonhole stitch on the stitch selector dial.
- Abbassare la leva dell'asola.
- Begin sewing; the machine will automatically create the buttonhole to the size of your button.

Figure 3: Buttonhole foot in position. This image shows the buttonhole presser foot attached to the machine, positioned over fabric, ready for automatic buttonhole stitching.
6. Manutenzione
Una manutenzione regolare garantisce la longevità e le prestazioni ottimali della tua macchina da cucire.
6.1 Pulizia
- Scollegare sempre la macchina prima della pulizia.
- Rimuovere la placca ago e la capsula della bobina.
- Use the lint brush (included with accessories) to remove lint and dust from the feed dogs and bobbin area.
- Pulire l'esterno della macchina con un panno morbido e asciutto. Non utilizzare prodotti chimici aggressivi o detergenti abrasivi.
6.2 Lubrificazione
Your SINGER Heavy Duty 6335M is designed to require minimal lubrication. Refer to the full instruction manual for specific oiling points if necessary. Over-oiling can attract lint and cause issues.
6.3 Sostituzione dell'ago
Replace needles frequently (after every 8-10 hours of sewing or when bent/dull) to prevent skipped stitches and fabric damage.
- Spegnere e scollegare la macchina.
- Allentare l'ago clamp vite.
- Rimuovere il vecchio ago.
- Inserire un nuovo ago con il lato piatto rivolto verso il retro della macchina, spingendolo verso l'alto il più possibile.
- Stringere l'ago clamp avvitare saldamente.
7. Risoluzione Dei Problemi
Questa sezione affronta i problemi più comuni che potresti incontrare.
| Problema | Possibile causa | Soluzione |
|---|---|---|
| La macchina non cuce | Machine not plugged in; power switch off; bobbin winder engaged. | Check power connection; turn power switch on; disengage bobbin winder. |
| Punti saltati | Incorrect needle size/type; bent or dull needle; improper threading; incorrect tension. | Change needle to correct type/size; replace needle; re-thread machine correctly; adjust tension. |
| Thread breaking (upper) | Improper threading; tension too tight; poor quality thread; burr on needle plate or bobbin case. | Re-thread machine; loosen upper tension; use good quality thread; check for burrs and smooth them. |
| Thread breaking (bobbin) | Improperly wound bobbin; bobbin inserted incorrectly; lint in bobbin case. | Re-wind bobbin evenly; re-insert bobbin correctly; clean bobbin case area. |
| Tessuto non alimentato | Feed dogs lowered; lint in feed dogs; presser foot pressure too low. | Raise feed dogs; clean feed dogs; increase presser foot pressure. |
For more detailed troubleshooting, please refer to the comprehensive manual available on the SINGER websito o contattare l'assistenza clienti.
8. Specifiche
| Caratteristica | Dettaglio |
|---|---|
| Numero di modello | Modello HD6335M |
| Marca | Cantante |
| Punti | 32 punti incorporati |
| Velocità | High Speed Capability |
| Tipo di braccio | Braccio libero |
| Dimensioni del prodotto | 22T x 45B x 34H cm |
| Dimensioni del pacco | Dimensioni: 44.8 x 34 x 21.8 cm |
| Peso del pacco | 7.9 chilogrammi |
| Colore | Grigio |
9. Garanzia e supporto
9.1 Garanzia del prodotto
The SINGER Heavy Duty 6335M Sewing Machine comes with a Garanzia del produttore di 2 anniLa presente garanzia copre i difetti di materiali e fabbricazione in condizioni di normale utilizzo. Si prega di conservare la prova d'acquisto per eventuali reclami in garanzia.
9.2 Assistenza clienti
For technical assistance, service, or to inquire about replacement parts, please contact SINGER customer support. You can find contact information and additional resources, including a digital version of this manual and FAQs, on the official SINGER websito: www.singer.com.
EU replacement parts availability is guaranteed for 2 years.
Ask a question about this manual
Ask about setup, troubleshooting, compatibility, parts, safety, or missing instructions. Manuals+ will review the question and use this page’s manual context to help answer it.