
1. Introduzione
Thank you for choosing the Arcam SA10 Class A/B Integrated Amplifier. Questo manuale fornisce informazioni essenziali per l'impostazione, il funzionamento e la manutenzione del tuo amplifier to ensure years of high-quality audio enjoyment. The SA10 is designed to deliver class-leading sound quality, bringing your music to life with its powerful 50W per channel output, high-performance ESS9016K2M Sabre DAC, and low noise floor. It offers a listening experience as close to the artist's original performance as possible.
2. Informazioni sulla sicurezza
Leggere attentamente tutte le istruzioni di sicurezza prima di utilizzare l'unità. Conservare il presente manuale per riferimento futuro.
- Non esporre questo apparecchio alla pioggia o all'umidità.
- Non ostruire le aperture di ventilazione. Installare secondo le istruzioni del produttore.
- Non installare vicino a fonti di calore come radiatori, bocchette di riscaldamento, stufe o altri apparecchi (inclusi amplificatori) che producono calore.
- Proteggere il cavo di alimentazione per evitare che venga calpestato o schiacciato, in particolare in corrispondenza delle spine, delle prese di corrente e del punto in cui esce dall'apparecchio.
- Utilizzare solo accessori/componenti specificati dal produttore.
- Scollegare l'apparecchio durante i temporali o quando non viene utilizzato per lunghi periodi di tempo.
- Affidare tutte le operazioni di manutenzione a personale di assistenza qualificato. L'assistenza è necessaria quando l'apparecchio è stato danneggiato in qualsiasi modo.
- Questo prodotto contiene sostanze chimiche note allo Stato della California come causa di cancro e malformazioni congenite o altri danni all'apparato riproduttivo.
3. Contenuto della confezione
All'apertura della scatola, assicurarsi che siano presenti tutti i seguenti elementi:
- Arcam SA10 Integrated Amppiù vivace
- Cavo di alimentazione CA
- Telecomando (con 2 batterie AAA incluse)
- Manuale dell'utente (questo documento)
4. Prodotto finitoview
Familiarize yourself with the front and rear panels of your Arcam SA10 amppiù vivace.
4.1 Pannello frontale
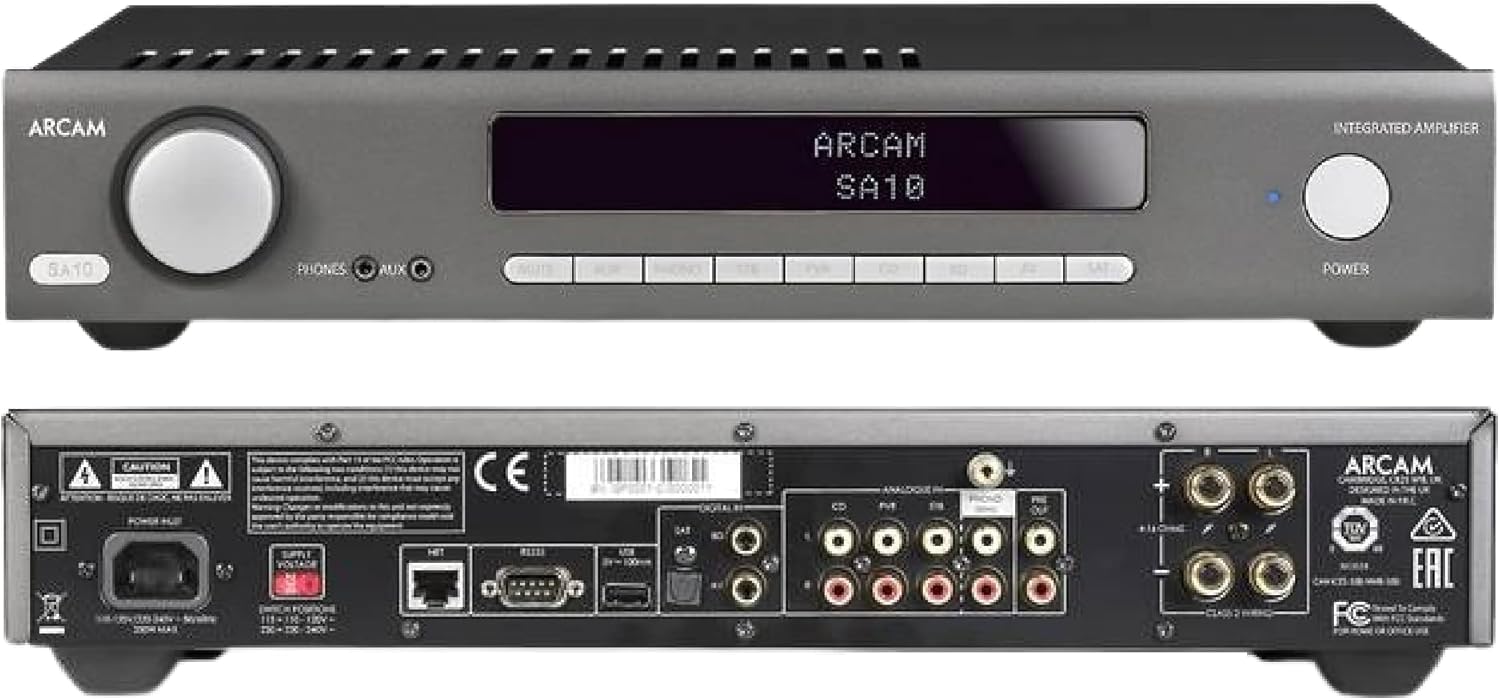
Figure 4.1: Front and Rear Panels of the Arcam SA10. The front panel features a large volume knob on the left, a display screen in the center, input selection buttons below the display, and a power button on the right. Headphone and auxiliary inputs are also present.
- Manopola del volume: Regola il volume di uscita complessivo.
- Schermo di visualizzazione: Mostra l'input corrente, il livello del volume e altre informazioni sullo stato.
- Pulsanti di selezione dell'input: Allows selection between various audio sources (CD, Tuner, AV, SAT, etc.).
- Pulsante di accensione: Attiva o disattiva il amplifier between standby and operational modes.
- Uscita cuffie: Jack da 3.5 mm per il collegamento delle cuffie.
- Ingresso ausiliario: 3.5mm jack for connecting portable audio devices.
4.2 Pannello posteriore
The rear panel provides all the necessary connections for your audio system.
Figure 4.2: Detailed Rear Panel Connections. This view highlights the speaker terminals, analog RCA inputs (including Phono), digital optical and coaxial inputs, and the power inlet.
- Terminali altoparlanti: Connect your passive speakers (left and right channels).
- Ingressi analogici (RCA): Multiple stereo RCA inputs for connecting analog audio sources like CD players, tuners, or other line-level devices.
- Ingresso Phono (RCA): Dedicated input for turntables with moving magnet (MM) cartridges.
- Ingressi digitali:
- Ottico (Toslink): For digital audio sources like TVs or game consoles.
- Coassiale: For digital audio sources like CD players or network streamers.
- Pre-uscita: Per il collegamento ad un alimentatore esterno amplifier o subwoofer amplificato.
- Porta USB: Per aggiornamenti del firmware o assistenza.
- Porta Ethernet: For network control and future updates.
- Ingresso di alimentazione CA: Collega il amplifier all'alimentazione di rete.
5. Impostazione
5.1 Posizionamento
Place the Arcam SA10 on a stable, level surface away from direct sunlight, heat sources, and excessive moisture. Ensure adequate ventilation around the unit to prevent overheating. Do not place other components directly on top of the amppiù vivace.
5.2 Collegamento degli altoparlanti
Connect your passive speakers to the speaker terminals on the rear panel. Ensure correct polarity (+ to + and - to -) for both left and right channels. Use high-quality speaker cables for optimal sound performance.
5.3 Collegamento delle sorgenti audio

Figure 5.3: The Arcam SA10 offers convenient connections including Toslink optical, two digital coaxial inputs, and three stereo analog RCA inputs, plus a dedicated phono input.
- Sorgenti analogiche: Connect CD players, tuners, or other line-level devices to the RCA analog inputs (CD, Tuner, AV, SAT).
- giradischi: Connect a turntable with a moving magnet (MM) cartridge to the dedicated PHONO input.
- Fonti digitali: Connect digital audio sources using either the optical (Toslink) or coaxial digital inputs.
- Portable Devices: Use the 3.5mm AUX input on the front panel for quick connection of portable media players.
5.4 Collegamento di alimentazione
Once all audio connections are made, connect the supplied AC power cord to the AC power inlet on the rear panel of the amplificatore e poi a una presa a muro adatta.
6. Istruzioni per l'uso
6.1 Accensione/Spegnimento
Premere il tasto ENERGIA button on the front panel or the remote control to switch the amplifier on or into standby mode. The blue LED next to the power button indicates operational status.
6.2 Selezione dell'ingresso
Use the input selection buttons on the front panel or the remote control to choose your desired audio source. The selected input will be displayed on the front panel screen.
6.3 Controllo del volume
Ruota il grande VOLUME knob on the front panel clockwise to increase volume and counter-clockwise to decrease it. Alternatively, use the volume up/down buttons on the remote control.
6.4 Uso delle cuffie
Plug your headphones into the 3.5mm TELEFONI sul pannello frontale. Collegando le cuffie, le uscite degli altoparlanti principali verranno automaticamente disattivate.
6.5 Controllo remoto e controllo tramite app

Figure 6.5: Control your SA10 with the included remote or via UPnP audio and basic functions using the FREE MusicLife App on your iPad, iPhone, or Android device.
The included remote control provides full functionality for the SA10. Ensure the supplied AAA batteries are correctly inserted. For advanced control and UPnP audio streaming, download the free Arcam MusicLife App from your device's app store (available for iOS and Android).
7. Manutenzione
To maintain the appearance and performance of your Arcam SA10:
- Pulire le superfici esterne con un panno morbido, asciutto e privo di lanugine.
- Non utilizzare detergenti abrasivi, cere o solventi.
- Assicurarsi che le griglie di ventilazione siano libere da polvere e ostruzioni.
- Disconnect the power cord from the wall outlet before cleaning.
8. Risoluzione Dei Problemi
If you experience issues with your Arcam SA10, refer to the following common problems and solutions:
| Problema | Possibile causa | Soluzione |
|---|---|---|
| Nessun potere | Cavo di alimentazione non collegato; presa di corrente difettosa. | Assicurarsi che il cavo di alimentazione sia collegato saldamente. Provare una presa di corrente diversa. |
| Nessun suono | Selezione di un ingresso errato; cavi degli altoparlanti allentati; volume troppo basso; disattivazione audio attivata. | Select correct input. Check speaker cable connections. Increase volume. Deactivate mute. |
| Suono distorto | Source signal too high; speaker impedance mismatch; faulty cables. | Reduce source output level. Ensure speakers are compatible (8 ohms recommended). Check/replace cables. |
| Il telecomando non funziona | Batterie scariche o inserite in modo errato; ostruzione tra telecomando e amppiù vivace. | Replace batteries. Ensure correct polarity. Remove obstructions. |
If the problem persists, please contact Arcam customer support or your authorized dealer.
9. Specifiche
Key technical specifications for the Arcam SA10 Integrated Amplificatore:

Figure 9.1: The Arcam SA10 delivers 50 watts per channel, features 5 analog inputs (including phono), 3 digital inputs, a 32-bit DAC, and boasts a low total harmonic distortion + noise of 0.003%.
- Potenza in uscita: 50W per channel (8 ohms, 20-20,000 Hz, at 0.5% THD)
- AmpTipo di lificazione: Classe A/B
- Convertitore digitale-analogico (DAC): 32-bit ESS9016K2M Sabre DAC
- Ingressi analogici: 5 (including 1 dedicated Phono input for Moving Magnet cartridges)
- Ingressi digitali: 3 (1 Optical Toslink, 2 Coaxial)
- Distorsione armonica totale + rumore: 0.003%
- Dimensioni (L x P x A): 17.05 x 12.72 x 3.43 pollici (433 x 323 x 87 mm)
- Peso: 2.03 libbre (0.92 kg)
- Controllare: Full I/P control, Remote Control, MusicLife App compatibility
- Batterie per telecomando: 2 AAA (incluse)
10. Garanzia e supporto
Arcam products are designed and manufactured to the highest standards. For information regarding warranty coverage, technical support, or service, please refer to the warranty card included with your product or visit the official Arcam websito. Conservare la prova d'acquisto per eventuali reclami in garanzia.