1. Prodotto finitoview
The Alecto WS-1560 is a wireless weather station designed to provide accurate indoor and outdoor environmental data. Featuring a clear color display and a remote outdoor sensor, it offers comprehensive weather information and additional useful functions for your home.
Caratteristiche principali:
- Measures indoor and outdoor temperature and humidity.
- Long-range wireless outdoor sensor (up to 100 meters).
- 5.7-inch well-lit color display with animated weather forecast icons.
- Temperature and ice alarm functions.
- Sveglia con funzione snooze.
- Memory function for latest and highest readings.
- Moon phase indicator, date, day, and time display.
- Battery-operated main unit and outdoor sensor with backup batteries.

Figure 1.1: Alecto WS-1560 Main Unit and Wireless Outdoor Sensor.
2. Contenuto della confezione
Ensure all components are present and in good condition upon unpacking:
- Unità principale Alecto WS-1560 (display interno)
- Sensore esterno wireless
- Manuale d'uso
- (Power adapter and batteries may be included depending on package)
Video 2.1: Illustrative video showing typical weather station components and basic setup. (Note: This video is for a related product and may not show the exact Alecto WS-1560 model.)
3. Configurazione e installazione
3.1. Installazione della batteria
Both the main unit and the outdoor sensor require batteries for operation. Ensure you use the correct type and polarity.
- Sensore esterno:
- Aprire il vano batteria sul retro del sensore esterno wireless.
- Inserire 2 batterie AA (non incluse) rispettando la polarità indicata (+/-).
- Chiudere bene il vano batterie.
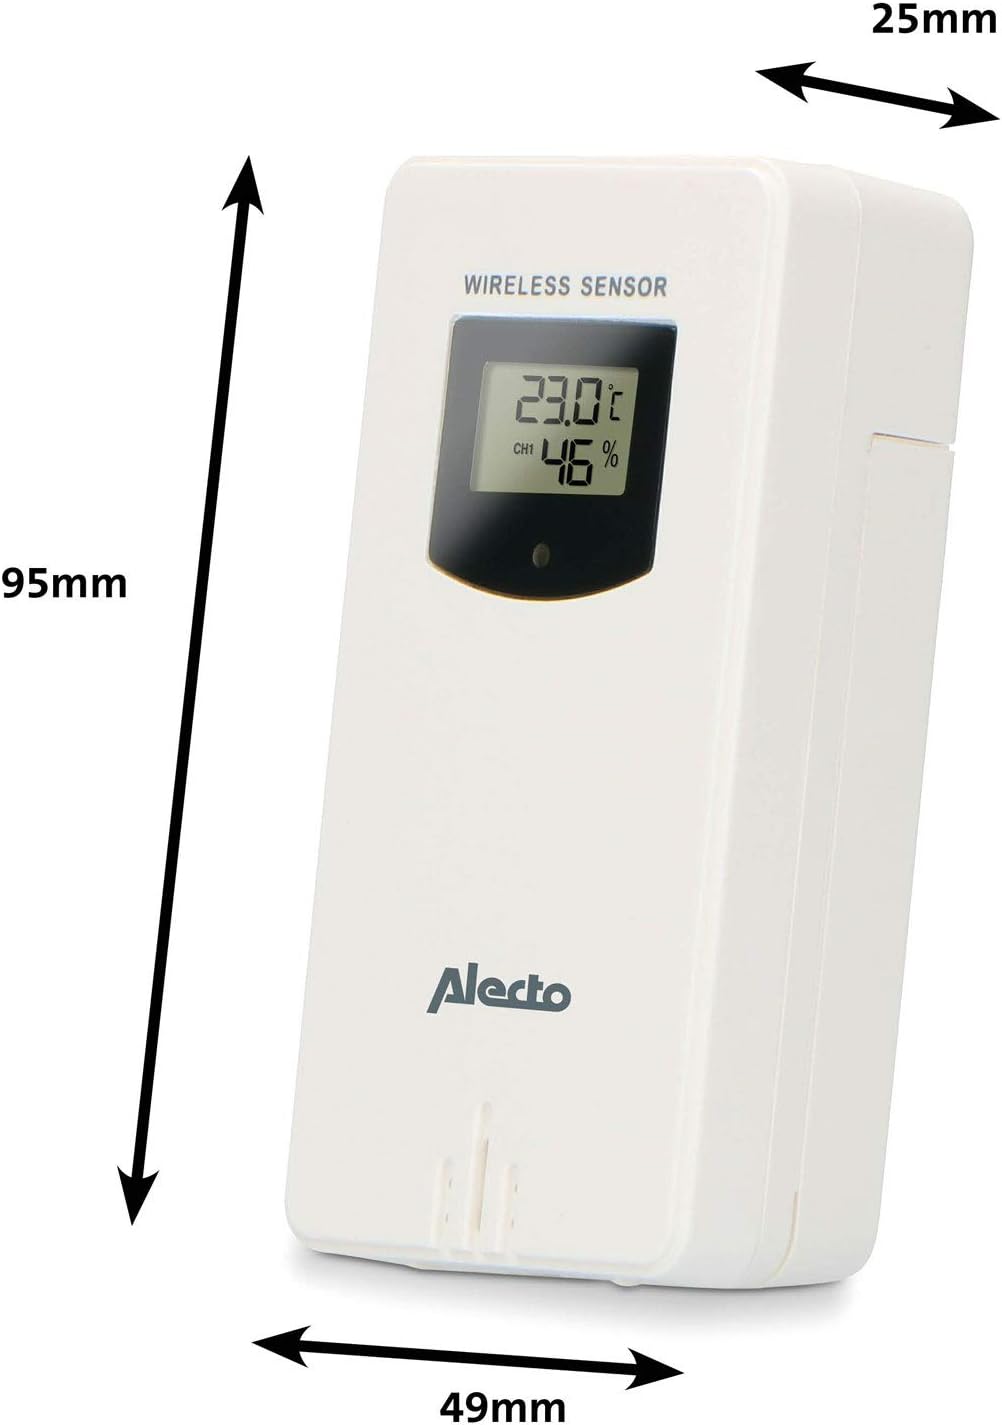
Figure 3.1: Wireless Outdoor Sensor dimensions and battery compartment location.
- Unità principale:
- Aprire il vano batterie sul retro dell'unità principale.
- Insert 2x AA batteries (not included) according to the polarity markings (+/-). These serve as backup batteries.
- Chiudere bene il vano batterie.
- Connect the main unit to a power outlet using the provided power adapter (if included).

Figure 3.2: Main Unit dimensions and power input.
3.2. Posizionamento del sensore
For accurate outdoor readings, proper placement of the wireless sensor is crucial:
- Place the sensor in a shaded area, away from direct sunlight, to prevent inaccurate temperature readings.
- Assicurare una buona circolazione dell'aria attorno al sensore.
- Montare il sensore verticalmente, a circa 1.5-2.5 metri (da 5 a 8 piedi) dal suolo.
- Avoid placing the sensor near heat sources (e.g., vents, windows) or moisture sources.
- The maximum transmission range is 100 meters (328 feet) in open air. Walls and other obstacles will reduce this range.

Figura 3.3: Esample of outdoor sensor placement on a wall.
3.3. Associazione del sensore all'unità principale
The main unit and sensor should automatically pair once both are powered on. If pairing does not occur:
- Ensure both units have fresh batteries and are within range.
- Press the "TX" button inside the outdoor sensor's battery compartment to manually send a signal.
- On the main unit, you may need to initiate a search for the outdoor sensor (refer to the "Operation" section for specific button functions).
4. Funzionamento
4.1. Layout di visualizzazione
Il display a colori da 5.7 pollici offre una visione chiaraview of all measured data. Key areas include:
- Temperatura e umidità esterne: Displays current outdoor conditions.
- Temperatura e umidità interna: Visualizza le condizioni interne attuali.
- Animated Weather Forecast: Icons predict upcoming weather (sunny, partly cloudy, cloudy, rainy, snowy).
- Ora dell'appuntamento: Ora, giorno e data correnti.
- Pressione barometrica: Pressione atmosferica attuale.
- Fase lunare: Rappresentazione grafica della fase lunare attuale.
- Temperature/Ice Alarm Indicators: Alerts for specific temperature thresholds or potential ice conditions.

Figura 4.1: dettagliata view of the main unit's color display.
4.2. Funzioni dei pulsanti
The main unit features several buttons for setting and adjusting functions. Common buttons include:
- IMPOSTATO: Accede alla modalità di configurazione per ora, data e altre impostazioni.
- DIREZIONI: Passa da una modalità di visualizzazione all'altra o conferma le impostazioni.
- SU/GIÙ (o +/-): Adjusts values during setup or cycles through channels.
- ALLARME: Imposta o attiva la funzione sveglia.
- MEM: Displays maximum/minimum temperature and humidity records. Long press to clear records.
- SNOOZE/LUCE: Activates snooze during an alarm or adjusts backlight brightness.
Video 4.2: Illustrative video demonstrating various features and settings of a weather station. (Note: This video is for a related product and may not show the exact Alecto WS-1560 model.)
4.3. Impostazione di ora e data
- Premere e tenere premuto il pulsante "SET" finché il display dell'ora non inizia a lampeggiare.
- Use the "UP" or "DOWN" buttons to adjust the hour, then press "SET" to confirm and move to minutes.
- Ripetere per minuti, anno, mese e giorno.
- Press "SET" again to exit the setting mode.
4.4. Impostazioni di allarme
- Press the "ALARM" button once to view l'ora della sveglia.
- Press and hold the "ALARM" button until the alarm time starts flashing.
- Use the "UP" or "DOWN" buttons to set the desired alarm hour and minute.
- Premere "ALARM" per confermare.
- To activate/deactivate the alarm, press the "ALARM" button briefly when the alarm time is displayed. An alarm icon will appear/disappear.
4.5. Record Max/Min
The weather station automatically records the maximum and minimum temperature and humidity values over a 24-hour period.
- Press the "MEM" button briefly to view the maximum recorded values.
- Press "MEM" again to view the minimum recorded values.
- Press "MEM" a third time to return to current readings.
- To clear the records, press and hold the "MEM" button for a few seconds.
5. Manutenzione
- Pulizia: Pulire le superfici del display e dell'unità con un panno morbido e asciutto.amp panno. Non usare detergenti abrasivi o solventi.
- Sostituzione della batteria: Sostituire le batterie sia nell'unità principale che nel sensore esterno quando sul display compare l'indicatore di batteria scarica. Sostituire sempre tutte le batterie contemporaneamente con batterie nuove dello stesso tipo.
- Cura del sensore: Periodically check the outdoor sensor for debris or obstructions that might affect its readings. Ensure it remains in a shaded, well-ventilated area.
6. Risoluzione Dei Problemi
| Problema | Possibile causa | Soluzione |
|---|---|---|
| No outdoor temperature/humidity reading (or "---" displayed) |
|
|
| Letture imprecise di temperatura/umidità |
|
|
| Il display è scuro o vuoto |
|
|
7. Specifiche
| Numero di modello | WS-1560 |
| Marca | Alettone |
| Fonte di alimentazione (unità principale) | Power Adapter (if included) + 2x AA batteries (backup) |
| Fonte di alimentazione (sensore esterno) | 2 batterie AA |
| Dimensioni del prodotto (unità principale) | Dimensioni: 5.1 x 16.5 x 12.3 cm |
| Peso del prodotto | 440 grammi |
| Portata del sensore wireless | Fino a 100 metri (all'aria aperta) |
| Dimensioni dello schermo | 5.7 pollici / 14.5 cm |
| Origine | Cina |
8. Garanzia e supporto
Per informazioni sulla garanzia, supporto tecnico o richieste di assistenza, fare riferimento alla scheda di garanzia inclusa con il prodotto o visitare il sito ufficiale Alecto websito. Conserva la ricevuta d'acquisto come prova d'acquisto.
Alettone Websito: www.aletto.nl (General Alecto websito, la pagina di supporto specifica può variare)