
1. Introduzione
This manual provides detailed instructions for the installation, operation, and maintenance of the Fafeicy TM626 DIN Rail Mount AC220V Power Timer Switch. This digital timer is designed for precise time control of electrical appliances and systems, offering programmable on/off cycles for various applications.
The TM626 is suitable for controlling street lights, factory equipment, advertising signs, production machinery, radio and television equipment, stage lighting, and other power equipment that requires regular automated switching.
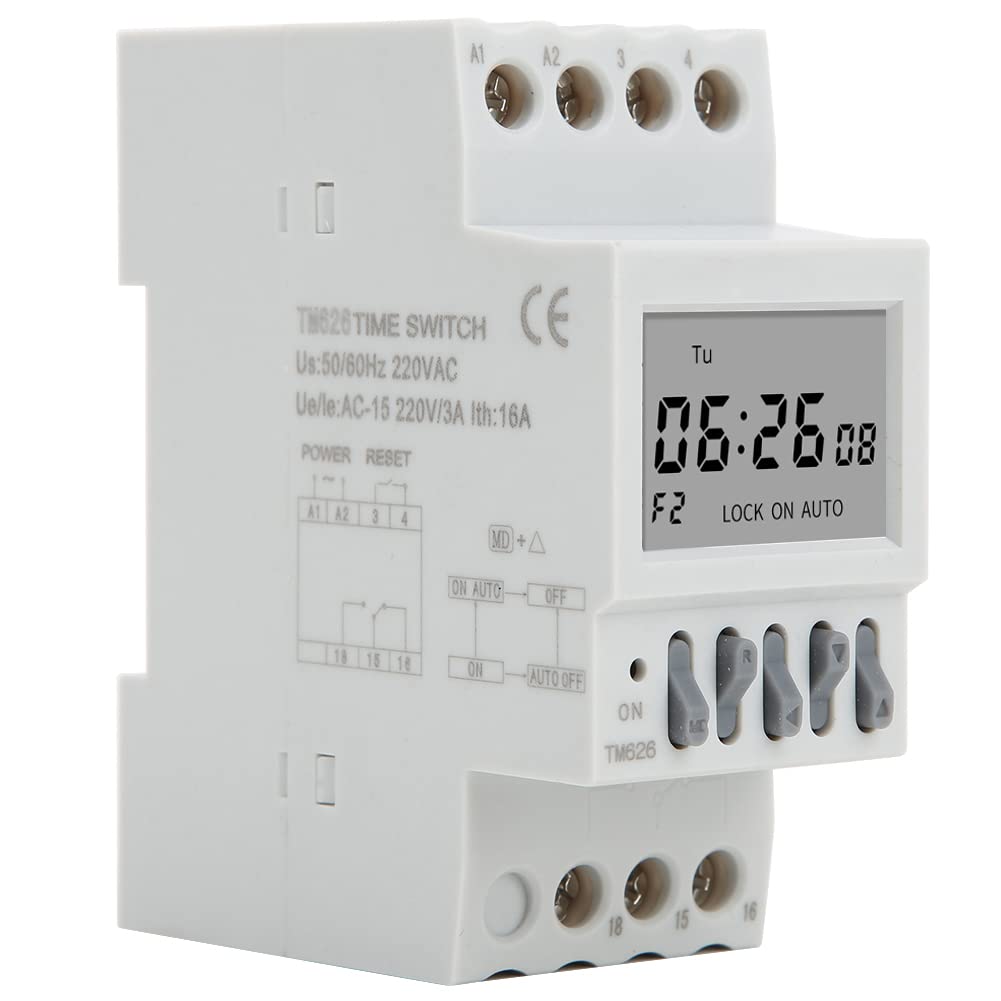
Immagine 1.1: Angolata view of the Fafeicy TM626 Power Timer Switch, showing the display and terminal connections.

Image 1.2: The TM626 timer switch is ideal for automating various applications, including street lighting, industrial equipment, and advertising displays.
2. Informazioni sulla sicurezza
Si prega di leggere attentamente tutte le istruzioni di sicurezza prima di installare o utilizzare questo dispositivo. La mancata osservanza di queste istruzioni può causare scosse elettriche, incendi o lesioni gravi.
- Prima di qualsiasi intervento di installazione o manutenzione, assicurarsi che l'alimentazione elettrica sia scollegata.
- L'installazione deve essere eseguita solo da un elettricista qualificato.
- Non superare il volume specificatotage (AC220V) and current (16A) ratings.
- Tenere il dispositivo lontano dall'acqua e da ambienti ad alta umidità.
- Non tentare di aprire o riparare il dispositivo da soli. Contattare personale qualificato per l'assistenza.
3. Prodotto finitoview
The Fafeicy TM626 is a compact digital timer switch designed for DIN rail mounting. It features a clear LCD display for time and program settings, along with intuitive control buttons.
3.1 Componenti
- Schermo LCD: Mostra l'ora corrente, il giorno e lo stato della programmazione.
- Pulsanti di controllo: Used for setting time, programming, and manual override.
- Morsettiere: For connecting power input and load output.
- DIN Rail Clips: Per un montaggio sicuro su una guida DIN standard.

Immagine 3.1: anteriore view of the TM626 timer switch, highlighting the LCD display and control buttons.

Immagine 3.2: Lato view of the TM626, illustrating the integrated DIN rail mounting clips.
4. Specifiche
| Caratteristica | Specificazione |
|---|---|
| Marca | Fafeicy |
| Numero di modello | TM626 (Fafeicy txusog0m3i) |
| Volume di eserciziotage | AC220V (50/60Hz) |
| Corrente nominale | 16A |
| Dimensioni dello schermo | 1.6 pollici |
| Vita meccanica | ≥ 30,000 volte |
| Vita elettrica | ≥ 10,000 volte |
| Dimensioni (circa) | Width: 35mm (1.4in), Height: 82mm (3.2in), Depth: 68mm (2.7in) |
| Montaggio | Guida DIN |
| Paese di origine | Cina |

Image 4.1: Dimensional drawing of the TM626 timer switch, showing key measurements.

Image 4.2: The TM626 timer switch, illustrating its robust design for long mechanical and electrical life.
5. Configurazione e installazione
Follow these steps for proper installation and initial setup of your TM626 timer switch.
5.1 Montaggio
- Prima del montaggio, assicurarsi che l'alimentazione principale sia SPENTA.
- Locate a standard 35mm DIN rail within your electrical panel.
- Align the DIN rail clips on the back of the TM626 with the DIN rail.
- Press the timer firmly onto the rail until it clicks into place.
5.2 Cablaggio
Refer to the wiring diagram on the device and below for correct connections. Incorrect wiring can damage the device or cause electrical hazards.

Immagine 5.1: Lato view of the TM626 showing the wiring terminals and a simplified internal diagram. Terminals A1 and A2 are for power input (AC220V). Terminals 15, 16, 18 are for load output (15: Common, 16: Normally Closed, 18: Normally Open).
- Connect the AC220V power supply to terminals A1 E A2.
- Connect the common wire of your load to terminal 15.
- For normally open operation (load turns ON when timer activates), connect the load's live wire to terminal 18.
- For normally closed operation (load turns OFF when timer activates), connect the load's live wire to terminal 16.
- Assicurarsi che tutti i collegamenti siano sicuri e isolati.
5.3 Accensione iniziale
After wiring, restore power. The display should light up. If the display is blank, check power connections. The timer may require an initial charge if it has been stored for a long time; allow it to be powered for a few minutes.
6. Istruzioni per l'uso
The TM626 timer switch allows you to set the current time and program multiple on/off cycles.
6.1 Impostazione dell'ora e del giorno correnti
- Premere il tasto OROLOGIO button (if available, or a similar button for time setting).
- Utilizzare il D+ (Day), H+ (Hour), and M+ (Minute) buttons to adjust the current day, hour, and minute.
- Premere OROLOGIO di nuovo per salvare ed uscire.
6.2 Programmazione dei cicli di accensione/spegnimento
The TM626 typically supports multiple ON/OFF programs. The exact number may vary, but common models support 8-16 programs.
- Premere il tasto PROG pulsante. Il display mostrerà "1 ON".
- Utilizzo D+ to select the day(s) for this ON event (e.g., Mon-Fri, Sat-Sun, every day, specific days).
- Utilizzo H+ E M+ per impostare l'orario di accensione desiderato.
- Premere PROG di nuovo. Il display mostrerà "1 OFF".
- Utilizzo D+, H+, E M+ to set the desired OFF time for the first program.
- Repeat steps 1-5 for additional ON/OFF programs (e.g., "2 ON", "2 OFF", etc.).
- Dopo aver impostato tutti i programmi desiderati, premere il tasto OROLOGIO button to exit programming mode and save settings.
6.3 Override manuale
IL MANUALE or ACCESO/AUTOMATICO/SPENTO button allows you to manually override the programmed settings.
- Pressing this button cycles through modes: ON (sempre acceso), AUTO (follows programs), SPENTO (always off).
- Selezionare AUTO for the timer to execute its programmed schedules.
6.4 Funzione di ripristino
To clear all settings and return the timer to its factory default state, locate the small RESET button (often recessed) and press it using a pointed object (e.g., a pen tip). This will erase all time and program settings.
7. Manutenzione
The Fafeicy TM626 timer switch requires minimal maintenance to ensure long-term reliable operation.
- Pulizia: Utilizzare un panno morbido e asciutto per pulire l'esterno del dispositivo. Non utilizzare detergenti abrasivi o solventi.
- Ispezione: Controllare periodicamente i collegamenti dei cavi per verificarne la tenuta e l'eventuale presenza di segni di usura o danni.
- Batteria di backup: The device typically includes an internal battery for retaining settings during power outages. This battery is usually non-replaceable by the user and recharges when the device is powered.
8. Risoluzione Dei Problemi
If you encounter issues with your TM626 timer switch, refer to the following common problems and solutions:
| Problema | Possibile causa | Soluzione |
|---|---|---|
| Il display è vuoto. | Nessuna alimentazione; batteria interna scarica. | Check power connections to A1/A2. Allow device to be powered for several minutes to charge the internal battery. |
| Il carico non si accende/spegne come programmato. | Incorrect programming; timer in manual ON/OFF mode; incorrect wiring; faulty load. | Verify program settings. Ensure the timer is in AUTO mode. Check wiring connections (15, 16, 18). Test the load independently. |
| L'ora non è corretta. | Time not set correctly; power interruption (though internal battery should prevent this). | Reset and re-set the current time and day. Ensure the internal battery is charged. |
| I pulsanti non rispondono. | Malfunzionamento del dispositivo; problema software temporaneo. | Perform a full reset using the recessed RESET button. If the issue persists, contact support. |
9. Garanzia e supporto
For warranty information or technical support, please refer to the documentation provided with your purchase or contact Fafeicy customer service through their official channels. Keep your purchase receipt as proof of purchase.
Per informazioni generali, puoi visitare il sito Fafeicy Brand Store.