1. Introduzione
This manual provides detailed instructions for the setup, operation, and maintenance of your BMW Multi-Function Clock, Alarm, and Weather Station. This device combines a digital clock, an alarm with a snooze function, and a weather station that displays temperature. Please read this manual carefully before use to ensure proper functionality and to maximize your experience with the product.
2. Contenuto della confezione
Si prega di controllare il contenuto della confezione al momento del disimballaggio. Se qualche articolo risulta mancante o danneggiato, contattare il rivenditore.
- BMW Multi-Function Clock, Alarm, and Weather Station Unit
- Manuale dell'utente (questo documento)
3. Impostazione
3.1. Installazione della batteria
Il dispositivo richiede 2 batterie AAA (non incluse) per il funzionamento. Seguire questi passaggi per installare le batterie:
- Individuare il coperchio del vano batterie sul retro dell'unità.
- Per aprire il vano, far scorrere o sollevare delicatamente il coperchio.
- Inserire due batterie AAA, assicurandosi che la polarità sia corretta (+ e -) come indicato all'interno del vano.
- Riposizionare saldamente il coperchio del vano batteria.
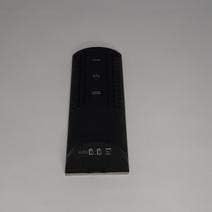
Figura 3.1: Indietro view of the device, illustrating the battery compartment and control buttons for setup.
3.2. Accensione iniziale
After battery installation, the device display will illuminate, and it will typically show a default time or begin searching for a signal (if applicable for weather functions). Proceed to the operating instructions to set the time and other functions.
4. Istruzioni per l'uso
4.1. Impostazione di ora e data
Per impostare l'ora e la data correnti:
- Premere e tenere premuto il tasto MODALITÀ button (usually located on the back or side) for a few seconds until the time display starts flashing.
- Utilizzare il UP or GIÙ buttons (often labeled '+' or '-') to adjust the hour.
- Premere MODALITÀ again to confirm the hour and move to the minutes.
- Regola i minuti utilizzando il UP or GIÙ pulsanti.
- Continua a premere MODALITÀ and adjusting with SU/GIÙ for year, month, and day settings.
- Premere MODALITÀ un'ultima volta per uscire dalla modalità di impostazione.
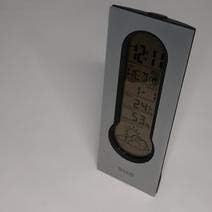
Figura 4.1: Front display of the device, showing the digital clock, temperature, and weather forecast icons.
4.2. Impostazione della sveglia
Per impostare l'ora della sveglia:
- Nella modalità di visualizzazione dell'ora normale, premere il tasto ALLARME pulsante (o MODALITÀ repeatedly until 'AL' or an alarm icon appears).
- Premere e tenere premuto il tasto ALLARME finché l'ora della sveglia non inizia a lampeggiare.
- Utilizzare il UP or GIÙ pulsanti per impostare l'ora desiderata per la sveglia.
- Premere ALLARME again to confirm the hour and move to the minutes.
- Regola i minuti utilizzando il UP or GIÙ pulsanti.
- Premere ALLARME one last time to save the alarm setting. An alarm icon will typically appear on the display to indicate the alarm is active.
4.3. Using Snooze Function
Quando suona la sveglia, premere il tasto POSTICIPARE button (usually a large button on the top of the unit) to temporarily silence the alarm. The alarm will sound again after a few minutes (typically 5-10 minutes, depending on the model). To turn off the alarm completely, press any other button or let it ring until it automatically stops.

Figura 4.2: Superiore view of the device, highlighting the prominent SNOOZE button.
4.4. Visualizzazione della temperatura
The device continuously displays the ambient temperature. The temperature unit (Celsius or Fahrenheit) can usually be switched by pressing a dedicated button (e.g., 'C/F' or 'TEMP') or by holding down one of the adjustment buttons during time setting.
4.5. Weather Station Function
The integrated weather station provides a basic weather forecast using graphical icons (e.g., sun, clouds, rain). This forecast is based on internal barometric pressure changes and is an estimation for the local area. It is not connected to external weather services.
5. Manutenzione
5.1. Pulizia
To clean the device, use a soft, dry cloth. Do not use abrasive cleaners, solvents, or chemical sprays, as these can damage the surface and electronic components. Avoid getting moisture into the device.
5.2. Sostituzione della batteria
When the display dims or functions become erratic, it is time to replace the batteries. Follow the battery installation steps in Section 3.1. Always replace both batteries at the same time with new AAA batteries.
6. Risoluzione Dei Problemi
Se riscontri problemi con il tuo dispositivo, consulta i seguenti problemi comuni e le relative soluzioni:
- Il display è vuoto o poco luminoso:
Check if batteries are installed correctly. Replace with fresh AAA batteries. - L'ora o la data non sono corrette:
Refer to Section 4.1 to reset the time and date. Ensure you confirm each setting step. - L'allarme non suona:
Verify that the alarm is set and activated (look for an alarm icon on the display). Ensure the volume is not set to zero if adjustable. - La lettura della temperatura sembra imprecisa:
Ensure the device is not placed in direct sunlight, near heat sources, or in drafts, which can affect readings. Allow some time for the sensor to stabilize after placement. - Weather forecast icons are not changing:
The weather forecast is based on local barometric pressure changes and may take time to update. It provides a general trend, not a precise forecast.
7. Specifiche
| Caratteristica | Dettaglio |
|---|---|
| Marca | La BMW |
| Numero di modello | 06017443015007 |
| Caratteristiche speciali | Alarm, Snooze, Temperature Display |
| Fonte di alimentazione | Batteria |
| Tipo di batteria | 2 batterie AAA (non incluse) |
| ASIN | B089QGJ9VR |
8. Garanzia e supporto
This product is covered by a standard manufacturer's warranty. For specific warranty terms and conditions, please refer to the documentation provided at the time of purchase or contact your retailer. For technical support or service inquiries, please reach out to the point of purchase or the manufacturer's customer service department.