
1. Introduzione
This manual provides detailed instructions for the installation, operation, and maintenance of your SpeaKa Professional Dual Monitor Mount, model SP-8986136. This monitor mount is designed for office and retail environments, offering flexible monitor positioning with 360° rotation and stepless adjustment. Please read this manual thoroughly before installation and use to ensure proper function and safety.
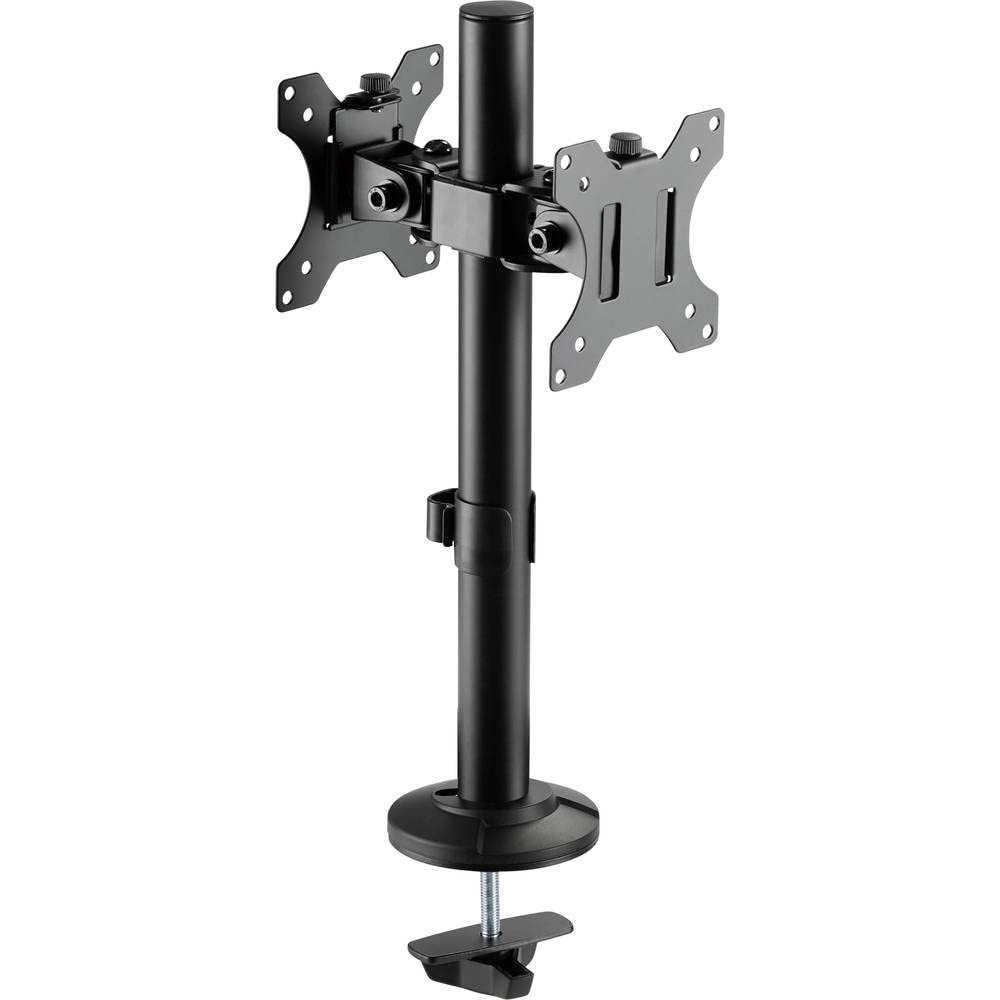
Figure 1: SpeaKa Professional Dual Monitor Mount (SP-8986136) overview.
2. Informazioni sulla sicurezza
- Prima dell'installazione, assicurarsi che tutti i componenti siano presenti e integri.
- Do not exceed the maximum weight capacity specified for the mount.
- Install the mount on a stable and sturdy surface capable of supporting the combined weight of the mount and monitors.
- Stringere saldamente tutte le viti, ma non eccessivamente per evitare di spanare le filettature.
- Tenere lontani bambini e animali domestici durante l'installazione.
- If you encounter any difficulties, consult a qualified professional.
3. Contenuto della confezione
Verifica che tutti i componenti siano inclusi nella confezione. Se qualche componente risulta mancante o danneggiato, contatta l'assistenza clienti.
- Main Pole with Clamp Base
- VESA Monitor Arms (2x)
- Piastre VESA (2x)
- Optional Screw Base
- Kit hardware (viti, rondelle, chiavi a brugola)
- Clip di gestione dei cavi
4. Configurazione e installazione
The SpeaKa Professional Dual Monitor Mount offers two installation options: a clamp base for most tables and desks, and a screw base for added security.
4.1. Scelta dell'opzione di montaggio

Figura 2: Clamp base (left) and screw base (right) options.
- Clamp Base: Ideal for desks with an edge. Provides strong support without drilling.
- Base a vite: Requires drilling a hole through the desk. Offers maximum stability and security.
4.2. clamp Installazione di base
- Allega il clamp base fino alla base del palo principale.
- Position the main pole on your desk edge.
- Stringere la clamp screw until the mount is securely fastened to the desk. Ensure it is stable and does not wobble.
4.3. Screw Base Installation (Grommet Mount)
- If your desk has a grommet hole, ensure it is large enough for the screw base. If not, drill a suitable hole (consult desk manufacturer for recommendations).
- Attach the screw base to the bottom of the main pole.
- Insert the main pole through the grommet hole.
- Secure the screw base from underneath the desk using the provided hardware. Tighten firmly.
4.4. Fissaggio dei bracci del monitor e delle piastre VESA
- Slide the monitor arms onto the main pole at your desired height. Use the provided Allen key to tighten the set screw on each arm.
- Attach the VESA plates to the back of your monitors using the appropriate screws from the hardware kit. Ensure the VESA pattern (e.g., 75x75mm or 100x100mm) matches your monitor.
- Carefully slide the monitors (with VESA plates attached) onto the monitor arms. Secure them with the locking mechanism on the VESA plate.
5. Funzionamento e regolazioni
The monitor mount allows for various adjustments to achieve an optimal viewesperienza di acquisizione.
- Regolazione dell'altezza: Loosen the set screw on the monitor arm, adjust the arm to the desired height on the main pole, and re-tighten the screw.
- Regolazione dell'inclinazione: The monitor can be tilted up to 90 degrees. Loosen the tilt knob on the VESA plate, adjust the monitor angle, and re-tighten.
- Regolazione della rotazione: The monitor arms can swivel horizontally along the main pole. The VESA plate also allows for 360-degree rotation, enabling portrait or landscape orientation.
- Gestione dei cavi: Use the integrated cable management clips on the main pole to route and organize your monitor cables for a tidy workspace.

Figura 3: Esample of dual monitor application in a retail setting.
6. Manutenzione
Una manutenzione regolare garantisce la longevità e il funzionamento sicuro del supporto per monitor.
- Pulizia: Pulisci il supporto con un panno morbido eamp panno. Evitare detergenti abrasivi o solventi.
- Controllo di tenuta: Controllare periodicamente tutte le viti e i collegamenti per assicurarsi che siano ben serrati. Serrare nuovamente se necessario.
- Capacità di peso: Do not add monitors that exceed the specified weight capacity.
7. Risoluzione Dei Problemi
| Problema | Possibile causa | Soluzione |
|---|---|---|
| Monitor wobbles or sags. | Screws are loose; mount not securely fastened to desk; monitor too heavy. | Check and tighten all screws on the VESA plate, monitor arm, and desk clamp/screw base. Ensure monitor weight is within limits. |
| Difficulty adjusting monitor position. | Le manopole/viti di regolazione sono troppo strette. | Slightly loosen the relevant adjustment knob or screw (e.g., tilt knob, arm height screw) before attempting to adjust. Re-tighten after positioning. |
| I cavi sono disordinati. | Gestione dei cavi non utilizzata. | Route cables through the integrated cable management clips on the main pole. |
8. Specifiche
| Numero di modello | SP-8986136 |
| Marca | SpeaKa Professional |
| Tipo di montaggio | Supporto da tavolo (Clamp o Occhiello) |
| Tipo di movimento | Swivel, Tilt, Rotation (360°) |
| Angolo di inclinazione massimo | 90 gradi |
| Dispositivi compatibili | Monitor (VESA compatible) |
| Colore | Nero |
| Peso dell'articolo | 2.15 chilogrammi |
| Dimensioni del pacco | Dimensioni: 46.3 x 35.2 x 10.1 cm |
| Prima data disponibile | 24 luglio 2020 |
9. Informazioni sulla garanzia
SpeaKa Professional products are designed for durability and performance. For specific warranty terms and conditions, please refer to the warranty card included with your product or visit the official SpeaKa Professional websito. Conservare la prova d'acquisto per eventuali reclami in garanzia.
10. Assistenza clienti
If you have any questions, require technical assistance, or need to report a missing/damaged part, please contact SpeaKa Professional customer support.
- Supporto online: Visit the official SpeaKa Professional websito per FAQ e risorse di supporto.
- Informazioni sui contatti: Fare riferimento alla confezione del prodotto o al foglietto illustrativo ufficiale websito per i dettagli di contatto aggiornati (telefono, e-mail).