
HENEX HC-300R
HENEX HC-300R Mini Wireless 2D Barcode Scanner User Manual
Modello: HC-300R | Marca: HENEX
1. Introduzione
The HENEX HC-300R Mini Wireless 2D Barcode Scanner is a versatile and portable device designed for efficient barcode reading. It supports 1D and 2D barcodes and offers multiple connection options including 2.4G wireless, Bluetooth, and wired USB. Featuring an LCD screen, it provides real-time feedback and allows for offline storage of scanned data, making it suitable for various applications such as retail, warehousing, and logistics.
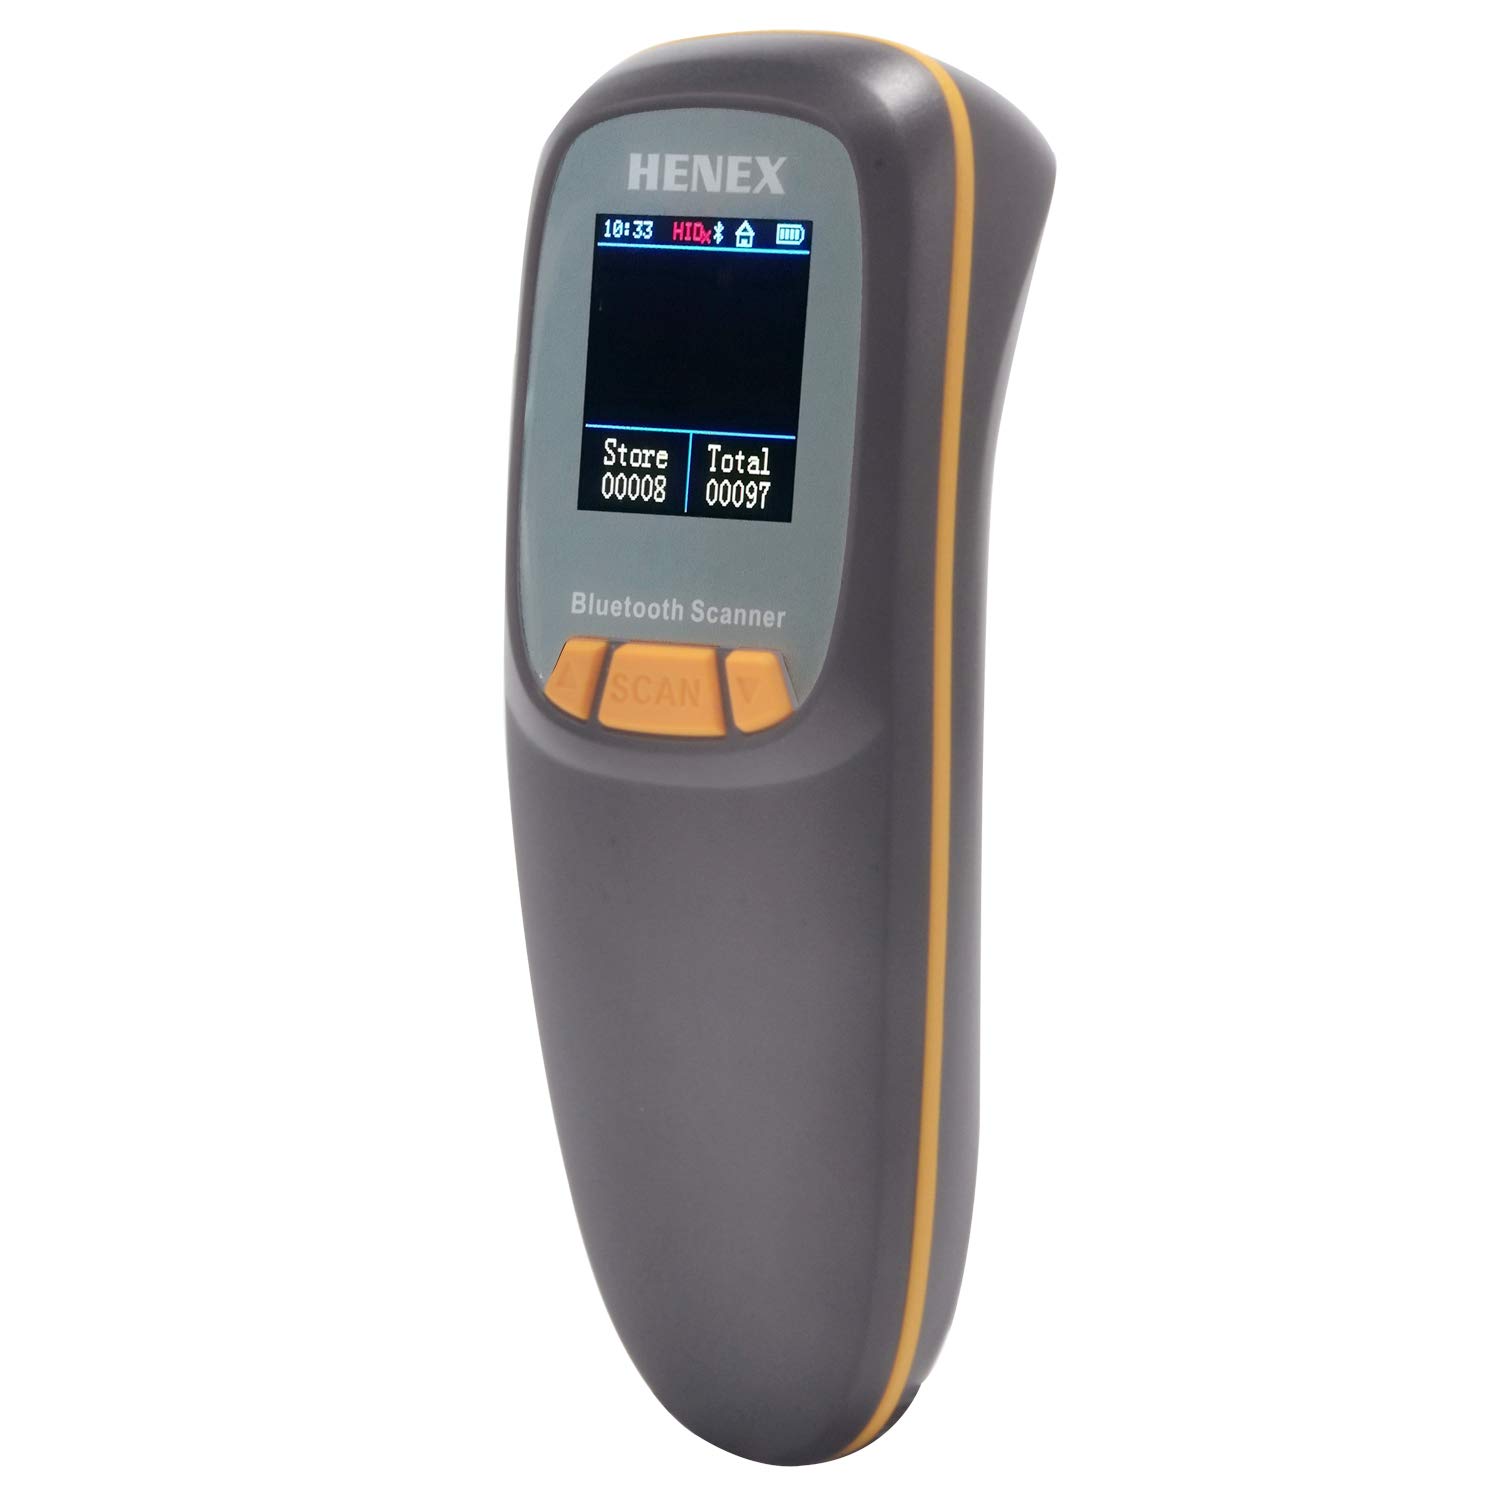
Image: The HENEX HC-300R Mini Wireless 2D Barcode Scanner, showcasingrazie al suo design compatto e alla compatibilità con vari sistemi operativi.

Image: The scanner is compatible with Bluetooth, WiFi, Windows, Android, and iPhone devices.

Image: The scanner is suitable for various scenarios like supermarkets, restaurants, pharmacies, warehouses, and logistics, supporting most 1D and 2D barcode types including QR Code, Data Matrix, PDF417, and Codebar.

Image: The scanner's light and convenient mini size (130g) makes it easy to carry in hand or pocket.
2. Contenuto della confezione
Dopo aver aperto la confezione, verificare che tutti gli articoli siano presenti e in buone condizioni:
- 1x HENEX HC-300R Barcode Scanner
- 1x cavo di ricarica USB (tipo C)
- 1x 2.4G USB Wireless Receiver
- 1x Barcode Instruction Manual (with setting barcodes)
- 1x Neck Rope

Image: All items included in the HENEX HC-300R package: the scanner, USB cable, 2.4G receiver, and manual.
3. Configurazione e connessione
The HENEX HC-300R offers a 3-in-1 connection design, supporting 2.4G wireless, Bluetooth, and wired USB connections. No driver software installation is required for basic operation.
3.1. 2.4G Wireless Connection (Default Mode)
- Ensure the scanner is powered on. The default connection mode is 2.4G wireless.
- Plug the 2.4G USB wireless receiver into an available USB port on your computer or device.
- The scanner will automatically connect to the receiver. A successful connection is indicated by the scanner's screen.
- You can now scan barcodes, and the data will be transmitted instantly to your connected device.
Video: This video demonstrates the unboxing, menu functions, and various connection modes of the HENEX HC-300R barcode scanner, including 2.4G wireless and Bluetooth pairing. It also shows barcode scanning in different modes.
Description of Video Segment (07:55 - 08:27): The video shows connecting the 2.4G USB receiver to a laptop and scanning barcodes. The scanned data appears instantly on the laptop screen, demonstrating the ease of use in default wireless mode.
3.2. Connessione Bluetooth
To connect via Bluetooth, you need to enter the scanner's built-in system and select the Bluetooth HID mode.
- Enter System Menu: Press the Up and Down buttons simultaneously on the scanner to enter the built-in system menu.
- Navigate to Connection Mode: Use the Up/Down buttons to navigate to "Connection mode" and press the middle "SCAN" button to confirm.
- Select Bluetooth HID: In the "Connection mode" menu, use the Up/Down buttons to select "Bluetooth HID" and press "SCAN" to confirm. The scanner's screen will flash, indicating it's in pairing mode.
- Associa al dispositivo: On your mobile phone or Bluetooth-enabled device, go to Bluetooth settings and search for "Barcode scanner HID". Select it to pair.
- Once paired, the scanner screen will stop flashing, and you can begin scanning.
Description of Video Segment (09:11 - 10:56): This part of the video demonstrates how to set up a Bluetooth connection. It shows navigating the scanner's menu to select "Bluetooth HID" mode, then pairing the scanner with a mobile phone. After successful pairing, barcodes are scanned, and the data is transmitted to a text application on the phone.
3.3. Connessione cablata
When the battery is low or if a wireless connection is not preferred, you can use the USB cable for a wired connection and charging.
- Connect the Type-C end of the USB cable to the scanner.
- Connect the USB-A end of the cable to your computer or a USB power adapter.
- The scanner will charge and can transmit data directly via the USB cable. The screen will display the charging status.
Description of Video Segment (08:28 - 08:54): The video illustrates connecting the scanner to a laptop via the USB cable. It shows the cable being plugged into the scanner and the laptop, and the scanner's screen displaying the charging status.
4. Modalità operative e impostazioni
The HENEX HC-300R features a built-in system with an LCD screen, allowing you to configure various settings directly on the device without scanning manual setting barcodes. To access the system menu, press the Up and Down buttons simultaneously.
4.1. Navigazione nel menu
- Tasto su: Represents upward selection.
- Tasto Giù: Represents downward selection.
- Middle "SCAN" Button: Confirms the selected option.
- To return to the scanning panel from any menu, press the Up and Down buttons simultaneously.
Description of Video Segment (00:54 - 01:56): This segment introduces the menu function of the built-in system. It demonstrates how to enter the system by pressing the Up and Down buttons, and how to navigate through the menu using the Up, Down, and SCAN buttons.
4.2. Modalità di connessione
This option allows you to switch between different connection types:
- 2.4G: Default wireless connection mode using the USB receiver.
- Bluetooth HID: For connecting to devices as a Human Interface Device (e.g., mobile phones, tablets).
- SPP (Porta seriale Profile): For serial data communication via Bluetooth.
- BLE (Bluetooth Low Energy): For low-power Bluetooth connections.
- Android CIE / Virtual COM: Specific modes for Android devices or virtual serial port emulation.
Description of Video Segment (02:01 - 02:51): The video shows navigating to the "Connection mode" option and cycling through the available modes like "Bluetooth 2.4G", "HID", "SPP", "BLE", "Android CIE", and "Virtual COM".
4.3. Impostazioni della tastiera
Configure the national language for barcode information entry. Supported languages include American, German, French, Spanish, and Italian.
Description of Video Segment (02:51 - 03:05): This part demonstrates selecting the "Keyboard" option and shows the list of supported keyboard layouts/languages.
4.4. Encoding Settings
This option's function is currently not activated.
Description of Video Segment (03:05 - 03:11): The video briefly highlights the "Encoding setting" option, stating it's not yet activated.
4.5. Impostazioni audio
Adjust the volume of the scanner's prompt sounds when scanning barcodes. Options include High, Middle, Low volume, Mute, and Frequency settings.
Description of Video Segment (03:11 - 03:32): The video shows navigating to "Sound settings" and adjusting options like "High volume", "Middle volume", "Low volume", "Mute", and "Frequency".
4.6. Impostazioni di vibrazione
Enable or disable vibration feedback during barcode scanning.
- Aprire: Enable vibration.
- Vicino: Disable vibration.
Description of Video Segment (03:32 - 03:52): This segment demonstrates how to turn vibration "Open" or "Close" within the "Vibration" settings.
4.7. Transport Mode (Offline Storage)
This mode is ideal for warehouse counting and data uploading, allowing the scanner to store barcodes offline.
- Modalità inventario: Offline storage mode. A storage icon will appear on the display panel.
- Modalità normale: Instant transmission mode. The storage icon will disappear.
- Don't Lose Mode: Ensures data is not lost during transmission.
- Caricamento dati: Uploads stored data to the connected device.
- Clear Count Data: Clears all stored barcode count data.

Image: The LCD display shows "Store" to collect and save barcodes, and "Total" to record the number of barcodes.
Description of Video Segment (03:52 - 04:27 & 08:54 - 12:51): The video shows navigating to "Transport Mode" and selecting "Inventory mode" for offline storage, indicated by a storage icon. It then demonstrates scanning barcodes in this mode, storing them, and later uploading them to a connected device. It also shows how to switch back to "Normal mode" for instant upload.
4.8. Dormancy Setting
Configure the idle time before the scanner enters standby sleep state. Options include 30 seconds, 1 minute, 2 minutes, 5 minutes, 10 minutes, and "Never sleep".
Description of Video Segment (04:27 - 04:50): This segment shows adjusting the "Dormancy setting" to various time intervals or "Never sleep".
4.9. Transfer Rate
Set the speed for uploading barcode information. Options include Fast, Medium speed, Low speed, and Super low speed.
Description of Video Segment (04:50 - 05:09): The video demonstrates selecting different "Transfer rate" options like "Fast", "Medium speed", "Low speed", and "Super low speed".
4.10. Impostazione senza fili
This option is used for pairing the scanner with 2.4G wireless and Bluetooth connections.
- Matching Mode: Initiates the pairing process.
- Nome Bluetooth: Displays the scanner's Bluetooth name.
Description of Video Segment (05:09 - 05:31): The video shows navigating to "Wireless setting" and selecting "MatchingMode" to start the pairing process.
4.11. Impostazione chiave
Configures the function of the scanner's "SCAN" key.
- Long Press Open/Close: Toggles scanning on/off with a long press.
- Double Click Open/Close: Toggles scanning on/off with a double click.
Description of Video Segment (05:31 - 05:48): This segment shows the "Key setting" options, including "Long Press Open/Close" and "Double Click Open/Close".
4.12. Barcode Hiding
Allows you to hide or upload the prefix or suffix of the read barcode information.
- Hidden Prefix: Hides the prefix.
- Hidden Suffix: Hides the suffix.
Description of Video Segment (05:48 - 06:05): The video demonstrates the "Barcode hiding" options for hiding prefixes or suffixes.
4.13. Barcode End
Sets the character(s) to be added after uploading barcode information.
- CR (Carriage Return): Adds a carriage return.
- LF (Line Feed): Adds a line feed.
- CR+LF: Adds both carriage return and line feed.
- SCHEDA: Adds a tab character.
- Not Add: Adds no character.
Description of Video Segment (06:05 - 06:24): This segment shows the "Barcode end" options for adding various termination characters after a scan.
4.14. Case Settings
Determines whether to convert the case of uploaded barcode information.
- Case To Lowercase: Converts to lowercase.
- Case To Uppercase: Converts to uppercase.
- Case Exchange: Swaps case (e.g., uppercase to lowercase, lowercase to uppercase).
- Normale: No case conversion.
Description of Video Segment (06:24 - 06:43): The video demonstrates the "Case settings" options for converting barcode text to lowercase, uppercase, exchanging case, or keeping it normal.
4.15. Versione
Displays the firmware version information of the barcode scanner system.
Description of Video Segment (06:43 - 06:51): This segment shows accessing the "Version" information on the scanner's screen.
4.16. Restore Defaults
Restores the barcode scanner to its factory default settings. This function is useful if the scanner is not working correctly or if settings are incorrect.
Description of Video Segment (06:51 - 07:08): The video demonstrates selecting "Restore Defaults" and confirming the action.
4.17. Clear Total Count
Clears the total number of scanned barcode information displayed in the scanner's work panel.
Description of Video Segment (07:08 - 07:20): This segment shows how to clear the total count of scanned barcodes using the "Clear Total Count" option.
4.18. Lingua
Sets the display language of the built-in system. Currently, English and Chinese languages are supported.
Description of Video Segment (07:20 - 07:37): The video demonstrates selecting the "Language" option and switching between English and Chinese.
4.19. Ritorno
Exits the setup system and returns to the main scanning panel.
Description of Video Segment (07:37 - 07:54): This segment shows using the "RETURN" option to exit the setup menu and go back to the main scanning interface.
5. Specifiche
| Caratteristica | Dettaglio |
|---|---|
| Immagine (pixel) | 640 pixels (horizontal) * 480 pixels (vertical) |
| Sorgente luminosa | Puntamento: LED da 617 nm; Illuminazione: LED da 4000K |
| Sensore di immagine | CMOS |
| Velocità di scansione | 30 fps/secondo |
| Filling Depth | 40-200mm @ UPC / EAN13mil PCS = 90%; 20-250mm @ QR 20mil PCS = 100% |
| Angolo di scansione | Elevation angle 65°/tilt angle 30°/deflection angle 55° |
| Campo di View | Orizzontale 34°, Verticale 28° |
| Risoluzione di lettura | Exceeds 5 million |
| Contrasto di stampa | Exceeds 25% |
| Indicatore visivo | Blue LED light, red charging light and buzzer |
| Modalità di comunicazione | 2.4G, Bluetooth BLE4.0 and Type-C |
| Distanza di comunicazione | 2.4G: 100 meters (open air), Bluetooth: 40 meters (open air) |
| Capacità di memoria | Up to 512000 bits (35000 EAN 13 codes) |
| Misurare | 135 mm * 51 mm * 40 mm (lunghezza * larghezza * altezza) |
| Peso | 104 grammi (4.6 once) |
| Materiale | ABS + PC |
| Cavo | Cavo di tipo C. |
| Ingresso volumetage | 5VDC ± 10% |
| Corrente di lavoro | 400mA |
| Batteria | Rechargeable lithium battery 1500mAh (1 Lithium Ion battery included) |
| Modello di ricarica | Ricarica con cavo di tipo C |
| Resistenza alla caduta | Can withstand a drop of 2 meters |
| Codici a barre 1D supportati | UPC/EAN/JAN, UPC-A and UPC-E, EAN-8 and EAN-13, JAN-8 and JAN-13, ISBN/ISSN, Code 39 (with full ASCII), Codabar (NW7), Code 128 & EAN 128, Code 93, Interleaved 2 of 5 (ITF), Appendix 2 of 5 IATA code, MSI/Plessy, Chinese postal code, Code 32 (Italian Pharmacopoeia), RSS 14, RSS Limited, RSS Extension. |
| Codici a barre 2D supportati | QR code, Data Matrix, PDF417, Aztec, Maxicode, GS1 DataBar stack. |
| Dispositivi compatibili | Laptop, PC, POS, Smartphone, Tablet, Computers (Windows XP/7/8/10, Mac OS, Linux, Windows Mobile) |

Image: Detailed dimensions of the scanner: Thick: 40mm, Wide: 52mm, High: 135mm.

Image: The scanner features a 1200mAh battery, offering longer continuous use and standby time compared to ordinary scanners (500mAh).

Image: Transmission distances for 2.4G Wireless Mode (30m/98ft barrier-free, 15m/49ft with obstacles) and BT 4.1 Mode (50m/164ft barrier-free, 20m/66ft with obstacles).
6. Manutenzione
- Keep the scanner clean by wiping it with a soft, dry cloth. Avoid using harsh chemicals or abrasive materials.
- Protect the scanner from extreme temperatures, direct sunlight, and moisture.
- Ensure the USB port is free from dust and debris.
- Regularly charge the battery to maintain its lifespan.
7. Risoluzione Dei Problemi
- Lo scanner non si connette:
- Assicurarsi che lo scanner sia acceso e completamente carico.
- Verify the correct connection mode (2.4G or Bluetooth) is selected in the scanner's settings.
- Per 2.4G, assicurarsi che il ricevitore USB sia collegato correttamente.
- For Bluetooth, ensure your device's Bluetooth is enabled and the scanner is paired.
- Provare a riavviare sia lo scanner sia il dispositivo host.
- I dati scansionati non vengono visualizzati:
- Check if the scanner is in "Inventory Mode" (offline storage). If so, upload the data.
- Ensure the cursor is active in a text field on your host device.
- Verify the connection is stable.
- Incorrect barcode output:
- Check the "Keyboard" and "Case settings" in the scanner's menu.
- Ensure the barcode type is supported by the scanner (refer to Specifications).
- Scanner unresponsive or settings are wrong:
- Use the "Restore Defaults" option in the system menu to revert to factory settings.
8. Garanzia e supporto
For any questions regarding the product, scanning barcodes, or technical assistance, please feel free to contact us. We are committed to providing support and will reply to your inquiries within 24 hours.
Manufacturer: Yafeng
For additional information, you may visit: http://m.atobo.com.cn/u/winningqd
Ask a question about this manual
Ask about setup, troubleshooting, compatibility, parts, safety, or missing instructions. Manuals+ will review the question and use this page’s manual context to help answer it.