Vacmaster VP200
Manuale di istruzioni per la macchina sottovuoto a camera VacMaster VP200
Modello: VP200
Marca: Vaccino
1. Introduzione
This instruction manual provides comprehensive guidance for the safe and efficient operation, maintenance, and troubleshooting of your VacMaster VP200 Chamber Vacuum Sealer. Please read this manual thoroughly before using the appliance to ensure optimal performance and longevity.
The VacMaster VP200 is an oil-less chamber vacuum sealer designed for professional and home use, offering superior vacuum packaging for various food items, liquids, and even for marinating.
2. Importanti istruzioni di sicurezza
Quando si utilizzano apparecchi elettrici, è necessario seguire sempre le precauzioni di sicurezza di base, tra cui le seguenti:
- Leggere tutte le istruzioni prima di mettere in funzione l'apparecchio.
- Non immergere l'apparecchio, il cavo o la spina in acqua o altri liquidi.
- È necessaria un'attenta supervisione quando un elettrodomestico viene utilizzato da bambini o nelle loro vicinanze.
- Scollegare dalla presa quando non in uso e prima di pulire. Lasciare raffreddare prima di mettere o togliere parti.
- Non utilizzare alcun apparecchio con un cavo o una spina danneggiati oppure dopo che l'apparecchio stesso non funziona correttamente o è stato danneggiato in qualsiasi modo.
- The use of accessory attachments not recommended by the manufacturer may cause hazards.
- Non utilizzare all'aperto.
- Non lasciare che il cavo penda dal bordo di un tavolo o di un bancone e non tocchi superfici calde.
- Non posizionare sopra o vicino a un fornello a gas o elettrico caldo, oppure in un forno caldo.
- Collegare sempre prima la spina all'apparecchio, quindi collegare il cavo alla presa a muro. Per scollegarlo, posizionare un qualsiasi interruttore su "off", quindi rimuovere la spina dalla presa a muro.
- Utilizzare questo apparecchio solo per l'uso previsto.
- Ensure the lid is properly closed and latched before starting any operation.
- Do not attempt to open the lid during a vacuum cycle.
3. Componenti del prodotto
Familiarize yourself with the main parts of your VacMaster VP200 Chamber Vacuum Sealer:
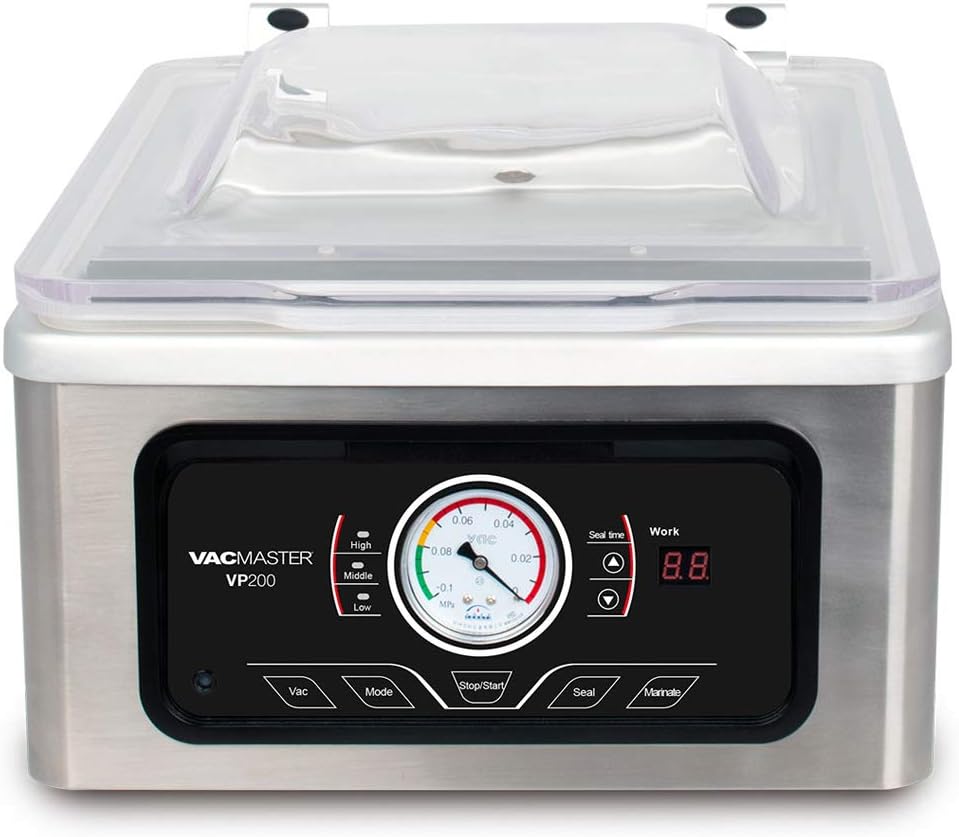
Figura 3.1: Davanti view of the VacMaster VP200 Chamber Vacuum Sealer with the lid closed, showing the control panel and vacuum gauge.

Figura 3.2: Davanti view of the VacMaster VP200 Chamber Vacuum Sealer with the lid open, revealing the vacuum chamber and seal bar.

Figura 3.3: The VacMaster VP200 Chamber Vacuum Sealer connected to an external vacuum canister, demonstrating its versatility for various container types.
- Coperchio: Coperchio trasparente per viewing the vacuum process.
- Camera sottovuoto: The area where the bag is placed for vacuuming.
- Barra di tenuta: Heats to create a strong, airtight seal on the bag.
- Pannello di controllo: Contiene pulsanti e display per il funzionamento.
- Vacuometro: Displays the vacuum level during operation.
- Porta del vuoto esterna: For use with external vacuum canisters (as shown in Figure 3.3).
4. Configurazione iniziale
- Disimballaggio: Carefully remove the vacuum sealer from its packaging. Retain packaging for future storage or shipping.
- Posizionamento: Posizionare l'unità su una superficie stabile, piana e asciutta. Assicurarsi che vi sia spazio sufficiente intorno all'unità per la ventilazione.
- Collegamento elettrico: Collegare il cavo di alimentazione a una presa elettrica con messa a terra. Assicurarsi che il volumetage matches the specifications of the unit (110 watts, 120V AC).
- Pulizia iniziale: Before first use, wipe down the vacuum chamber and seal bar with a damp panno e sapone neutro. Asciugare accuratamente.
5. Istruzioni per l'uso
5.1. Basic Vacuum & Seal Operation
- Preparare la borsa: Use only VacMaster chamber vacuum bags or other high-quality chamber-specific bags. Ensure the bag is large enough for the contents and allows at least 2-3 inches of space above the food for sealing.
- Place Item in Bag: Place the food item into the vacuum bag. For liquids or moist foods, ensure the top of the bag is clean and dry to allow for a proper seal.
- Position Bag in Chamber: Lay the open end of the bag flat across the seal bar, ensuring it is smooth and free of wrinkles. The contents of the bag should be entirely within the vacuum chamber.
- Chiudi coperchio: Chiudere saldamente il coperchio finché non scatta in posizione.
- Select Vacuum Level (Mode Button):
- Premere il tasto Modalità button to cycle through vacuum levels: Alto, Mezzo, Basso. Select the appropriate level based on the food item's fragility.
- The vacuum gauge will indicate the current vacuum pressure.
- Adjust Seal Time (Seal Time Display):
- The "Seal Time" display shows the duration the seal bar will heat. Adjust this based on bag thickness. Thicker bags require longer seal times.
- Utilizzare il Up E Giù arrows next to the "Seal Time" display to adjust.
- Inizio ciclo: Premere il tasto Arresto/avvio button to begin the vacuum and seal cycle. The unit will automatically vacuum the air from the chamber, then seal the bag, and finally release the vacuum.
- Coperchio aperto: Once the cycle is complete and the vacuum has released (indicated by the gauge returning to zero), open the lid and remove the sealed bag.
5.2. Marinating Function
The VP200 can also be used for rapid marinating:
- Place food and marinade into a chamber vacuum bag.
- Position the bag in the chamber as described in step 5.1.3.
- Chiudere bene il coperchio.
- Premere il tasto Marinare button. The unit will cycle through vacuum and release phases multiple times to infuse the marinade into the food.
- Once the cycle is complete, open the lid and remove the marinated food.
5.3. External Canister Vacuuming
To use with an external canister (as shown in Figure 3.3):
- Connect one end of the accessory hose to the external vacuum port on the VP200 and the other end to your VacMaster-compatible vacuum canister.
- Ensure the canister lid is properly sealed.
- Premere il tasto Vuoto button. The unit will pull a vacuum on the canister.
- Once the desired vacuum level is reached, press Arresto/avvio or disconnect the hose.
6. Cura e manutenzione
Proper maintenance ensures the longevity and optimal performance of your VacMaster VP200.
- Pulizia della camera: After each use, especially when sealing moist foods, wipe the vacuum chamber with a damp cloth and mild, non-abrasive detergent. Dry thoroughly. Do not use harsh chemicals or abrasive cleaners.
- Cleaning the Seal Bar: Gently wipe the seal bar and the Teflon strip with a damp cloth. Ensure no food particles or moisture are present on the sealing area, as this can affect the seal quality.
- Cura della guarnizione: The rubber gasket around the rim of the chamber creates the vacuum seal. Inspect it regularly for cracks, tears, or debris. Clean it with a damp cloth. If damaged, it may need replacement.
- Oil-less Pump: The VacMaster VP200 features an oil-less pump, meaning it does not require oil changes or regular pump maintenance associated with oil-based vacuum pumps. This simplifies upkeep significantly.
- Magazzinaggio: Store the unit in a clean, dry place. It is recommended to leave the lid slightly ajar when not in use to prevent compression of the gasket and allow air circulation.
7. Guida alla risoluzione dei problemi
Fare riferimento a questa sezione per i problemi più comuni e le relative soluzioni.
| Problema | Possibile causa | Soluzione |
|---|---|---|
| L'unità non si accende. | Non collegato; problema con la presa di corrente; fusibile bruciato. | Ensure unit is securely plugged into a working outlet. Check circuit breaker or fuse. |
| Il sacchetto non aspira correttamente. | Lid not closed securely; bag not flat on seal bar; bag has a hole; gasket dirty or damaged. | Ensure lid is latched. Smooth bag on seal bar. Check bag for leaks. Clean or replace gasket. |
| La busta non si sigilla. | Seal bar dirty/wet; seal time too short/long; bag material incompatible; Teflon strip damaged. | Clean seal bar and ensure it's dry. Adjust seal time. Use proper chamber bags. Inspect and replace Teflon strip if necessary. |
| Vacuum gauge not moving. | Lid not sealed; pump issue. | Ensure lid is firmly closed. If problem persists, contact customer support. |
8. Specifiche del prodotto
| Caratteristica | Dettaglio |
|---|---|
| Numero di modello | VP200 |
| Marca | Vaccino |
| Fonte di alimentazione | Elettrico con cavo |
| Cosatage | 110 watt |
| Peso dell'articolo | 27.5 libbre |
| Dimensioni del pacco | 21.4 x 18.4 x 14.5 pollici |
| Colore | Nero, Argento |
| Tipo di pompa | Oil-less Dry Pump |
9. Garanzia e assistenza clienti
For detailed warranty information, product registration, or technical support, please visit the official VacMaster webo contattare il servizio clienti. Conservare la ricevuta d'acquisto come prova d'acquisto per eventuali reclami in garanzia.
Vacmaster Official Websito: www.vacmasterfresh.com
For service or parts, please contact VacMaster customer support directly.
Ask a question about this manual
Ask about setup, troubleshooting, compatibility, parts, safety, or missing instructions. Manuals+ will review the question and use this page’s manual context to help answer it.