1. Informazioni sulla sicurezza
Read this entire manual carefully before operating the X-PRO 50cc Maui 50 moped. Failure to follow instructions and safety precautions may result in serious injury or property damage.
- Always wear an approved helmet and appropriate safety gear when operating the moped.
- Ensure all local and state regulations regarding moped operation, licensing, and registration are followed.
- The Manufacturer Statement of Origin (MSO) and Bill of Sale paperwork will be sent separately. Do not attempt to register or title the moped before receiving these documents and confirming the product is satisfactory.
- Perform a pre-ride inspection before each use, checking tires, brakes, lights, and fluid levels.
- This moped is designed for adult use.
2. Assemblaggio e configurazione iniziale
The X-PRO 50cc Maui 50 moped requires some assembly upon delivery. It is recommended that assembly be performed by an individual with mechanical aptitude or a qualified technician.
2.1 Disimballaggio e ispezione
Upon receiving your moped, carefully inspect the packaging for any signs of damage. The moped is typically shipped in a protective steel frame within a cardboard box.

Image: The X-PRO Maui 50 moped packaged in its shipping box, secured with straps, indicating careful transport.
2.2 Fasi di assemblaggio richieste
- Installazione del manubrio: Secure the handlebar to the steering column. Ensure all bolts are tightened to specification.
- Front Wheel and Brake Assembly: Install the front wheel. Carefully align the brake rotor with the caliper. Ensure the speedometer cable is connected correctly.
- Installazione della batteria: Locate the battery compartment (often under the floor mat). Install the new battery, connecting the positive and negative terminals securely.
- Trunk (if included): Attach the rear storage trunk using the provided hardware.
- Installazione dello specchio: Install and adjust the rearview mirrors for optimal visibility.
2.3 Initial Fluid Checks and Fueling
- Olio motore: The moped is shipped with transport oil. It is crucial to drain this and replace it with fresh 10W-40 4T motorcycle oil. The capacity is approximately 700ml. Ensure the oil level is within the cross-hatches on the dipstick.
- Carburante: Fill the fuel tank with mid-grade or premium gasoline.
3. Istruzioni per l'uso
3.1 Starting the Moped
- Assicurarsi che l'interruttore del carburante sia in posizione "ON".
- Inserire la chiave nell'accensione e girarla in posizione "ON".
- For electric start: Squeeze either brake lever and press the electric start button.
- For kick start: Ensure the key is 'ON', then firmly push down on the kick start lever.
- Lasciare riscaldare il motore per un breve periodo prima di guidare.
3.2 Periodo di rodaggio
The first few hundred miles are critical for the engine's longevity. Avoid full throttle operation and sudden accelerations during this period. Vary your speed and avoid prolonged periods at a single RPM. This allows components like piston rings and bearings to seat properly.
3.3 Controlli e funzionalità
- Throttle: Situato sul manubrio destro. Ruotare delicatamente per accelerare.
- Freni: Hand levers on both handlebars control the front and rear brakes.
- Luci: Headlight, taillight, and turn signals are operated via switches on the handlebars.
- Corno: Button on the handlebar.
- Porta di ricarica: A convenient USB charging port is available for electronic devices.
- Magazzinaggio: Features include under-seat storage and a rear trunk for personal items.

Immagine: dettagliata view of the moped's charging port, widened foot pedal, and comfortable seat design.

Immagine: Oltreview of the moped's storage options, showing a convenient front compartment, under-seat storage, and a lockable rear trunk.
4. Manutenzione
Regular maintenance is essential for the safe and reliable operation of your X-PRO 50cc Maui 50 moped.
4.1 Controlli di routine
- Pressione degli pneumatici: Check tire pressure regularly. Maintain recommended PSI (e.g., 40 PSI as suggested by users).
- Freni: Inspect brake pads and fluid levels. Ensure brakes are responsive.
- Luci: Verify all lights (headlight, taillight, turn signals) are functioning.
- Elementi di fissaggio: Periodically check and tighten all important bolts and fasteners. Applying blue threadlocker to critical bolts is recommended.
4.2 Engine Oil Changes
After the break-in period (e.g., first 100-200 miles), perform an oil change. Subsequent oil changes should follow the schedule outlined in a more detailed service manual, typically every 500-1000 miles or seasonally.
- Drain old oil by removing the drain plug, spring, and mini filter.
- Reinstall the filter, spring, and plug, ensuring the grommet is correctly seated.
- Add approximately 700ml of fresh 10W-40 4T motorcycle oil.
- Controllare il livello dell'olio utilizzando l'astina di livello.
4.3 Candela
Consider replacing the factory spark plug with a quality alternative like an NGK spark plug for improved performance and reliability.
4.4 Cura della batteria
Keep the battery charged, especially during periods of non-use. Disconnect the battery if storing the moped for an extended time.
5. Risoluzione Dei Problemi
This section addresses common issues you might encounter with your moped.
- Moped Not Starting:
- Check fuel level and ensure the fuel switch is ON.
- Verify the key is in the 'ON' position.
- Ensure a brake lever is squeezed when using the electric start.
- Controllare la carica della batteria.
- Confirm fuel flow to the carburetor (e.g., by checking the clear fuel filter).
- Engine Shuts Off After Short Period:
- This could indicate a fuel delivery issue (clogged fuel line, carburetor problem) or an electrical fault. Consult a technician.
- Throttle Issues (Stuck or Non-Responsive):
- Inspect the throttle cable for kinks or damage.
- Adjust the throttle cable tension at the handle grip.
- If the throttle remains stuck or unresponsive, discontinue use immediately and seek professional inspection.
- Speedometer Not Working:
- Check the speedometer cable connection at both the front wheel and the instrument cluster.
- A damaged or disconnected cable is a common cause. Replacement may be necessary.
6. Specifiche
| Caratteristica | Specificazione |
|---|---|
| Marca | XPRO |
| Modello | Maui 50 |
| Numero modello articolo | MC-N13 |
| Dimensioni del motore | 50cc |
| Dimensioni della ruota | 13 Inches (overall), 10 Inches (rim/item diameter) |
| Tipo di servizio del veicolo | Scooter, Motorcycle |
| Colore | Bianco |
| Peso dell'articolo | 163 libbre |
| Tipo di inizio | Electric/Kick Start |
| Caratteristiche speciali | Lights, Seat |
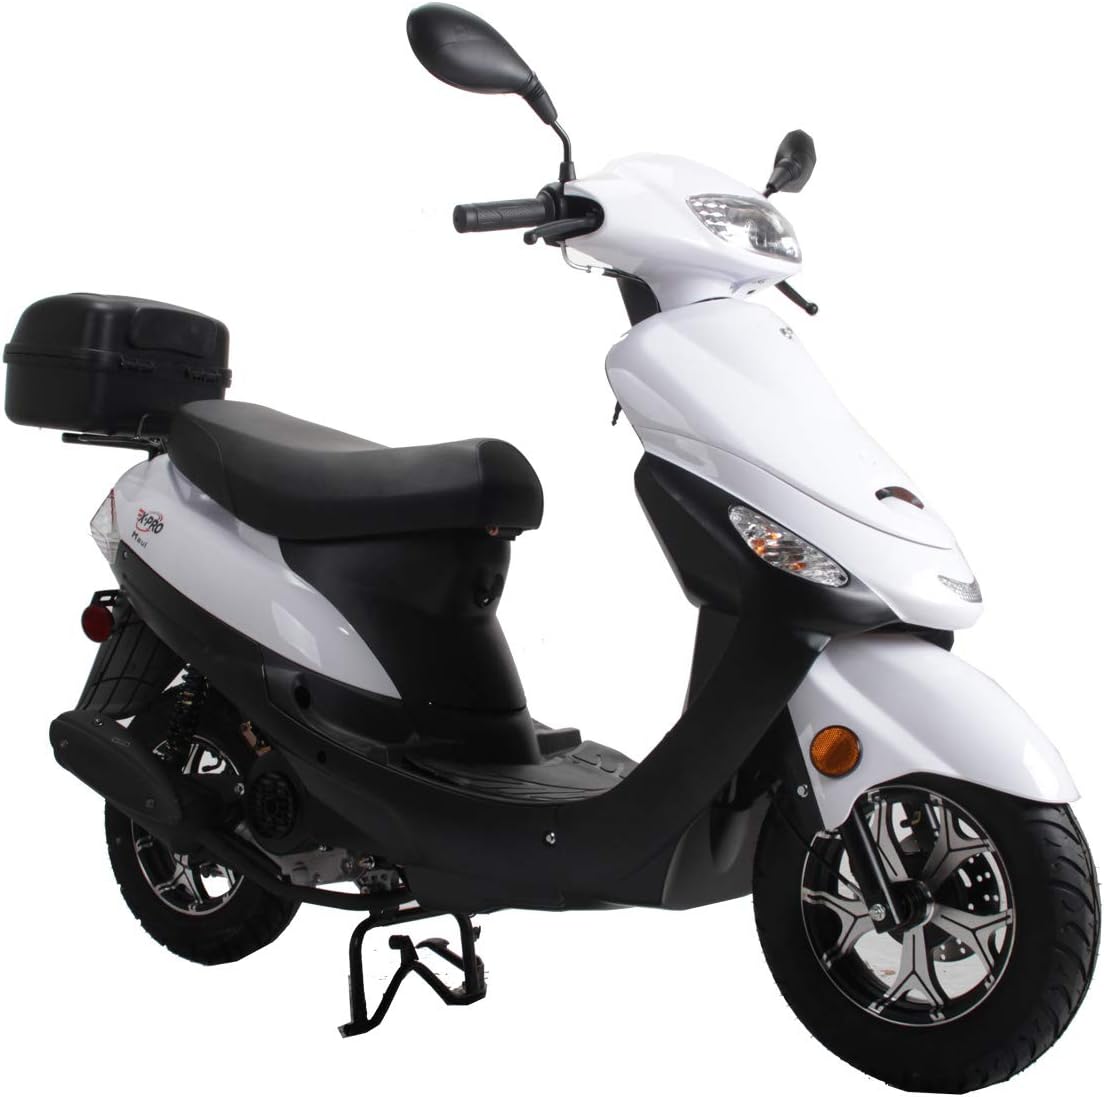
Immagine: Frontale view of the X-PRO Maui 50 moped in white, showcasing its design and headlight.

Immagine: Pro lateralefile of the X-PRO Maui 50 moped in white, highlighting the seat, engine, and wheels.

Immagine: un primo piano view of the 50cc engine, emphasizing its compact design and power delivery for urban commuting.

Immagine: Un dettaglio view of the dual front fork suspension, designed to absorb bumps and provide a smooth riding experience.

Image: An illustrative diagram highlighting the robust, high-strength frame of the moped, ensuring stability and durability.

Image: A close-up of the lightweight and strong aluminum wheel, paired with a disc brake system for effective stopping power.

Immagine: Un dettaglio view of the 10-inch front and rear DOT-approved tires, designed for safety and reliability on public roads.

Image: A diagram illustrating the ergonomic riding triangle, showing dimensions for handlebar height, seat height, and foot placement for rider comfort.
7. Garanzia e supporto
For warranty information and technical support, please refer to the documentation provided with your purchase or contact X-PRO customer service directly. Keep your purchase receipt and MSO for any warranty claims.
You can find more information and contact details on the official X-PRO store page: X-PRO Store.