1. Introduzione
Thank you for choosing the Beelink GK55 Mini PC. This compact and versatile computer is designed for various applications, including business, home entertainment, and specialized networking tasks. Equipped with an Intel Celeron J4125 processor, 8GB LPDDR4 RAM, and a 256GB SSD, it offers reliable performance in a small form factor. This manual provides essential information for setting up, operating, maintaining, and troubleshooting your device.
2. Prodotto finitoview
The Beelink GK55 Mini PC features a robust design with multiple connectivity options and efficient cooling. Its compact size allows for flexible placement, including VESA mounting behind a monitor.
2.1 Caratteristiche principali
- Processore: Intel Celeron J4125 (up to 2.7GHz, 4C/4T)
- Sistema operativo: Windows 11 Pro preinstallato
- Memoria: 8 GB di RAM LPDDR4
- Magazzinaggio: 256GB M.2 SATA SSD (expandable with 2.5-inch HDD)
- Grafica: Intel UHD Graphics 600, supporting 4K UHD resolution at 60FPS
- Connettività: Dual Band 2.4G/5G WiFi, Bluetooth 4.0, Dual Gigabit Ethernet
- Uscita video: Dual HDMI ports for simultaneous dual monitor display
- Funzioni speciali: Accensione automatica, Wake On LAN, avvio PXE, riattivazione RTC
- Raffreddamento: All-copper heat sink with silent fan
2.2 Ports and Components
Familiarize yourself with the various ports and components of your Beelink GK55 Mini PC:

Figura 2.2.1: Frontale e laterale view of the Beelink GK55 Mini PC. This image shows the compact design and accessible front ports.

Figura 2.2.2: Posteriore view of the Beelink GK55 Mini PC. This image highlights the power input, HDMI ports, and Gigabit Ethernet ports.
- Pannello frontale: Power Button, 2x USB 3.0 ports, 1x Type-C port, Audio Jack
- Pannello posteriore: DC Power Input, 2x HDMI ports, 2x Gigabit Ethernet ports, 2x USB 2.0 ports

Figure 2.2.3: Summary of key features including processor, display support, cooling, storage, and display outputs.
3. Impostazione
Follow these steps to set up your Beelink GK55 Mini PC for the first time.
3.1 Contenuto della confezione
Prima di procedere, assicurati che tutti gli articoli siano presenti nella confezione:
- Mini PC Beelink GK55
- Adattatore di alimentazione
- 2 cavi HDMI
- VESA Mount with screws
- Manuale dell'utente (questo documento)
3.2 Collegamento delle periferiche
- Connetti Display: Use one of the provided HDMI cables to connect your monitor(s) to the HDMI port(s) on the rear of the Mini PC. The GK55 supports dual displays.
- Collegare tastiera e mouse: Collega la tastiera e il mouse USB alle porte USB disponibili (USB 3.0 sulla parte anteriore, USB 2.0 su quella posteriore).
- Connetti rete (facoltativo): For a wired connection, connect an Ethernet cable from your router or modem to one of the Gigabit Ethernet ports on the rear. For wireless, refer to Section 4.2.
- Connetti alimentazione: Plug the power adapter into the DC Power Input port on the rear of the Mini PC, then plug the adapter into a power outlet.
3.3 Installazione con montaggio VESA (opzionale)
Il supporto VESA incluso consente di fissare il Mini PC sul retro di un monitor compatibile o a una parete, risparmiando spazio sulla scrivania.
- Attach the VESA bracket to the back of your monitor using the provided screws. Ensure the monitor has standard VESA mounting holes.
- Slide the Beelink GK55 Mini PC onto the mounted bracket until it clicks securely into place.

Figure 3.3.1: Beelink Mini PC set up on a desk, demonstrating its compact footprint.
4. Istruzioni per l'uso
4.1 Accensione/spegnimento
- Accensione: Premere il pulsante di accensione situato sul pannello frontale. La spia di accensione si illuminerà.
- Spegni: From Windows, click the Start button, then Power > Shut down. Alternatively, you can press and hold the power button for 5-7 seconds to force a shutdown (not recommended for regular use).
4.2 Connettività di rete
- Connessione cablata: If an Ethernet cable is connected (as per Section 3.2), the system should automatically detect and connect to the network.
- Connessione wireless: In Windows, click the Wi-Fi icon in the taskbar, select your desired network, enter the password, and click Connect. The GK55 supports both 2.4GHz and 5GHz Wi-Fi bands.
4.3 Configurazione del doppio display
The Beelink GK55 supports connecting two monitors simultaneously via its dual HDMI ports, enhancing productivity.
- Collegare entrambi i monitor alle porte HDMI del Mini PC.
- Once Windows loads, right-click on the desktop and select "Display settings."
- Under "Multiple displays," you can choose to extend or duplicate your desktop across the two screens. Adjust resolution and orientation as needed.

Figure 4.3.1: The Beelink GK55 Mini PC configured for a dual monitor setup.

Figure 4.3.2: Visual representation of the dual screen display capability.
4.4 Funzionalità avanzate
- Soft Router Functionality: The dual Gigabit Ethernet interfaces allow the GK55 to be configured as a soft router. This requires specific software installation and network configuration, typically performed by advanced users.
- Auto Power On, Wake On LAN, PXE Boot, RTC Wake: These features can be enabled and configured within the BIOS settings. To access BIOS, press the DEL or F7 ripetutamente il tasto durante l'avvio.
5. Manutenzione
Una corretta manutenzione garantisce la longevità e le prestazioni ottimali del tuo Mini PC.
5.1 Pulizia
- Pulire regolarmente la parte esterna del Mini PC con un panno morbido e asciutto.
- Ensure ventilation openings are free from dust and obstructions to maintain proper airflow. Do not use liquid cleaners directly on the device.
5.2 Espansione dello storage
The Beelink GK55 supports storage expansion to meet your needs.
- SSD SATA M.2: The device comes with an M.2 SATA 2280 SSD. This can be upgraded up to 1TB.
- 2.5-inch HDD/SSD: An additional 2.5-inch SATA HDD or SSD (up to 2TB) can be installed for expanded storage. Refer to the internal layout for the mounting bracket and SATA connector.

Figura 5.2.1: Interno view showing the M.2 SATA SSD slot and space for a 2.5-inch HDD.
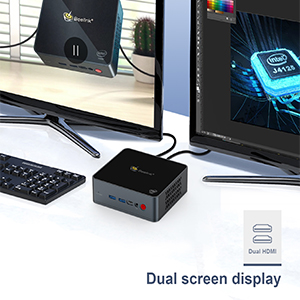
Figure 5.2.2: Diagram illustrating the M.2 SATA SSD and 2.5-inch HDD expansion capabilities.
5.3 Sistema di raffreddamento
The GK55 features an all-copper heat sink and a silent fan for efficient heat dissipation. Ensure the device is placed in a well-ventilated area to prevent overheating.

Figura 5.3.1: Interno view of the Beelink GK55 Mini PC's cooling system, featuring a copper heat sink and fan.
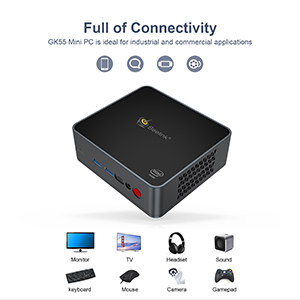
Figure 5.3.2: Diagram showing the heat dissipation path within the Mini PC.
6. Risoluzione Dei Problemi
This section addresses common issues you might encounter with your Beelink GK55 Mini PC.
6.1 Nessun potere
- Assicurarsi che l'adattatore di alimentazione sia collegato saldamente sia al Mini PC sia a una presa di corrente funzionante.
- Verificare che la presa di corrente funzioni collegandovi un altro dispositivo.
- Controllare se la spia luminosa dell'adattatore di alimentazione (se presente) è accesa.
6.2 Nessuna visualizzazione
- Confirm that the HDMI cable(s) are securely connected to both the Mini PC and the monitor(s).
- Ensure your monitor is powered on and set to the correct input source (e.g., HDMI1, HDMI2).
- Try connecting to a different monitor or using a different HDMI cable to rule out faulty components.
6.3 Problemi di connettività di rete
- Wired: Controlla la connessione del cavo Ethernet. Assicurati che il router/modem funzioni correttamente.
- Senza fili: Verify that Wi-Fi is enabled in Windows settings. Ensure you are connecting to the correct network and entering the password accurately. Restart your router/modem if necessary.
6.4 System Instability or Crashing
- Ensure the Mini PC is placed in a well-ventilated area to prevent overheating. Avoid blocking the air vents.
- Chiudere le applicazioni non necessarie per liberare risorse di sistema.
- Assicurarsi che Windows e tutti i driver siano aggiornati.
- If issues persist, consider performing a system restore or reinstalling Windows (back up your data first).
7. Specifiche
Detailed technical specifications for the Beelink GK55 Mini PC.
| Caratteristica | Specificazione |
|---|---|
| Marca | Collegamento ape |
| Nome del modello | GK55 |
| Sistema operativo | Windows 11 Pro |
| Modello CPU | Processore Intel Celeron J4125 |
| Velocità della CPU | 2.2 GHz (up to 2.7 GHz burst) |
| Numero di processori | 4 |
| Coprocessore grafico | Grafica Intel UHD 600 |
| Dimensione della memoria RAM installata | 8 GB DDR4 |
| Velocità di clock della memoria | 2133 MHz |
| Capacità di archiviazione della memoria | 256 GB SSD (M.2 SATA 2280) |
| Descrizione del disco rigido | SSD (expandable with 2.5-inch HDD/SSD) |
| Porte USB totali | 4 (2x USB 3.0, 2x USB 2.0) |
| Numero totale di porte HDMI | 2 |
| Altre porte | 1x Type-C, 2x Gigabit Ethernet, Audio Jack |
| Connettività wireless | Wi-Fi 2.4G/5G, Bluetooth 4.0 |
| Risoluzione massima dello schermo | 3840 x 2160 pixel (4K) |
| Consumo energetico | 24 Watt |
| Dimensioni dell'articolo | 4.88 x 4.45 x 1.61 pollici |
| Metodo di raffreddamento | Fan |
8. Garanzia e supporto
Beelink is committed to providing excellent customer service and support for your GK55 Mini PC.
8.1 Informazioni sulla garanzia
Your Beelink GK55 Mini PC comes with a 1 anno di garanzia gratuita from the date of purchase. This warranty covers manufacturing defects and hardware malfunctions under normal use. Please retain your proof of purchase for warranty claims.
8.2 Supporto tecnico
Beelink offers Supporto tecnico a vita E Servizio post-vendita 24 ore su 24, 7 giorni su 7. If you encounter any issues or have questions regarding your Mini PC, please do not hesitate to contact our support team. Contact information can typically be found on the official Beelink websito o tramite la tua piattaforma di acquisto.