
1. Importanti istruzioni di sicurezza
Please read these instructions carefully before installing or using your NODOR NorCook GH 6030 Gas Hob. Keep this manual for future reference.
- Sicurezza del gas: Ensure proper ventilation. Do not store flammable materials near the hob. In case of a gas leak, turn off the gas supply, open windows, and do not operate electrical switches.
- Sicurezza elettrica: The appliance must be properly earthed. Do not use adapters or extension cords. Disconnect from power before cleaning or maintenance.
- Sicurezza generale: This appliance is for domestic use only. Do not leave children unsupervised near the hob. Use appropriate cookware. Do not use the hob as a space heater.
- Superfici calde: I bruciatori e le aree circostanti diventano caldi durante l'uso. Evitare di toccare le superfici calde.
2. Prodotto finitoview
The NODOR NorCook GH 6030 is a gas hob designed for efficient cooking. It features multiple burners with individual control knobs.
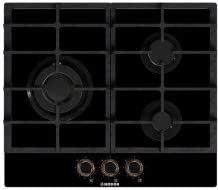
Immagine 1: anteriore view of the NODOR NorCook GH 6030 Gas Hob. This image displays the cooktop surface with four gas burners and the corresponding control knobs located at the front.
Componenti:
- bruciatori: Various sizes for different cooking needs.
- Supporti per pentole: Removable supports for cookware.
- Manopole di controllo: Regulate gas flow and ignite burners.
- Sistema di accensione: Integrated electronic ignition.
3. Installazione e configurazione
L'installazione deve essere eseguita da un tecnico qualificato nel rispetto delle normative e degli standard locali.
3.1 Disimballaggio
- Rimuovere con cautela tutto il materiale di imballaggio.
- Inspect the hob for any damage. Do not install a damaged appliance.
3.2 Posizionamento
- Assicurare una distanza adeguata dalle pareti e dagli armadi adiacenti.
- The hob requires a suitable cutout in the countertop. Refer to the installation diagram for precise dimensions.
3.3 Collegamento del gas
- Collegare il piano cottura all'alimentazione del gas utilizzando tubi flessibili o rigidi omologati.
- Check all connections for leaks using a soapy water solution. Never use an open flame.
- Ensure the gas type (Natural Gas or LPG) matches the appliance's configuration. Conversion kits may be required.
3.4 Collegamento elettrico
- Collegare l'apparecchio a una presa elettrica correttamente messa a terra.
- The electrical supply is primarily for the ignition system.
4. Istruzioni per l'uso
4.1 Primo utilizzo
- Before first use, clean the hob surface and pan supports.
- Burn off any manufacturing residues by operating each burner on maximum for a few minutes in a well-ventilated area.
4.2 Accensione di un bruciatore
- Place appropriate cookware on the pan support.
- Push down the control knob for the desired burner and turn it counter-clockwise to the maximum flame setting.
- Hold the knob down for a few seconds until the flame ignites and stabilizes. If the flame goes out, repeat the process.
- Once ignited, release the knob and adjust the flame to the desired intensity by turning the knob.
4.3 Regolazione dell'intensità della fiamma
- Turn the control knob towards the minimum flame symbol for a lower heat setting.
- Turn the control knob towards the maximum flame symbol for a higher heat setting.
- To turn off the burner, turn the knob clockwise to the "OFF" position.
5. Pulizia e manutenzione
Prima di procedere alla pulizia, assicurarsi sempre che il piano cottura sia freddo e scollegato dalla rete elettrica.
5.1 Pulizia giornaliera
- Wipe the hob surface with a soft cloth and mild detergent.
- Rimuovere immediatamente eventuali residui di cibo per evitare macchie.
- Asciugare accuratamente con un panno pulito.
5.2 Componenti del bruciatore
- Remove pan supports, burner caps, and burner rings.
- Wash them in warm soapy water. For stubborn stains, use a non-abrasive cleaner.
- Ensure all components are completely dry before reassembling. Blocked burner holes can affect performance.
5.3 Pan Supports
- Clean pan supports regularly to remove grease and food residue.
- They can be washed by hand or in a dishwasher if specified by the manufacturer (check product details).
6. Risoluzione Dei Problemi
Prima di contattare l'assistenza, verificare i seguenti problemi comuni:
| Problema | Possibile causa | Soluzione |
|---|---|---|
| Il bruciatore non si accende. | Nessuna fornitura di gas, elettricità fuoritage, clogged burner holes, wet ignition electrode. | Check gas valve. Check power supply. Clean burner components. Dry ignition electrode. |
| La fiamma è irregolare o gialla. | Fori del bruciatore ostruiti, tipo di gas errato, miscela d'aria non idonea. | Clean burner holes. Verify gas type. Contact a qualified technician for air mixture adjustment. |
| Rilevato odore di gas. | Perdita di gas. | Immediately turn off gas supply. Open windows. Do not operate electrical switches. Contact emergency services and a qualified technician. |
| Control knob is stiff. | Food residue or dirt under the knob. | Remove knob and clean the area thoroughly. |
Se il problema persiste dopo aver provato queste soluzioni, contattare un tecnico qualificato.
7. Specifiche
| Caratteristica | Dettaglio |
|---|---|
| Marca | Nodor |
| Modello | NorCook GH 6030 |
| Fonte di alimentazione | Alimentato a gas |
| ASIN | B08KTNDSK1 |
| Produttore | NODORE |
8. Garanzia e supporto
This NODOR appliance comes with a manufacturer's warranty. Please refer to the warranty card included with your product for specific terms and conditions, including warranty period and coverage.
For technical support, spare parts, or service inquiries, please contact your local NODOR authorized service center or the retailer from whom you purchased the product. Always provide the model number (GH 6030) and serial number (if applicable) when seeking assistance.
Note: Information regarding spare parts availability and software updates is not available at this time, as per product specifications.