
Introduzione
This manual provides detailed instructions for the installation, operation, and maintenance of your Spider Farmer 4-Inch Air Filtration Kit. This kit is designed to provide efficient air circulation and odor control for grow tents, hydroponic systems, and other indoor gardening environments. It includes an inline duct fan, an RJ12 speed humidity controller, a carbon filter, and 13 feet of ducting.
Componenti inclusi
- 4-Inch Inline Duct Fan
- RJ12 Speed Humidity Controller
- Filtro al carbone
- 13 Ft Flexible Ducting
- Acciaio Inox Clamps
- Cinghie appese
Specifiche
| Caratteristica | Specificazione |
|---|---|
| Marca | Spider Farmer |
| Numero di modello | 4CFM-200 |
| Dimensione del condotto | 4 pollici / 100 mm |
| Capacità del flusso d'aria | 205 piedi cubi |
| Livello di rumore | 26.8 dB |
| Energia | 27 Watts ± 5% |
| Voltage | CA 110-240 V |
| Frequenza | Frequenza 50/60 Hz |
| Velocità della ventola | 3000 giri al minuto |
| Tipo di motore | EC (Brushless) |
| Materiale | Metallo, Plastica |
| Peso dell'articolo | 6 chilogrammi |
| Lunghezza del cavo di alimentazione | 4.9 piedi (1.5 m) |
| Fan to Controller RJ12 Cord Length | 8.2 piedi (2.5 m) |
Istruzioni di sicurezza
- Scollegare sempre l'alimentazione prima dell'installazione, della pulizia o della manutenzione.
- Assicurarsi che tutti i collegamenti elettrici siano conformi ai codici e alle normative locali.
- Non utilizzare il ventilatore con un cavo o una spina danneggiati.
- Tenere le mani e gli oggetti estranei lontani dalle pale del ventilatore durante il funzionamento.
- Install the fan and filter in a stable, secure location to prevent falling.
- Avoid exposing the controller to water or high humidity environments.
Guida all'installazione
1. Inline Duct Fan and Carbon Filter Assembly
The inline duct fan and carbon filter work together to provide optimal air filtration. Follow these steps for assembly:
- Attach the Carbon Filter: Connect one end of the carbon filter to the intake side of the inline duct fan. Secure it tightly with one of the provided stainless steel clamps.
- Collegare i condotti: Attach the flexible ducting to the exhaust side of the inline duct fan. Use another stainless steel clamp to ensure a secure, airtight connection.
- Montaggio: Use the included hanging straps to suspend the assembled fan and filter unit within your grow tent or desired ventilation area. Ensure the unit is level and securely fastened.

Figura 1: Oltreview of the Spider Farmer 4-Inch Air Filtration Kit components.

Figure 2: Installation suggestions for setting up the ventilation system in a grow tent.
2. RJ12 Speed Humidity Controller Connection
The RJ12 Speed Humidity Controller allows for precise control over your fan's operation.
- Collegare il cavo RJ12: Locate the RJ12 port on the inline duct fan and on the controller. Connect the provided RJ12 cable between these two ports. No additional power cable is needed for the controller as it is powered by the inline fan.
- Accensione: Plug the inline fan's power cord into a suitable electrical outlet. The controller display should illuminate, indicating a successful connection.
Video 1: Demonstrates how to connect the RJ12 cable for fan control, highlighting that no extra power wire is needed for the controller.

Figure 3: The RJ12 controller connected to the inline fan, compatible with GGS controllers and power strips for intelligent ventilation.
Istruzioni per l'uso
1. Funzionamento della ventola
The inline duct fan features an energy-efficient EC motor designed for quiet and powerful performance.
- Flusso d'aria: Provides 205 CFM (Cubic Feet Per Minute) of airflow.
- Livello di rumore: Funziona a un basso livello di rumore di 26.8 dB.
- Controllo della velocità: The fan speed can be adjusted via the RJ12 controller or a compatible app.

Figure 4: The Spider Farmer 4-inch inline duct fan, a key component of the air filtration kit.

Figure 5: The fan's energy-efficient EC motor provides powerful airflow with minimal noise and a long lifespan.
2. RJ12 Speed Humidity Controller Functions
The RJ12 controller offers various modes to manage your environment:
- Modalità manuale: Directly set the fan speed from 25% to 100%.
- Time Slot Mode: Schedule specific start and stop times for the fan to operate, along with desired running and standby speeds.
- Modalità ciclo: Set the fan to run for a specified duration and then pause for another set duration, repeating the cycle a chosen number of times.
- Modalità ambiente: Prioritize either temperature or humidity. The fan will automatically adjust its speed to maintain your target environmental parameters.
- CO2 Device Control: The controller includes a switch to manage a connected CO2 device, if applicable.
Video 2: A detailed guide on using the GGS controller to manage fan settings and environmental parameters.
Manutenzione
1. Manutenzione del filtro al carbone
The carbon filter is crucial for odor control. Regular maintenance ensures its effectiveness and extends its lifespan.
- Pulizia del prefiltro: The pre-filter captures larger particles. It should be removed and cleaned regularly (e.g., weekly or bi-weekly, depending on usage) by washing with warm water and mild soap, then air-dried completely before reinstallation.
- Sostituzione del filtro al carbone: The RC412 activated carbon has a finite lifespan. Replace the carbon filter every 6-12 months, or sooner if odor control effectiveness diminishes. The filter features a reversible flange to potentially double its life by flipping it.

Figura 6: Esploso view of the carbon filter, showing its multi-layered design for effective filtration.
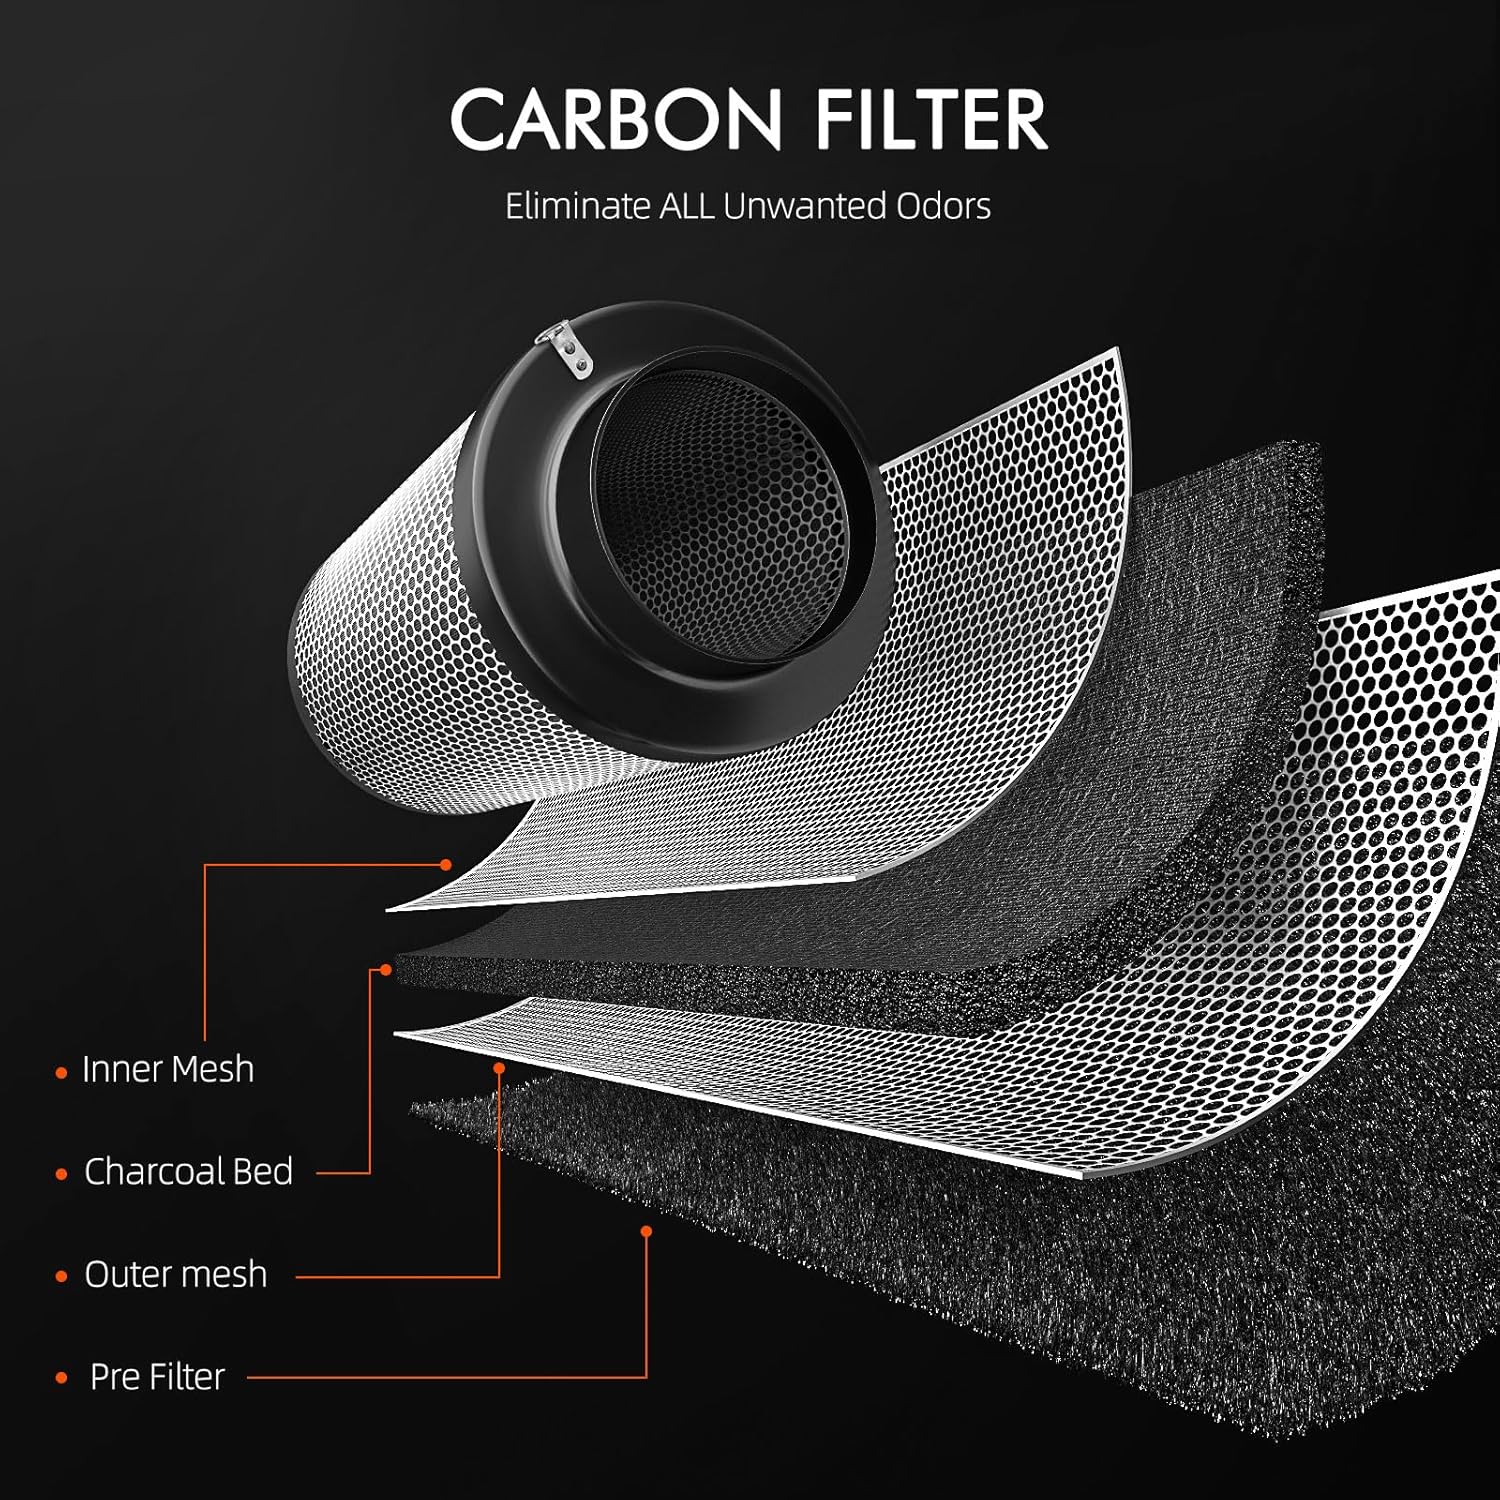
Figure 7: The premium carbon filter features a reversible flange and RC412 activated carbon for superior odor control.
2. Fan and Ducting Cleaning
- Pale del ventilatore: Periodically inspect the fan blades for dust and debris accumulation. Clean gently with a soft cloth or brush. Ensure the fan is completely dry before resuming operation.
- Canalizzazione: Check the flexible ducting for any tears, kinks, or blockages that could impede airflow. Replace damaged ducting as necessary.
Risoluzione dei problemi
| Problema | Possibile causa | Soluzione |
|---|---|---|
| La ventola non si accende | No power, loose connection, controller off | Check power outlet, ensure all cables are securely connected, verify controller is on and in an active mode. |
| Scarsa circolazione dell'aria | Blocked filter, kinked ducting, low fan speed setting | Clean or replace pre-filter, check ducting for obstructions, increase fan speed setting on controller. |
| Odori persistenti | Saturated carbon filter | Replace the carbon filter. Ensure proper sealing of all connections. |
| Il controller non risponde | Loose RJ12 cable, power issue | Ensure RJ12 cable is firmly connected to both fan and controller. Check fan power. |
Garanzia e supporto
Spider Farmer products are manufactured to high-quality standards. For specific warranty details, please refer to the warranty card included with your product or visit the official Spider Farmer website. If you encounter any issues or require technical assistance, please contact Spider Farmer customer support through their official channels.
Risorse online:
- Official Spider Farmer Websito: www.spider-farmer.com
- Negozio Amazon: Spider Farmer Amazon Store