
1. Introduzione
Thank you for choosing the XTUGA ES USB/MP3/Bluetooth Professional Audio Mixer. This manual provides essential information for the safe and efficient operation of your mixer. Please read it thoroughly before use and retain it for future reference.
The XTUGA ES series mixers (ES802/ES1202) are designed for professional audio applications, offering features such as USB/MP3 playback and recording, Bluetooth connectivity, built-in digital effects, and +48V phantom power for condenser microphones. Its ultra-thin design and robust metal chassis make it suitable for various environments, including DJ setups, stage performances, and recording studios.
2. Istruzioni di sicurezza
- Alimentazione elettrica: Utilizzare solo l'adattatore di alimentazione specificato. Assicurarsi che il volumetage corrisponde all'alimentazione elettrica locale.
- Ventilazione: Non ostruire le aperture di ventilazione. Garantire un adeguato flusso d'aria attorno all'unità per evitare il surriscaldamento.
- Acqua e umidità: Non esporre il mixer a pioggia, umidità o liquidi. Non posizionare oggetti contenenti liquidi sul mixer.
- Fonti di calore: Tenere il mixer lontano da fonti di calore come termosifoni, bocchette di riscaldamento, stufe o altri apparecchi (inclusi amplificatori) che producono calore.
- Pulizia: Pulire solo con un panno asciutto. Scollegare l'alimentazione prima della pulizia.
- Manutenzione: Non tentare di riparare questo prodotto da soli. Affidare tutte le operazioni di manutenzione a personale di assistenza qualificato.
- Messa a terra: Garantire un'adeguata messa a terra per evitare scosse elettriche.
- Gestione dei cavi: Proteggere i cavi di alimentazione per evitare che vengano calpestati o schiacciati, in particolare in corrispondenza delle spine, delle prese di corrente e del punto in cui escono dall'apparecchio.
3. Prodotto finitoview
The XTUGA ES series mixer features a compact, durable design with a comprehensive set of controls for versatile audio mixing. It includes multiple input channels, a 3-band equalizer per channel, built-in digital effects, and various connectivity options.

Figura 3.1: Davanti view of the XTUGA ES Series Professional Audio Mixer, showing all input channels, faders, EQ knobs, and the central control panel with USB/MP3 display.
Caratteristiche principali:
- Canali: Available in 8 or 12 mono channel configurations with stereo inputs.
- Preamplificatori: High-quality microphone preamplificatori.
- Equalizzazione: 3-band EQ on each mono channel for precise tone shaping.
- Connettività: USB/MP3 playback and recording, Bluetooth function for wireless audio streaming.
- Potenza fantasma: Alimentazione phantom +48V per microfoni a condensatore.
- Effetti digitali: Processore di effetti digitali integrato.
- Monitoraggio: Headphone monitoring and dual 12-band main level display.
- Design durevole: Ultra-thin metal chassis for durability and portability.
4. Impostazione
4.1 Collegamento di alimentazione
- Ensure the mixer's power switch is in the "OFF" position.
- Collegare l'adattatore di alimentazione in dotazione all'ingresso di alimentazione del mixer.
- Collegare l'adattatore di alimentazione a una presa di corrente CA adatta.
- Turn the mixer's power switch to "ON". The power indicator will illuminate.
4.2 Collegamenti di ingresso
Il mixer supporta diverse sorgenti di input:
- Microfoni: Connect microphones to the XLR inputs (MIC) on each channel. For condenser microphones requiring phantom power, ensure the +48V button is activated (see Section 5.2).
- Dispositivi a livello di linea: Connect instruments, keyboards, or other line-level devices to the 1/4" TRS/TS LINE inputs on each channel.
- Ingressi stereo: Use the dedicated stereo input channels for devices like CD players or external media players.
4.3 Collegamenti di uscita
- Uscita principale: Collega i tuoi altoparlanti principali o amplifier to the MAIN L/R outputs (XLR or 1/4" TRS).
- Uscita cuffie: Collegare le cuffie all'uscita PHONES per il monitoraggio.
- Invio AUX: Use the AUX SEND output to connect to external effects processors or monitor speakers.
4.4 Connessione al computer (USB)
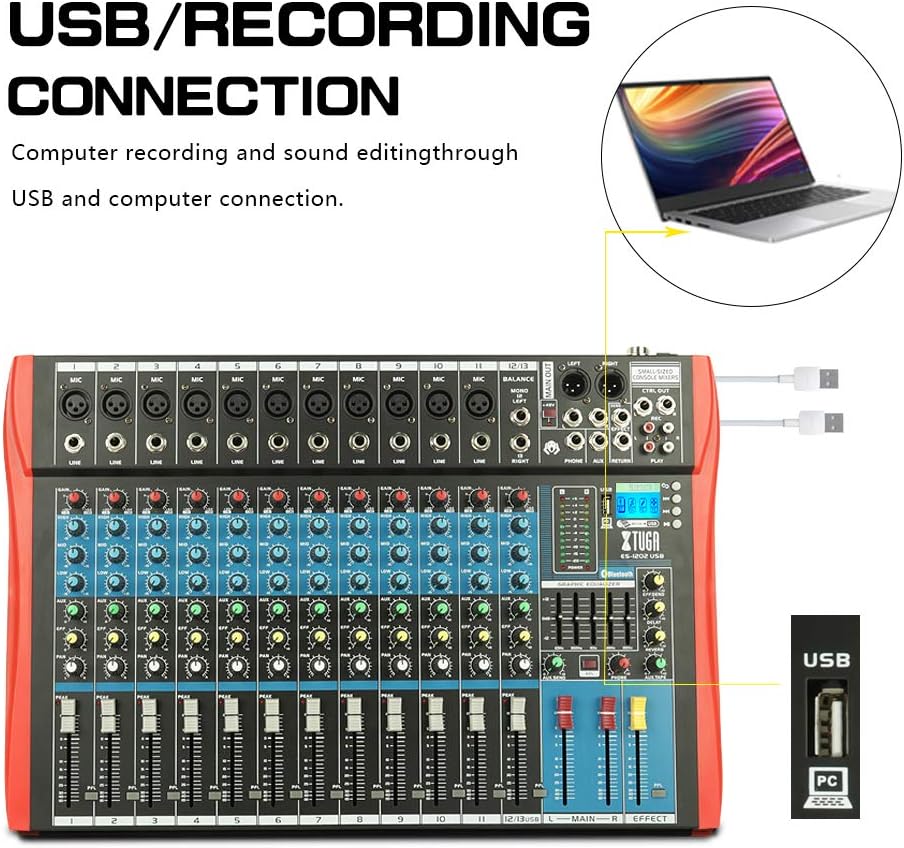
Figura 4.1: Diagram illustrating the USB connection for computer recording and sound editing. Connect the mixer's USB port to your computer using a standard USB cable.
To use the mixer with a computer for recording or playback:
- Connect a USB cable from the mixer's USB port to an available USB port on your computer.
- The mixer will typically be recognized as a standard audio device. No special drivers are usually required for basic functionality.
- Select the mixer as your input/output device in your computer's sound settings or digital audio workstation (DAW) software.
5. Istruzioni per l'uso
5.1 Controlli dei canali
- GUADAGNO: Adjusts the input sensitivity for each channel. Set this to achieve a strong signal without clipping (the PEAK LED should only flash occasionally).
- EQ (ALTO, MEDIO, BASSO): Equalizzatore a 3 bande per modellare il tono di ciascun canale.

Figura 5.1: Visual representation of the 3-band EQ frequency response curves. The HIGH band boosts/cuts above 12kHz, the MID band sweeps from 250Hz to 6kHz, and the LOW band boosts/cuts below 80Hz.
- ALTO: Adjusts frequencies above 12 kHz (±15 dB).
- CENTRO: Adjusts frequencies between 150 Hz and 3.5 kHz (±15 dB). This is a sweepable mid-range control.
- BASSO: Adjusts frequencies below 80 Hz (±15 dB).
- EFFETTO: Sends a portion of the channel signal to the built-in effects processor.
- PADELLA: Regola la posizione stereo del segnale del canale (da sinistra a destra).
- FADER CANALE: Controls the output level of each individual channel to the main mix.
- LED DI PICCO: Si accende quando il segnale di ingresso è troppo alto, indicando un potenziale clipping. Ridurre il GAIN se questo LED si accende frequentemente.
5.2 Alimentazione Phantom +48V
The mixer provides +48V phantom power for condenser microphones. To activate:
- Ensure all channel faders and the main fader are set to their minimum positions.
- Connect your condenser microphone(s) to the XLR inputs.
- Press the +48V PHANTOM POWER button. An indicator light will confirm activation.
- Gradually raise the channel faders and main fader to the desired levels.
Caution: Do not activate phantom power when dynamic microphones or other devices not requiring +48V are connected, as this may cause damage.
5.3 Connessione Bluetooth

Figura 5.2: Close-up of the Bluetooth and MP3 control panel, showing the digital LCD display and control buttons.
Per connettere un dispositivo Bluetooth:
- Press the "MODE" button on the MP3 player section until "Bluetooth" is selected on the digital display.
- On your mobile phone, tablet, or other Bluetooth-enabled device, search for available Bluetooth devices.
- Select "XTUGA MIXER" (or similar name) from the list to pair.
- Once paired, you can play audio from your device through the mixer.
5.4 Riproduzione e registrazione USB/MP3
The mixer supports U-DISK MP3 playback and direct recording to a USB drive.
- Riproduzione MP3: Inserire un'unità flash USB contenente MP3 files into the USB port. The mixer will automatically detect and begin playing the files. Use the control buttons (PLAY/PAUSE, PREV, NEXT) on the MP3 player section to navigate.
- Registrazione: To record the main mix to a USB drive, ensure a formatted USB drive is inserted. Press the "REC" button on the MP3 player section to start recording. Press it again to stop.
5.5 Effetti digitali
The mixer includes a built-in digital effects processor. Use the "EFFECT" knob on each channel to send signal to the effects. The main "EFFECT" fader controls the overall level of the effects return to the main mix. Adjust the effect type and parameters using the dedicated controls in the effects section.
5.6 Monitoraggio
Connect headphones to the PHONES jack to monitor the main mix. The PHONES level knob controls the headphone volume. The main LED meters provide a visual indication of the main output level.

Figura 5.3: Close-up of the main LED level meters, showing output levels for Left (L) and Right (R) channels, along with the USB and PC connection ports.
6. Manutenzione
- Pulizia: Regularly wipe the mixer's surface with a soft, dry, lint-free cloth. Do not use abrasive cleaners, solvents, or waxes.
- Magazzinaggio: Quando non viene utilizzato per lunghi periodi, conservare il mixer in un luogo fresco e asciutto, lontano dalla luce solare diretta e da temperature estreme. Coprire l'unità per proteggerla dalla polvere.
- Cura del cavo: Evitare di piegare o torcere eccessivamente i cavi. Scollegare i cavi tirando la spina, non il cavo stesso.
7. Risoluzione Dei Problemi
| Problema | Possibile causa | Soluzione |
|---|---|---|
| Nessuna uscita audio |
|
|
| Suono distorto |
|
|
| Il Bluetooth non si connette |
|
|
| USB/MP3 not playing or recording |
|
|
8. Specifiche
| Caratteristica | Specificazione |
|---|---|
| Marca | XTUGA |
| Modello | ES802/1202 |
| Numero di canali | 8 o 12 (a seconda del modello) |
| Tecnologia di connettività | Ausiliario, Bluetooth, USB |
| Fonte di alimentazione | Elettrico con cavo |
| Risposta in frequenza | Microphone line input to any output: ±1.5 dB, 20 Hz ~ 20 KHz |
| Distorsione Armonica Totale + Rumore | Sensitivity -30dB, Mix output +14dBu <0.02% @ 1 KHz or EQ (stereo input) |
| Crosstalk (1 KHz) | Channel mute > 90 dB, Fader off > 90 dB, AUX send port closed > 83 dB |
| Mono EQ (Q(MF): 1.5) | Low: 80Hz ± 15dB, Mid (sweepable): 150Hz-3.5KHz ± 15dB, High: 12 KHz ± 15 dB |
| Stereo EQ (Q(MF): 0.8) | Low: 80Hz ± 15dB, Mid: 720Hz ± 15dB, High: 12KHz ± 15dB |
| Consumo energetico | Meno di 35 W |
| Temperatura di esercizio | da 5°C a +40°C |
| Ingresso audio | XLR, Line, and Digital Inputs |
| Codice UPC | 784124158662 |
| Codice GTIN | 784124158662 |
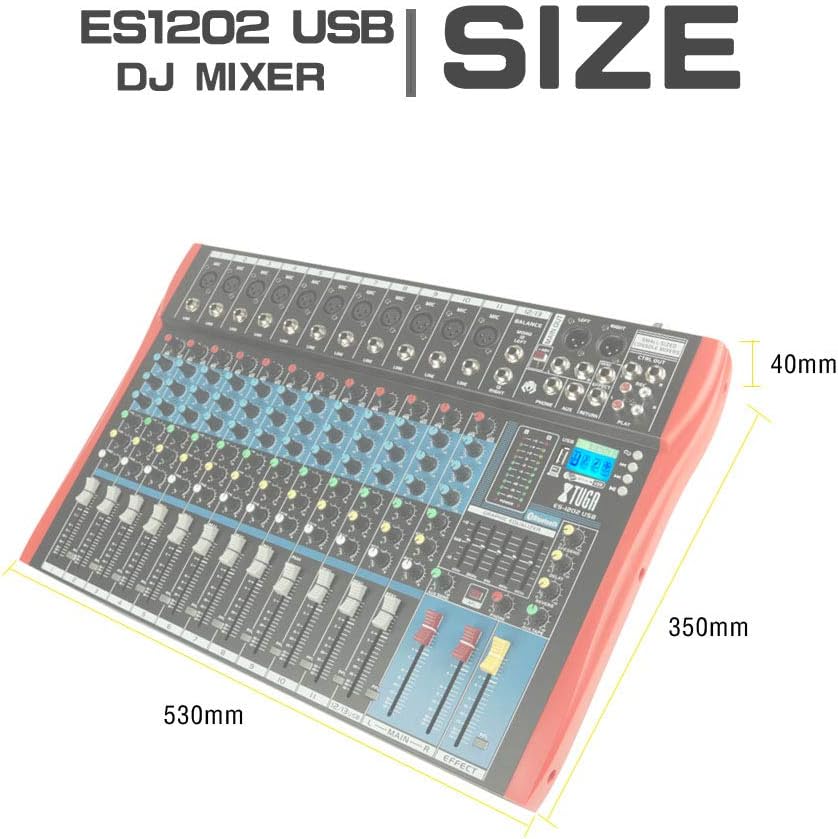
Figura 8.1: Dimensions of the XTUGA ES1202 USB Mixer, showing approximate measurements of 530mm (width), 350mm (depth), and 40mm (height).
9. Garanzia e supporto
9.1 Informazioni sulla garanzia
XTUGA products are designed and manufactured to high-quality standards. For specific warranty terms and conditions, please refer to the warranty card included with your product or contact your local XTUGA distributor or retailer. Keep your proof of purchase for warranty claims.
9.2 Assistenza clienti
If you encounter any issues or have questions regarding your XTUGA ES USB/MP3/Bluetooth Professional Audio Mixer that are not covered in this manual, please contact XTUGA customer support or your authorized dealer for assistance. Please have your model number (ES802/1202) and purchase information ready when contacting support.