
1. Introduzione
This manual provides essential information for the safe and efficient installation, operation, and maintenance of your Zoeller Waste-Mate 290 Series Model J295 High Head Sewage Pump. Please read this manual thoroughly before attempting to install or operate the pump. Retain this manual for future reference.
The Zoeller Waste-Mate 290 Series J295 is a high-head submersible sewage pump designed for residential or light commercial dewatering and wastewater applications. It is capable of transferring groundwater, effluent, or raw sewage. Its vortex impeller design minimizes clogging and allows for the passage of 2-inch spherical solids. Constructed from durable cast iron with a powder-coated epoxy finish, this pump is built for corrosion resistance and efficient heat dissipation, ensuring a long service life.
2. Informazioni sulla sicurezza
ATTENZIONE: Rischio di scossa elettrica. Questa pompa è dotata di un conduttore di messa a terra e di una spina di collegamento con messa a terra. Per ridurre il rischio di scossa elettrica, assicurarsi che sia collegata solo a una presa di corrente con messa a terra adeguata.
WARNING: Always disconnect the pump from the power source before handling or servicing.
- Assicurarsi che tutti i collegamenti elettrici siano conformi ai codici e alle ordinanze locali.
- Non utilizzare la pompa in atmosfera esplosiva.
- Non pompare liquidi infiammabili.
- Indossare adeguati dispositivi di protezione individuale (DPI) durante l'installazione e la manutenzione.
- Keep hands clear of the impeller and discharge opening when the pump is connected to power.
- Non sollevare la pompa per il cavo di alimentazione.
3. Contenuto della confezione
Verificare che tutti i componenti siano presenti e integri al momento del disimballaggio:
- Zoeller Waste-Mate 290 Series J295 High Head Sewage Pump
- Cavo di alimentazione da 20 piedi
- Manuale di istruzioni (questo documento)
Note: Additional accessories such as control panels (e.g., 10-1084, 10-1112) are sold separately.
4. Configurazione e installazione
Una corretta installazione è fondamentale per le prestazioni e la durata della pompa. In caso di dubbi su qualsiasi passaggio, consultare un professionista qualificato.
4.1 Controlli pre-installazione
- Controllare che la pompa non abbia subito danni durante il trasporto.
- Assicurarsi che l'alimentazione corrisponda al volume della pompatage (200-208 Volts, 3 Phase).
- Verify the basin o la fossa è pulita e priva di detriti.
4.2 Collegamento elettrico
This pump requires a 200-208 Volt, 3-phase electrical supply. All wiring must be performed by a qualified electrician in accordance with national and local electrical codes.
- Collegare la pompa a un circuito dedicato con un'adeguata protezione da sovracorrente.
- Garantire un'adeguata messa a terra per evitare scosse elettriche.
- The 20 ft power cord should not be modified or extended without consulting a qualified electrician.
4.3 Collegamento idraulico
The pump features a 2-inch NPT female flanged vertical discharge.
- Connect the discharge piping to the pump's flanged outlet. Use appropriate sealant for a watertight connection.
- Install a check valve in the discharge line to prevent backflow into the basin.
- Ensure the discharge piping is adequately supported to prevent strain on the pump.
- The pump is designed for submersible operation. Ensure it is fully submerged during use.
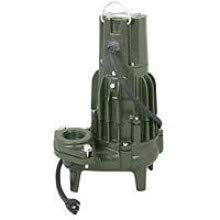
Figure 1: Zoeller Waste-Mate 290 Series J295 High Head Sewage Pump. This image shows the general appearance of the pump, highlighting its robust cast iron construction and discharge port.
5. Istruzioni per l'uso
The Zoeller J295 is a manual pump, meaning its operation is typically controlled by an external control panel or switch (not included with the pump itself). It is designed for continuous duty when submerged.
5.1 Avvio iniziale
- After installation, ensure the pump is fully submerged in the liquid to be pumped.
- Verify all plumbing connections are secure and leak-free.
- Engage the power supply to the pump via its control panel or switch.
- Observe the pump's operation. It should start pumping liquid immediately.
- Check for any unusual noises or vibrations. If detected, disconnect power and investigate.
5.2 Funzionamento normale
- The pump is designed to operate automatically when connected to a compatible control panel with float switches.
- Ensure the pump basin remains free of excessive debris that could impede float switch operation or clog the pump.
- The maximum fluid temperature for continuous operation is 130°F (54°C). Do not exceed this temperature.
6. Manutenzione
Una manutenzione regolare garantisce prestazioni ottimali e prolunga la durata della pompa. Scollegare sempre l'alimentazione prima di eseguire qualsiasi intervento di manutenzione.
6.1 Controlli di routine (mensili)
- Basin Ispezione: Check the pump basin for excessive buildup of solids or debris. Clean as necessary.
- Funzionamento della pompa: Verify the pump cycles on and off correctly (if using a control panel).
- Linea di scarico: Ensure the discharge line is free of obstructions.
6.2 Ispezione annuale
- Ispezione della girante: Disconnect power, remove the pump from the basin, and inspect the impeller for wear or damage. Clear any lodged debris.
- Tenuta dell'albero: Inspect the shaft seal for any signs of leakage. The pump features a single stainless steel carbon & ceramic rotary seal. If leakage is observed, professional service may be required.
- Cavo di alimentazione: Check the power cord for any signs of fraying, cuts, or damage. Replace if necessary.
7. Risoluzione Dei Problemi
Prima di tentare qualsiasi riparazione, scollegare sempre la pompa dalla fonte di alimentazione.
| Problema | Possibile causa | Soluzione |
|---|---|---|
| La pompa non si avvia o non funziona. | Nessuna alimentazione alla pompa. Sovraccarico termico scattato. Guasto al motore. | Check circuit breaker/fuse. Ensure power cord is securely plugged in. Reset thermal overload (if applicable, 1 Ph only). Consult a qualified technician for motor issues. |
| La pompa funziona ma non pompa l'acqua oppure pompa lentamente. | Clogged impeller or discharge line. Blocco d'aria. Basso volumetage. | Disconnect power, remove pump, and clear any obstructions from impeller and discharge. Ensure pump is fully submerged. Verify correct voltage fornitura. |
| La pompa esegue cicli troppo frequenti. | Check valve failure. Float switch issues (if applicable). Basin troppo piccolo. | Inspect and replace check valve if faulty. Adjust or replace float switches. Consult a professional for basin dimensionamento. |
| Rumore o vibrazioni eccessivi. | Detriti nella pompa. Cuscinetti usurati. Installazione impropria. | Disconnect power and clear debris. If noise persists, professional service may be required for bearings. Recheck installation for proper seating and support. |
8. Specifiche
| Caratteristica | Dettaglio |
|---|---|
| Modello | J295 |
| Numero di parte del produttore | 295-0010 |
| Serie | Waste-Mate 290 Series |
| Tipo di prodotto | High Head Sewage Pump |
| Applicazione | Sewage/Dewatering |
| Operazione | Manual (requires external control) |
| Potenza (CV) | 2 CV |
| Voltage | 200-208 Volt |
| Fase | 3 Fase |
| Frequenza | Frequenza 60 Hz |
| Amprabbia | 14.3 Amps |
| Velocità | 3450 giri al minuto |
| Tipo di sigillo | Single (Stainless Steel Carbon & Ceramic Rotary) |
| Materiale dell'alloggiamento della pompa | Ghisa |
| Materiale della girante | Ghisa |
| Tipo di girante | Vortice non intasante |
| Maximum Solids Handling | 2 inches spherical |
| Collegamento di scarico | 2 inch NPT Flanged Vertical |
| Portata massima | 214 GPM (galloni al minuto) |
| Prevalenza massima | 75 piedi |
| Lunghezza del cavo | 20 piedi |
| Temperatura massima del fluido | 130°F (54°C) |
| Fine | Corrosion-resistant, powder coated epoxy |
9. Garanzia e supporto
For warranty information and technical support, please contact Zoeller Company directly or visit their official websito. Conserva la ricevuta d'acquisto come prova d'acquisto.
Informazioni di contatto della società Zoeller:
- Fare riferimento al sito ufficiale Zoeller websito o sulla confezione del prodotto per i dettagli di contatto più aggiornati.
Note: Warranty terms and conditions may vary. Please consult the official warranty statement provided with your product or on the manufacturer's websito.