
1. Introduzione
Thank you for choosing the XTUGA AM6 4/6-Channel Audio Mixer. This professional mixing console is designed for a variety of audio applications, including home music production, live webcasting, and karaoke (K-song). It features Bluetooth connectivity, USB recording capabilities, 48V phantom power for condenser microphones, and integrated effects. Please read this manual thoroughly to understand the mixer's functions and ensure optimal performance.
2. Contenuto della confezione
Si prega di controllare la confezione per verificare la presenza dei seguenti elementi:
- 1 x XTUGA AM6 Audio Mixer
- 1 cavo USB
- 1 x adattatore di alimentazione/caricabatterie
- 1 x Manuale utente
3. Caratteristiche del prodotto
The XTUGA AM6 mixer offers a range of features to enhance your audio experience:
- 4-Channel/6-Channel Mixing Console: Features two mono channels and one stereo tape channel.
- USB Recording & Playback: Direct recording to USB or computer, and playback of MP3, FLAC, etc.
- Connettività Bluetooth: Wireless connection for mobile devices within 4-8 meters (without obstruction).
- Alimentazione Phantom 48V: Integrated phantom power for condenser microphones.
- Built-in Effects Processor: Includes Delay and Repeat effects.
- Funzione della scheda audio: Acts as an external sound card when connected to a computer via USB.
- Design a basso rumore: Ensures clear audio on all microphone inputs.
- Controlli regolabili: Gain, 2-band EQ (high/low), signal level, main output, headphone volume, and effect parameters.
- Dedicated Headphone Output: With independent volume control for monitoring.
- Molteplici opzioni di input: Supports 6.5mm phone type and RCA type connectors for line-level instruments.
- Compatto e portatile: Can be powered directly via PC USB, mobile power bank, or AC/DC adapter.
4. Impostazione
4.1 Collegamento di alimentazione
Connect the provided power adapter to the mixer's power input and then to a suitable power outlet. Alternatively, the mixer can be powered via a USB connection to a computer or a mobile power bank.
4.2 Collegamenti di ingresso
Connect your audio sources to the appropriate input channels:
- Microfoni: Use XLR (card head) or 6.5mm jack connectors for microphone inputs. For condenser microphones requiring phantom power, ensure the 48V phantom power is activated (see Section 5.2).
- Strumenti a livello di linea: Use 6.5mm phone type or RCA type connectors for instruments like electronic keyboards or other audio equipment.

4.3 Collegamenti di uscita
- Uscita principale: Connect the main output (L/R) to your amplificatore, altoparlanti amplificati o interfaccia di registrazione.
- Uscita cuffie: Connect your headphones to the dedicated headphone jack for monitoring. Adjust the headphone volume using its dedicated control.
5. Istruzioni per l'uso
5.1 Mixaggio audio di base
Each input channel features controls for gain, high/low EQ, and signal level. Adjust these to achieve the desired sound for each input. Use the main output level control to set the overall volume.
5.2 Alimentazione Phantom 48V
To use condenser microphones, activate the 48V phantom power. Locate the 48V switch on the mixer and press it. Ensure condenser microphones are connected before activating phantom power to prevent damage to other equipment.

5.3 Connessione Bluetooth
Per connettere un dispositivo mobile tramite Bluetooth:
- Assicurarsi che il mixer sia acceso.
- Switch the MP3 function to BT (Bluetooth) mode. The display will indicate Bluetooth pairing mode.
- On your mobile device, search for available Bluetooth devices and select "XTUGA AM6" (or similar name).
- Una volta effettuato il collegamento, puoi trasmettere l'audio in modalità wireless dal tuo dispositivo al mixer.

5.4 Registrazione e riproduzione USB
5.4.1 Registrazione sul computer
The mixer can function as a sound card for your computer:
- Collega il mixer al computer utilizzando il cavo USB in dotazione.
- Switch the mixer's MP3 function to PC mode. The display will show "PC".
- On your computer, select the mixer as the audio input/output device in your recording software (e.g., GoldWave).
- You can now record audio from the mixer to your computer and play background music from your computer through the mixer.


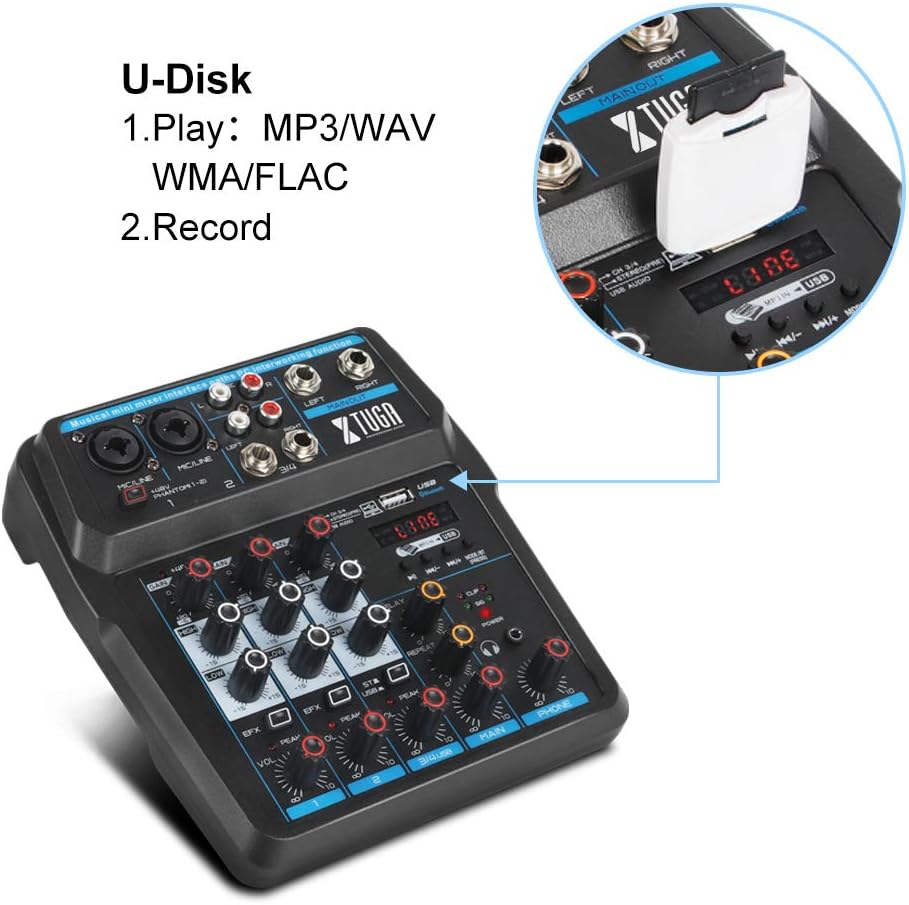
5.4.2 U-Disk (USB Drive) Playback and Recording
Insert a USB flash drive into the USB port on the mixer:
- Riproduzione: The mixer can play MP3, WAV, WMA, FLAC, and other audio formats directly from the U-Disk. Use the MP3 function keys to control playback.
- Registrazione: You can also record directly to the U-Disk. Refer to the mixer's display and controls for recording functions.
5.5 Processore di effetti
The mixer includes built-in Delay and Repeat effects. Use the dedicated controls to adjust the effect parameters, such as echo repeat frequency and time interval, to achieve your desired sound.
6. Manutenzione
To ensure the longevity and optimal performance of your XTUGA AM6 mixer:
- Pulizia: Utilizzare un panno morbido e asciutto per pulire la superficie del mixer. Evitare l'uso di detergenti liquidi o solventi.
- Magazzinaggio: Conservare il mixer in un luogo fresco e asciutto, lontano dalla luce solare diretta, da temperature estreme e da elevata umidità.
- Gestione: Maneggiare il mixer con cura. Evitare di farlo cadere o di sottoporlo a forti urti.
- Ventilazione: Garantire un'adeguata ventilazione attorno al mixer per evitare il surriscaldamento.
7. Risoluzione Dei Problemi
If you encounter issues with your XTUGA AM6 mixer, refer to the following common problems and solutions:
- Nessun potere: Ensure the power adapter is securely connected and the power outlet is functional. Try a different USB power source if using USB power.
- Nessuna uscita audio: Check all cable connections (inputs, main output, headphones). Verify that gain controls, channel levels, and the main output level are turned up. Ensure the correct input source is selected (e.g., LINE, BT, PC, USB).
- Microfono non funzionante: For condenser microphones, ensure 48V phantom power is activated. Check microphone cable connections. Verify microphone gain and channel level.
- Problemi di connessione Bluetooth: Ensure the mixer is in BT mode and discoverable. Turn off and on Bluetooth on your mobile device. Ensure no other devices are connected to the mixer via Bluetooth.
- USB Recording/Playback Problems: Ensure the mixer is in PC or USB mode as appropriate. Check USB cable connection to the computer or U-Disk insertion. Verify computer audio settings if recording to PC.
- Suono distorto: Reduce input gain or channel levels to prevent clipping (indicated by peak LEDs). Check cable quality.
If the problem persists, please contact XTUGA customer support for further assistance.
8. Specifiche
| Caratteristica | Specificazione |
|---|---|
| Marca | XTUGA |
| Modello | AM4 |
| Numero di canali | 4 (also described as 4/6-channel) |
| Tecnologia di connettività | Ausiliario, Bluetooth, USB |
| Fonte di alimentazione | Elettrico con cavo |
| Voltage | 48 Volt (per alimentazione Phantom) |
| Numero di parte del produttore | AM |
| Codice UPC | 784124158778 |
9. Garanzia e supporto
XTUGA products are designed for reliability and performance. For warranty information, technical support, or service inquiries, please refer to the warranty card included with your product or visit the official XTUGA websito. Conservare la ricevuta d'acquisto come prova d'acquisto per eventuali reclami in garanzia.