
Introduzione
Thank you for choosing the BONTEC GDM01 Single Monitor Arm. This manual provides essential information for the safe and correct installation, operation, and maintenance of your monitor arm. Please read these instructions carefully before assembly and keep them for future reference.
The BONTEC GDM01 is designed to support LCD LED screens ranging from 13 to 27 inches, with a maximum weight capacity of 6.5 kg (14.3 lbs). It features a gas spring for smooth height adjustment and offers full motion flexibility, including tilt, swivel, and rotation, to achieve an ergonomic viewposizione di avanzamento.
Informazioni sulla sicurezza
- Prima del montaggio, assicurarsi che tutti i componenti siano presenti e integri. Non utilizzare parti danneggiate.
- Non superare la capacità di peso massima di 6.5 kg (14.3 libbre).
- Ensure the mounting surface (desk) is strong enough to support the combined weight of the monitor arm and your monitor.
- Tighten all screws firmly but do not overtighten. Overtightening can damage the product.
- Always use two people for heavy lifting or when attaching the monitor to the arm.
- Keep children away from small parts that could be swallowed.
- If you have any questions or encounter difficulties, contact customer support.
Contenuto della confezione
Si prega di verificare che tutti i componenti siano inclusi nella confezione:
- Gruppo braccio monitor
- Scrivania Clamp Componente
- Componente di montaggio passacavo
- Piastra VESA
- Kit hardware (viti, rondelle, chiavi a brugola)
- Manuale di istruzioni
Configurazione e installazione
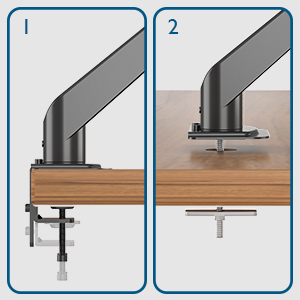
The BONTEC GDM01 monitor arm offers two installation methods: desk clamp e supporto passacavo.
Metodo 1: Scrivania Clamp Installazione
- Allega il Clamp Base: Fissare il C-clamp to the edge of your desk. Ensure the desk thickness is between 10mm and 83mm. Tighten the clamp screw until the base is firmly attached to the desk.
- Attacca il braccio: Slide the monitor arm assembly onto the pole of the clamp base. Secure it with the provided screws or locking mechanism.
- Collegare la piastra VESA al monitor: Align the VESA plate with the mounting holes on the back of your monitor (75x75mm or 100x100mm). Use the appropriate screws from the hardware kit to secure the plate to the monitor.
- Montare il monitor sul braccio: Carefully slide the monitor (with VESA plate attached) onto the arm's mounting head. The open top slots on the VESA plate make this process easier. Ensure it clicks into place or is secured with the locking screw.


Method 2: Grommet Mount Installation
- Prepare Grommet Hole: Ensure your desk has a grommet hole. If not, you may need to drill one (consult a professional if unsure).
- Insert Grommet Base: Place the grommet base through the hole. Secure it from underneath the desk with the provided plate and nut.
- Attacca il braccio: Slide the monitor arm assembly onto the pole of the grommet base. Secure it with the provided screws or locking mechanism.
- Collegare la piastra VESA al monitor: Align the VESA plate with the mounting holes on the back of your monitor (75x75mm or 100x100mm). Use the appropriate screws from the hardware kit to secure the plate to the monitor.
- Montare il monitor sul braccio: Carefully slide the monitor (with VESA plate attached) onto the arm's mounting head. Ensure it clicks into place or is secured with the locking screw.
Operating and Adjusting the Monitor Arm
The BONTEC GDM01 monitor arm offers extensive adjustability for optimal viewing comfort and ergonomics.
Tension Adjustment (Gas Spring)
The built-in gas spring allows for smooth and effortless height adjustment. The tension needs to be adjusted according to the weight of your monitor.
- If the monitor arm sags or cannot hold the monitor's weight, turn the bolt clockwise to increase gas spring tension.
- If the monitor arm is too stiff or difficult to move downwards, turn the bolt counter-clockwise to decrease tension.

Regolazione dell'altezza
Once the gas spring tension is correctly set, you can easily raise or lower your monitor to the desired height. The arm allows for a height adjustment range from 155mm to 400mm.

Inclinazione, rotazione e rotazione
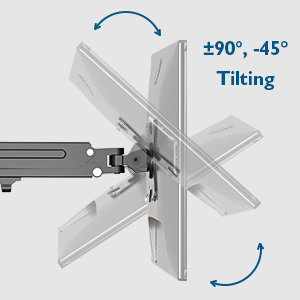
- Inclinazione: Adjust the monitor tilt from -45° to +90° to reduce glare and find your preferred viewangolo di ing.
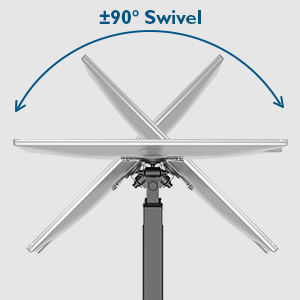
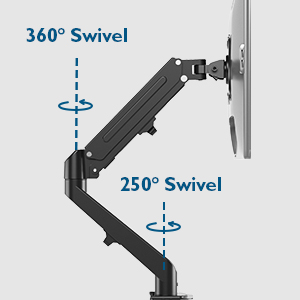
- Girevole: The arm allows for 180° swivel at the base and 250° swivel at the joint, enabling you to share your screen or change viewdirezione.
- Rotazione: Rotate your monitor 360° for landscape or portrait orientation.
Gestione dei cavi
The integrated cable management system helps keep your workspace tidy. Route your monitor cables along the arm and through the designated clips or channels to conceal them.

Manutenzione
- Controllare regolarmente tutte le viti e i collegamenti per assicurarsi che siano sempre ben serrati.
- Pulire il braccio del monitor con un panno morbido eamp panno. Evitare detergenti abrasivi o solventi.
- Do not attempt to disassemble the gas spring mechanism.
Risoluzione dei problemi
| Problema | Possibile causa | Soluzione |
|---|---|---|
| Monitor arm sags or won't stay up. | La tensione della molla a gas è troppo bassa per il peso del monitor. | Increase gas spring tension by turning the adjustment bolt clockwise with the provided Allen key. |
| Il braccio del monitor è troppo rigido per poter essere mosso. | Gas spring tension is too high. | Decrease gas spring tension by turning the adjustment bolt counter-clockwise with the provided Allen key. |
| Il monitor oscilla sul braccio. | VESA plate screws or arm connection screws are loose. | Ensure all VESA plate screws and arm connection screws are securely tightened. |
| Scrivania clamp non è stabile. | Clamp not tightened sufficiently or desk surface is uneven. | Retighten the desk clamp. Ensure the desk surface is flat and stable. Consider using the grommet mount if the clamp non è adatto. |
Specifiche
- Modello: Modello GDM01
- Materiale: Acciaio legato
- Compatibilità delle dimensioni dello schermo: 13 - 27 pollici
- Capacità di peso: 6.5 kg (14.3 libbre)
- Compatibilità VESA: 75x75mm, 100x100mm
- Intervallo di regolazione dell'altezza: 155 mm - 400 mm
- Estensione del braccio: Fino a 525 mm
- Gamma di inclinazione: da -45° a +90°
- Gamma di rotazione: 180° (base), 250° (joint)
- Rotazione: 360°
- Scrivania Clamp Spessore: 10 mm - 83 mm
Garanzia e supporto
BONTEC products are designed for durability and performance. For warranty information or technical support, please refer to the contact details provided with your purchase or visit the official BONTEC website. Please have your model number (GDM01) and purchase details ready when contacting support.
Produttore: BONTEC