Pipo X10s
Manuale utente per PiPo X10s All-in-One Mini PC
Model: X10s
Introduzione
This manual provides essential information for the proper setup, operation, and maintenance of your PiPo X10s All-in-One Mini PC. Please read this manual thoroughly before using the device to ensure optimal performance and safety.
The PiPo X10s is a versatile 10.1-inch tablet computer designed as an all-in-one mini PC, featuring a Windows 10 operating system, Intel Celeron J4105 Quad Core processor, 6GB RAM, and 64GB ROM. It supports various connectivity options including WiFi, Bluetooth, TF Card, and RJ45 Ethernet.

Image: The PiPo X10s Mini PC, showcasingrazie al suo design compatto e al display integrato.
Informazioni sulla sicurezza
- Non esporre il dispositivo a temperature estreme, alla luce solare diretta o a elevata umidità.
- Evitare di far cadere o sottoporre il dispositivo a forti impatti.
- Utilizzare solo l'adattatore di alimentazione originale fornito con il dispositivo.
- Non tentare di smontare o riparare il dispositivo da soli. Rivolgersi a personale qualificato.
- Tenere il dispositivo lontano dall'acqua e da altri liquidi.
- Garantire una ventilazione adeguata per evitare il surriscaldamento.
Prodotto finitoview
Familiarize yourself with the various ports and components of your PiPo X10s Mini PC.

Image: Detailed diagram of the PiPo X10s ports and controls.
- Pulsante di spegnimento: Accendere/spegnere il dispositivo.
- Volume up and down keys: Regola il volume dell'audio.
- USB interface (x4): Connect USB devices such as keyboards, mice, or external storage.
- Interfaccia audio da 3.5 mm: Collega cuffie o altoparlanti esterni.
- Presa per scheda TF: Insert a TF (MicroSD) card for expanded storage (up to 32GB, not included).
- Interfaccia HDMI: Collegalo a un display esterno o a una TV.
- RJ45 network interface: Connect to a wired Ethernet network.
- DC 12V power interface: Collegare l'adattatore di alimentazione.
- Interfaccia RS232: Serial port for specific industrial or legacy connections.
Impostare
Accensione iniziale
- Connect the provided 12V / 2.4A power adapter to the DC 12V power interface on the device.
- Collegare l'adattatore di corrente a una presa a muro.
- Press and hold the "Off button" (Power button) located on the side of the device until the screen lights up.
- Seguire le istruzioni visualizzate sullo schermo per completare la configurazione iniziale di Windows 10, inclusa la selezione della lingua, la connessione di rete e la creazione dell'account utente.
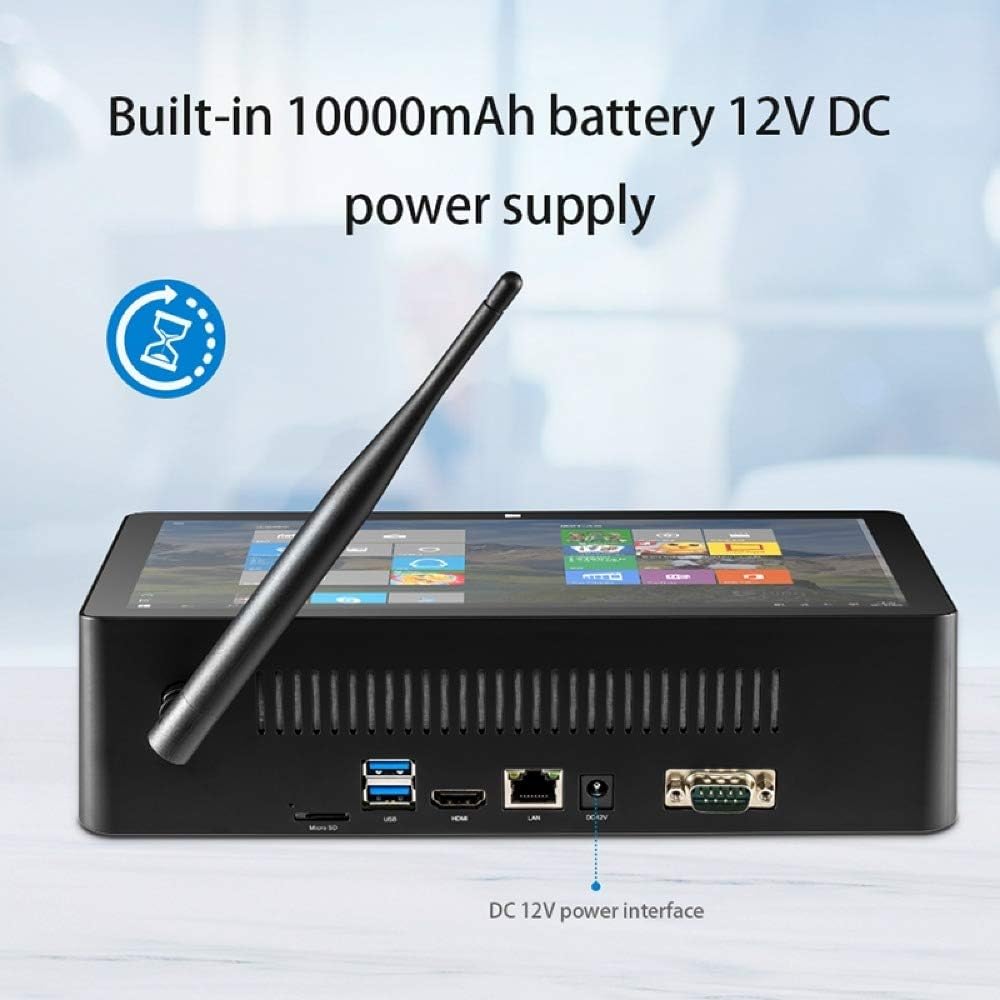
Image: The DC 12V power interface on the rear of the device.
Operativo
Funzionamento di base
- Accensione/spegnimento: Press the power button to turn on. To turn off, click the Start button in Windows, then Power > Shut down. A short press of the power button will put the device to sleep.
- Interazione con lo schermo: The 10.1-inch IPS capacitive screen supports touch input. Navigate Windows 10 by tapping, swiping, and pinching.
- Controllo del volume: Use the dedicated volume up and down buttons on the device, or adjust volume through the Windows taskbar.
Windows 10 Environment
Your PiPo X10s comes pre-installed with Windows 10. You can customize settings, install applications, and manage files just like on a standard desktop PC. The system supports multi-languages, which can be downloaded and installed via Windows settings.
Connettività
Connessione Wi-Fi
- Fare clic sull'icona Wi-Fi nella barra delle applicazioni di Windows.
- Seleziona la rete desiderata dall'elenco delle reti disponibili.
- Se richiesto, immettere la password di rete e fare clic su "Connetti".
Connessione Bluetooth
- Vai su Impostazioni di Windows > Dispositivi > Bluetooth e altri dispositivi.
- Assicurati che il Bluetooth sia attivato.
- Fare clic su "Aggiungi dispositivo Bluetooth o altro" e selezionare "Bluetooth".
- Choose your Bluetooth device from the list and follow the pairing instructions.
Wired Ethernet (LAN)
Connect an Ethernet cable from your router or network switch to the RJ45 network interface on the device. The device will automatically detect and connect to the wired network.

Image: Connecting an Ethernet cable to the RJ45 port.
External Display (HDMI)
Connect an HDMI cable from the HDMI interface on the device to an HDMI input on your monitor or TV. Windows will automatically detect the external display. You can configure display settings (duplicate, extend, second screen only) via Windows Display Settings.
USB Devices and TF Card
- Porte USB: Plug in USB keyboards, mice, flash drives, or other peripherals into any of the four USB 2.0 ports.
- Carta TF: Insert a TF (MicroSD) card into the TF card slot for additional storage. The device supports cards up to 32GB.
Manutenzione
- Pulizia: Utilizzare un panno morbido e asciutto per pulire lo schermo e l'esterno. Per i segni ostinati, strofinare leggermenteampLavare il panno con acqua. Evitare prodotti chimici aggressivi.
- Aggiornamenti software: Regularly check for Windows updates to ensure your system has the latest security patches and performance improvements. Go to Windows Settings > Update & Security > Windows Update.
- Gestione della memoria: Periodicamente cancellare temporaneamente files and unnecessary applications to maintain optimal performance. Windows Disk Cleanup utility can assist with this.
Risoluzione dei problemi
| Problema | Possibile soluzione |
|---|---|
| Il dispositivo non si accende. | Ensure the power adapter is securely connected to both the device and a working power outlet. Check if the power outlet is active. The built-in battery might be depleted; allow it to charge for a few minutes before attempting to power on again. |
| Nessuna connessione Wi-Fi. | Check if Wi-Fi is enabled in Windows settings. Ensure you are within range of a Wi-Fi network. Verify the Wi-Fi password is correct. Restart the device and your Wi-Fi router. |
| Lo schermo non risponde. | Riavvia il dispositivo. Se il problema persiste, assicurati che lo schermo sia pulito e privo di detriti. |
| Prestazioni lente. | Close unnecessary applications. Check for and install Windows updates. Run Disk Cleanup to free up storage space. Consider reducing the number of startup programs. |
| Display esterno non rilevato. | Ensure the HDMI cable is securely connected to both the device and the external display. Verify the external display is set to the correct HDMI input. Try restarting both devices. |
Specifiche
Detailed technical specifications for the PiPo X10s All-in-One Mini PC:
| Caratteristica | Dettaglio |
|---|---|
| Modello | PiPo X10s |
| Sistema operativo | Finestre 10 |
| processore | Intel Celeron J4125 Quad-core, 1.5-2.5 GHz |
| Scheda grafica | Intel Graphics UHD 600 |
| Memoria RAM | 6 GB |
| ROM (memoria interna) | 64 GB |
| Memoria esterna | Scheda TF fino a 32 GB (non inclusa) |
| Dimensioni dello schermo | 10.1 pollici |
| Tipo di schermo | Schermo capacitivo IPS |
| Risoluzione dello schermo | 1920x1200 |
| Wifi | 802.11a/b/g/n |
| Bluetooth | V4.0 |
| Capacità della batteria | 3.7 V 10000 mAh |
| Potenza in ingresso | 12V / 2.4A |
| Interfacce | 1 x TF Card Slot, 1 x 3.5mm Earphone Port, 1 x DC Port, 1 x HDMI Port, 1 x RJ45 Jack, 4 x USB 2.0 Ports, 1 x RS232 DB9 |
| Dimensioni (L x P x A) | 274 x 162 x 68 mm |
| Peso | 1025g |

Image: Physical dimensions of the PiPo X10s.
Garanzia e supporto
For warranty information and technical support, please refer to the documentation included with your purchase or visit the official Pipo websito. Conservare la prova d'acquisto per eventuali reclami in garanzia.
For common issues, please consult the Troubleshooting section of this manual. If you require further assistance, contact Pipo customer support.
Ask a question about this manual
Ask about setup, troubleshooting, compatibility, parts, safety, or missing instructions. Manuals+ will review the question and use this page’s manual context to help answer it.