ANCHEER RM-5768
ANCHEER Hydraulic Rowing Machine RM-5768 User Manual
Modello: RM-5768
Introduzione
Thank you for choosing the ANCHEER Hydraulic Rowing Machine RM-5768. This manual provides essential information for the safe assembly, operation, and maintenance of your rowing machine. Please read this manual thoroughly before use and retain it for future reference.
Informazioni importanti sulla sicurezza
- Consultare un medico prima di iniziare qualsiasi programma di esercizi.
- Tenere i bambini e gli animali domestici lontani dalla macchina durante il funzionamento.
- Place the rowing machine on a flat, stable surface. Ensure adequate space around the machine.
- Prima di ogni utilizzo, ispezionare la macchina per verificare la presenza di parti allentate o danneggiate. Non utilizzarla se danneggiata.
- Indossare abbigliamento e calzature sportive adeguati.
- Non superare il peso massimo dell'utente di 250 kg (550 libbre).
- Interrompere immediatamente l'attività fisica se si avvertono dolore, vertigini o mancanza di respiro.
Prodotto finitoview
The ANCHEER Hydraulic Rowing Machine RM-5768 is designed for a full-body cardio workout. It features a unique full-motion arm system and adjustable hydraulic resistance.
Componenti chiave
- Cilindri idraulici: Provide resistance for rowing motion.
- Full-Motion Arms: Allow for a 360-degree rotation, simulating realistic rowing.
- Adjustable Foot Pedals: Non-slip design with adjustable straps for secure foot placement.
- Ergonomic Padded Seat: Designed for comfort during extended workouts.
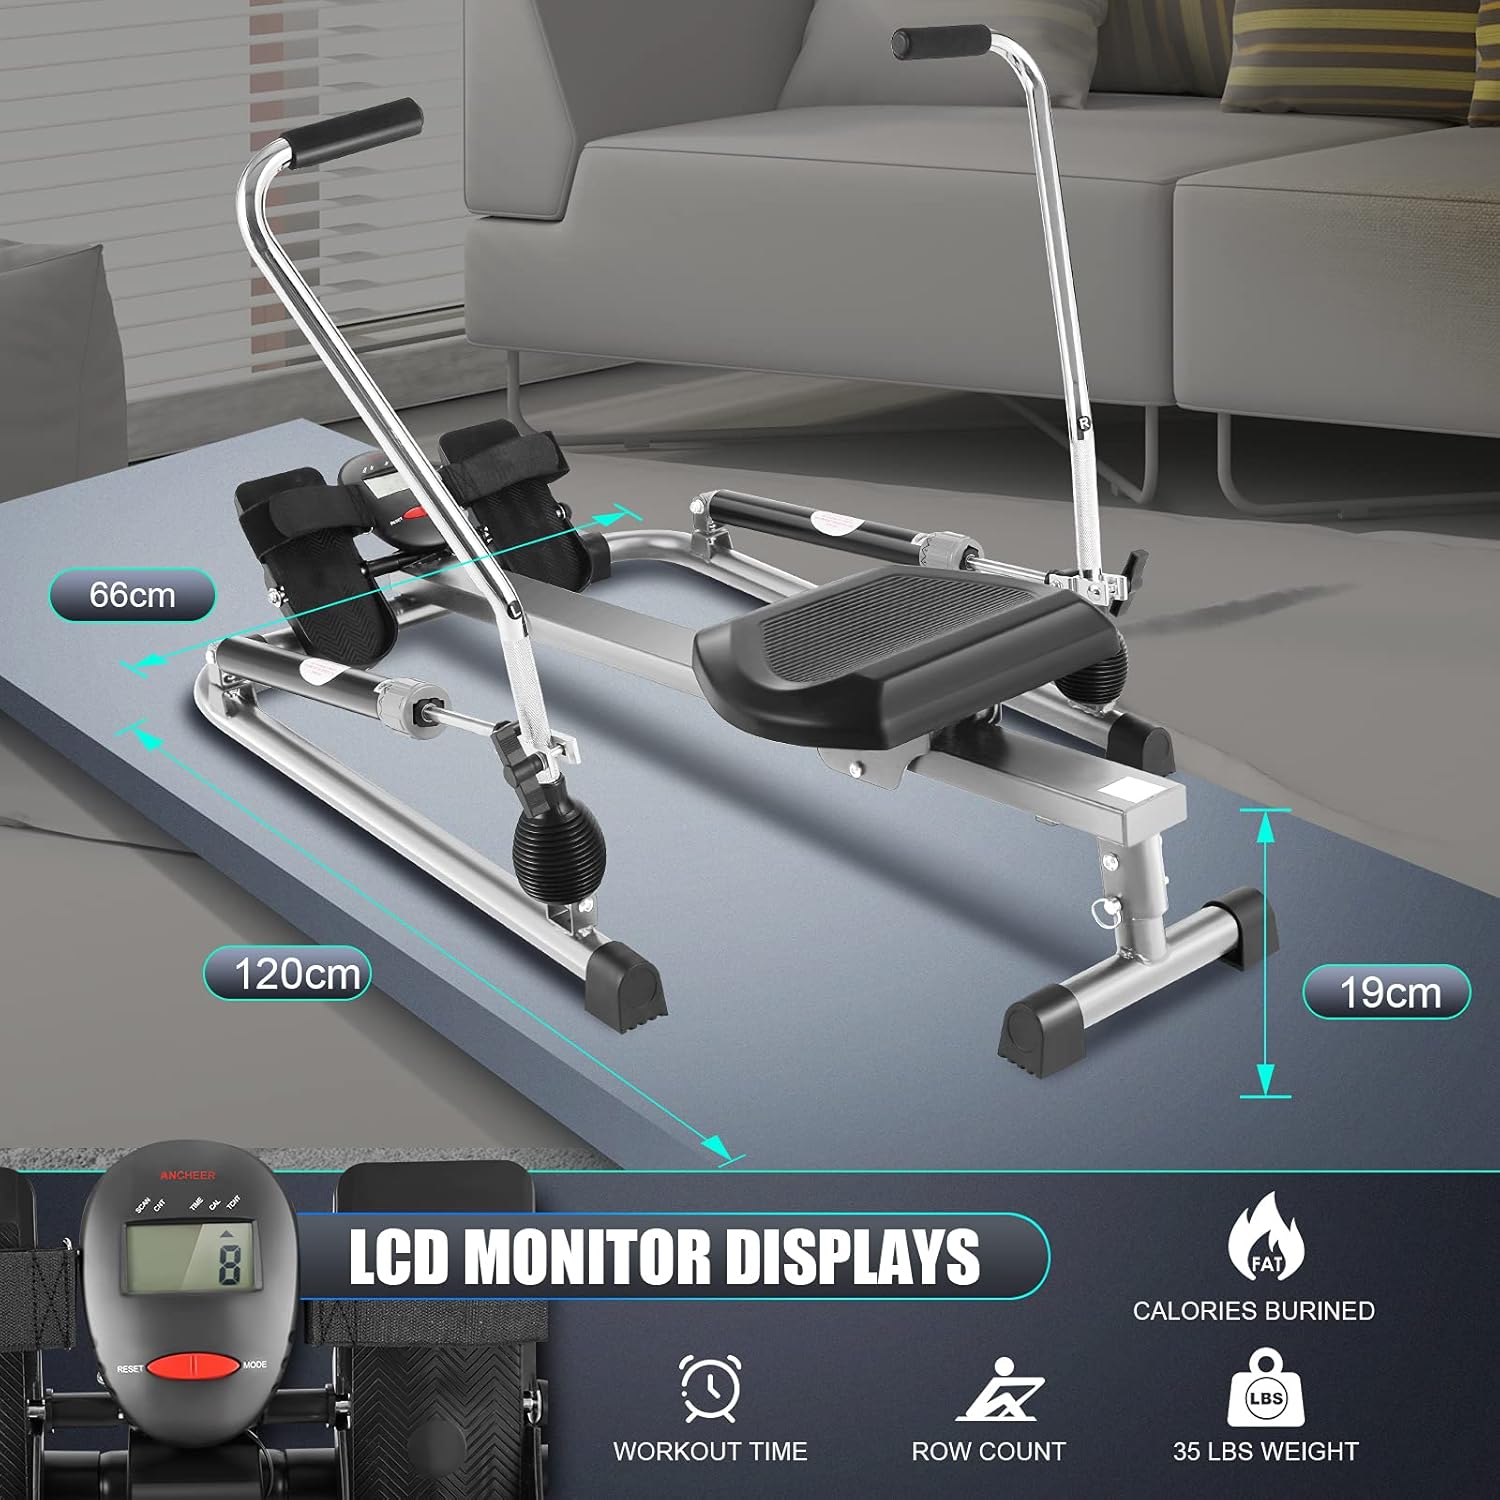
- Monitor LCD: Displays workout data such as time, count, calories, and distance.
- Aluminum Rail: Ensures smooth and quiet seat movement.

Installazione e assemblaggio
Before assembly, ensure all parts are present and undamaged. Refer to the included hardware pack and assembly diagram.
Fasi di assemblaggio:
- Disimballare i componenti: Estrarre con cautela tutti i componenti dall'imballaggio e disporli su una superficie pulita e piana.
- Fissare gli stabilizzatori: Fissare gli stabilizzatori anteriori e posteriori al telaio principale utilizzando i bulloni e le rondelle forniti.
- Installa il sedile: Slide the ergonomic seat onto the aluminum rail. Ensure it moves smoothly.
- Mount Rowing Arms: Attach the full-motion rowing arms to the main frame. Connect the hydraulic cylinders to the arms and the frame.
- Fissare i pedali: Secure the foot pedals to the designated points on the frame.
- Installare il monitor LCD: Mount the LCD monitor onto its bracket. Insert 2 AAA batteries (not included) into the monitor.
- Controllo finale: Verify all bolts are tightened and all components are securely in place.

Istruzioni per l'uso
Regolazione della resistenza
The rowing machine features 12 levels of adjustable hydraulic resistance. To adjust the resistance:
- Locate the adjustment knob on the hydraulic cylinders.
- Turn the knob clockwise to increase resistance (levels 9-12 for higher intensity).
- Turn the knob counter-clockwise to decrease resistance (levels 1-4 for lower intensity).
- Ensure both hydraulic cylinders are set to the same resistance level for balanced operation.

Utilizzo del monitor LCD
The LCD monitor tracks your workout progress. It displays:
- TEMPO: Durata del tuo allenamento.
- CONTARE: Numero di colpi di canottaggio.
- CALORIE: Calorie bruciate stimate.
- DISTANZA: Estimated distance rowed.
Pulsanti:
- DIREZIONI: Press to cycle through display functions or hold to reset values.
- RIPRISTINA: Press to reset current values.
Tecnica di canottaggio corretta
For an effective and safe workout, follow these steps:
- Posizione di partenza: Sit on the seat with knees bent, feet securely strapped into the pedals. Lean slightly forward from the hips, keeping your back straight. Grasp the handles with an overhand grip.
- La guida: Push off with your legs, extending them fully. As your legs extend, pull the handles towards your abdomen, engaging your core and back muscles. The full-motion arms allow for a natural, wide rowing arc.
- La finitura: Your legs should be fully extended, and the handles should be near your abdomen. Your body should be leaning slightly back.
- La ripresa: Extend your arms forward, then bend your knees, allowing the seat to slide forward. Return to the starting position in a controlled manner.

Manutenzione
Una manutenzione regolare garantisce la longevità e il funzionamento sicuro del vostro vogatore.
- Pulizia: Pulisci la macchina con adamp Dopo ogni utilizzo, pulire con un panno per rimuovere sudore e polvere. Evitare detergenti abrasivi.
- Lubrificazione: Periodically check the moving parts, especially the seat rollers and rail, for smooth operation. Apply a silicone-based lubricant if necessary.
- Stringere i dispositivi di fissaggio: Regularly inspect all bolts, nuts, and screws. Tighten any loose fasteners to prevent instability and wear.
- Magazzinaggio: Store the rowing machine in a cool, dry place away from direct sunlight and extreme temperatures.
- Sostituzione della batteria: Sostituire le batterie AAA nel monitor LCD quando il display diventa scuro o non risponde.

Risoluzione dei problemi
| Problema | Possibile causa | Soluzione |
|---|---|---|
| Nessuna visualizzazione sul monitor LCD | Le batterie sono scariche o installate in modo errato. | Sostituire le batterie AAA o verificare la corretta polarità. |
| Resistance feels uneven or too weak/strong | Hydraulic cylinders not set to the same level; cylinder malfunction. | Adjust both cylinders to the same resistance level. If issue persists, contact customer support. |
| Rumore stridente o stridente | Loose fasteners; dry moving parts (seat rollers, rail). | Tighten all bolts and screws. Lubricate the seat rail and rollers with silicone spray. |
| Il sedile non scorre fluidamente | Debris on the rail; dry rail; damaged rollers. | Clean the aluminum rail. Apply silicone lubricant. Inspect rollers for damage. |
Specifiche
| Caratteristica | Dettaglio |
|---|---|
| Nome del modello | RM-5768 |
| Marca | ANCORA |
| Meccanismo di resistenza | Idraulico |
| Livelli di resistenza | 12 (regolabile) |
| Materiale del telaio | Acciaio legato |
| Materiale ferroviario | Alluminio |
| Tipo di visualizzazione | LCD |
| Funzioni di monitoraggio | Time, Count, Calories, Distance |
| Dimensioni del prodotto (L x P x A) | 120 x 66 x 19 cm (47.2 x 26 x 7.5 pollici) |
| Peso del prodotto | 18.12 kg (39.9 libbre) |
| Peso massimo dell'utente | 250 kg (550 libbre) |
| Batterie richieste | 2 x AAA (non incluso) |
| Caratteristiche speciali | Digital display, Adjustable resistance, Compact, Contoured seat, Lightweight, Full-motion arms |
Garanzia e supporto
ANCHEER products are manufactured to high-quality standards. For warranty information, please refer to the warranty card included with your purchase or contact ANCHEER customer support directly.
If you have any questions, require assistance with assembly, operation, or maintenance, or need to report a missing or damaged part, please contact ANCHEER customer service. Contact details can typically be found on the product packaging or the official ANCHEER websito.
Ask a question about this manual
Ask about setup, troubleshooting, compatibility, parts, safety, or missing instructions. Manuals+ will review the question and use this page’s manual context to help answer it.