Teslong TD450D85L1 Articulating Borescope User Manual
Model: TD450D85L1
1. Introduzione
The Teslong TD450D85L1 Articulating Borescope is a professional inspection tool designed for visual examination of hard-to-reach areas. It features a two-way 180-degree articulating probe, an integrated 4.5-inch IPS LCD monitor, and high-definition imaging capabilities. This manual provides essential information for the safe and effective use of your borescope.
2. Informazioni sulla sicurezza
- Non-Waterproof Probe: The inspection probe of this borescope is NON IMPERMEABILE. Do not submerge the probe or any part of the device in water or other liquids. Doing so will cause damage and void the warranty.
- Evitare di utilizzare il dispositivo in ambienti con temperature estreme o elevata umidità.
- Tenere il dispositivo lontano da forti campi magnetici.
- Non tentare di smontare o modificare il dispositivo. Le riparazioni devono essere eseguite solo da personale autorizzato.
- Ensure the device is fully charged before use to prevent unexpected power loss during inspections.

3. Contenuto della confezione
Verifica che tutti gli articoli elencati di seguito siano inclusi nel tuo pacchetto:
- TD450D85L1 Articulating Borescope Unit (with integrated 4.5-inch IPS monitor)
- Cavo di ricarica USB di tipo C.
- Scheda MicroSD da 8 GB (preinstallata)
- Custodia per il trasporto
- Manuale dell'utente

4. Prodotto finitoview e Caratteristiche
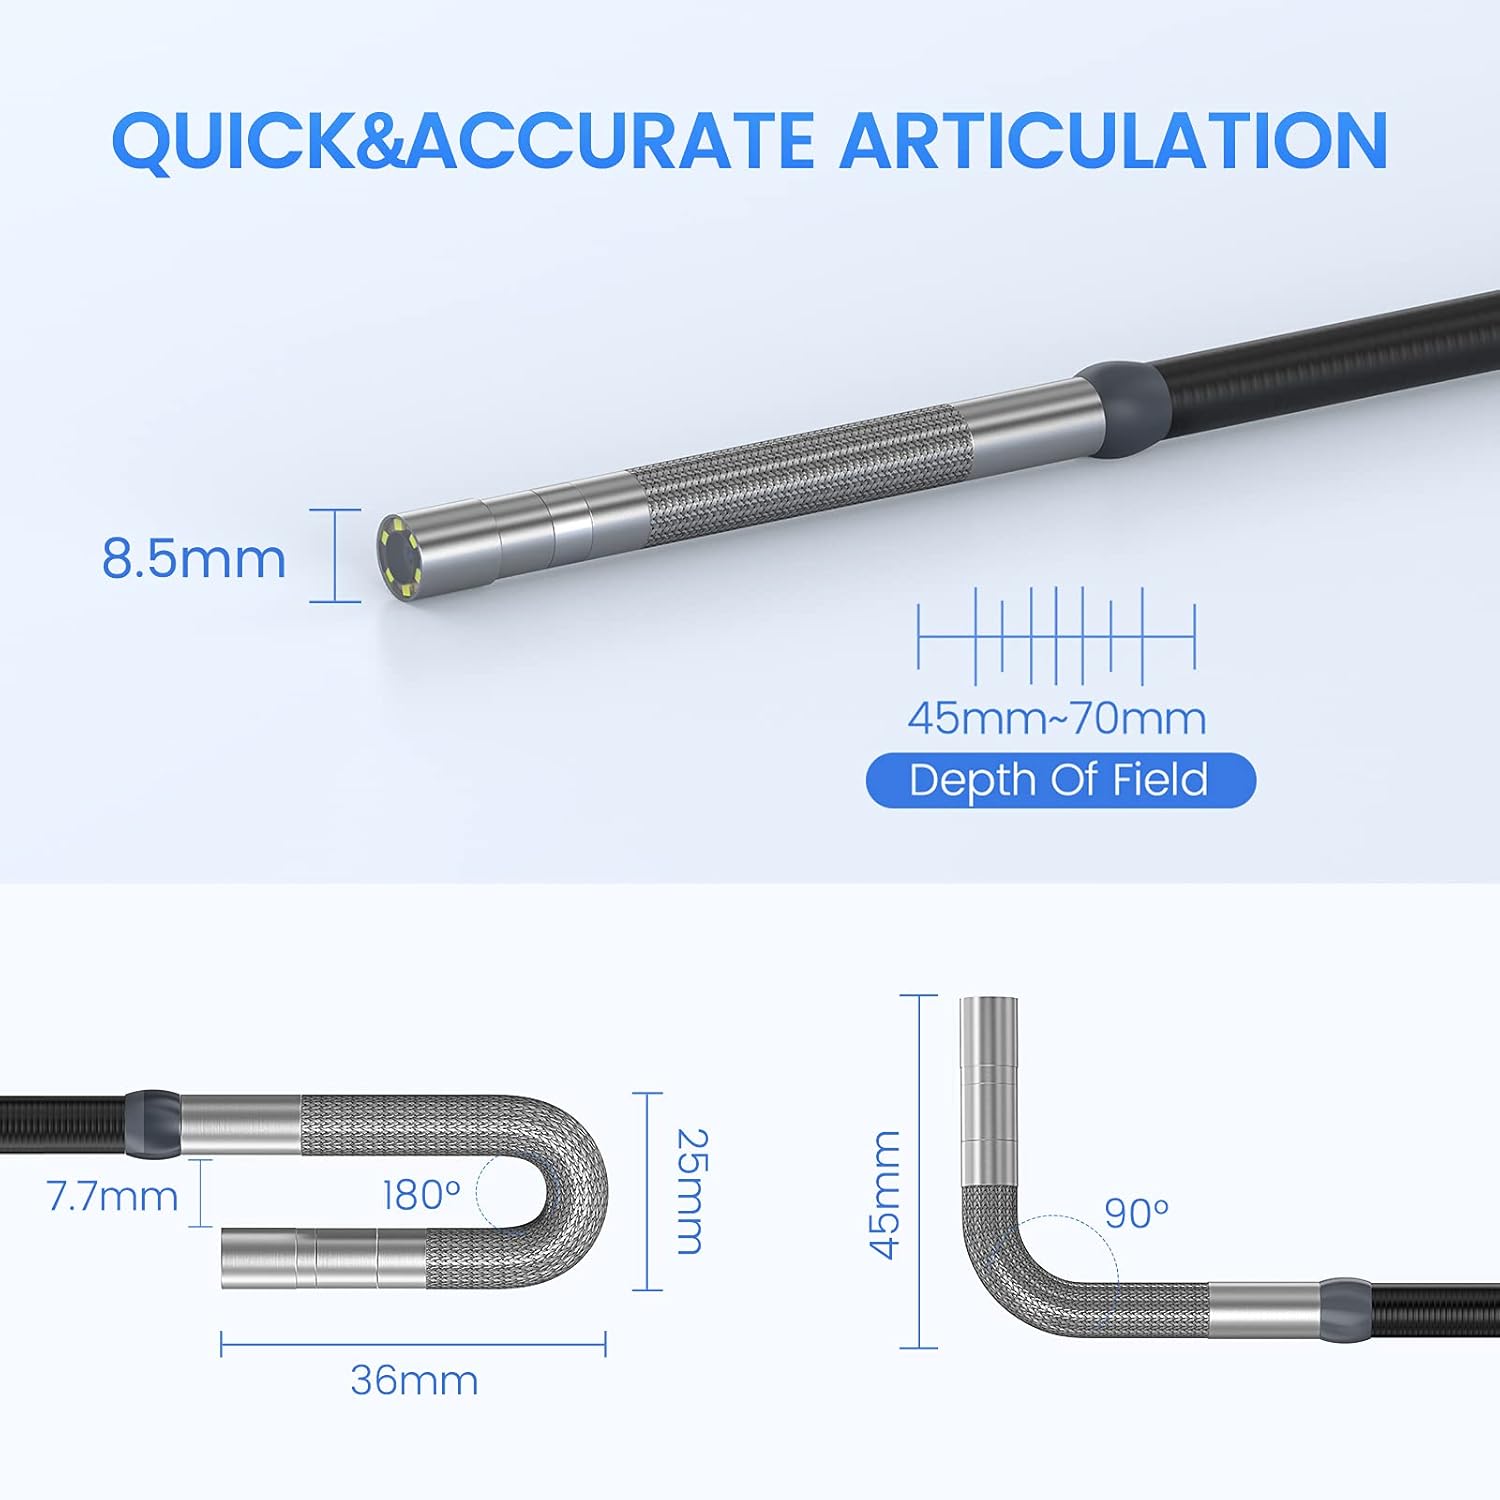
The Teslong TD450D85L1 is an advanced inspection camera designed for detailed visual inspections. It features a flexible gooseneck probe with an 8.5mm diameter and a 2.0MP CMOS sensor, providing 1080P HD image and video capture. The integrated 4.5-inch IPS LCD monitor offers a clear view without the need for external devices or Wi-Fi connections.
Caratteristiche principali:
- Two-Way 180° Articulation: Allows precise control of the probe tip for navigating complex spaces and maintaining optimal viewangoli di inclinazione.
- Integrated 4.5-inch IPS LCD Monitor: Provides a clear, real-time display of the inspection area. No smartphone, Wi-Fi, or app required.
- Immagini ad alta definizione: 1080P HD resolution with a 2.0MP CMOS sensor for capturing detailed images and videos.
- Illuminazione LED regolabile: Built-in highlighting LEDs ensure clear visibility in dark conditions.
- Registrazione di foto e video: Supports JPG image and AVI video recording directly to the included 8GB MicroSD card. Includes a microphone and speaker for audio recording.
- Batteria a lunga durata: Equipped with a built-in 5000mAh rechargeable battery for extended operation.


5. Impostazione
5.1 Carica iniziale
- Connect the USB Type-C charging cable to the borescope's charging port.
- Collegare l'altra estremità del cavo USB a un adattatore di alimentazione USB standard (non incluso) o alla porta USB di un computer.
- Allow the device to charge fully before first use. The charging indicator light will change when charging is complete.
5.2 Installazione della scheda MicroSD
The 8GB MicroSD card is typically pre-installed. If it needs to be inserted or replaced:
- Locate the MicroSD card slot on the side of the monitor unit.
- Gently insert the MicroSD card with the gold contacts facing down until it clicks into place.
- Per rimuoverla, spingere leggermente la scheda finché non scatta fuori.

6. Istruzioni per l'uso
6.1 Accensione/Spegnimento
- Per accendere, tenere premuto il pulsante di accensione finché lo schermo non si illumina.
- Per spegnere, tieni premuto il pulsante di accensione finché lo schermo non si spegne.
6.2 Controlling Articulation
The borescope probe features two-way 180-degree articulation. Use the control knob on the handle to adjust the direction of the probe tip:
- Rotate the knob clockwise or counter-clockwise to bend the probe tip left or right.
- The articulation can be locked in position for stable viewing.

6.3 Regolazione dell'illuminazione a LED
The probe tip is equipped with adjustable LED lights to illuminate the inspection area. Use the dedicated button on the monitor unit to cycle through different brightness levels or turn the lights off.
6.4 Scattare foto e registrare video
- Per scattare una foto: Mentre in diretta view, press the Photo button (usually indicated by a camera icon) to capture a still image.
- Per registrare un video: Press the Video button (usually indicated by a video camera icon) to start recording. Press it again to stop recording. The device will record audio through its built-in microphone.
- All captured media is saved to the installed MicroSD card.
6.5 RiviewMedia
Accedi alla modalità di riproduzione dal menu principale per view captured photos and videos. Use the navigation buttons to browse through your media files.
7. Manutenzione
- Pulizia: Gently wipe the monitor screen and the probe with a soft, dry cloth. For stubborn dirt on the probe, use a slightly damp cloth and ensure it is completely dry before storage. Do not use abrasive cleaners or solvents.
- Magazzinaggio: Conservare il boroscopio nella sua custodia per il trasporto in un luogo fresco e asciutto, lontano dalla luce solare diretta e da temperature estreme.
- Cura della batteria: Per una durata ottimale della batteria, caricare il dispositivo regolarmente ed evitare di scaricarlo completamente per periodi prolungati. Se non lo si utilizza per un lungo periodo, caricarlo fino a circa il 50% ogni pochi mesi.
- Aggiornamenti software: Controllare il produttore webperiodicamente il sito per verificare la disponibilità di eventuali aggiornamenti del firmware.
8. Risoluzione Dei Problemi
| Problema | Possibile causa | Soluzione |
|---|---|---|
| Il dispositivo non si accende. | Batteria scarica. | Carica completamente il dispositivo. |
| Nessuna immagine sullo schermo. | Probe cable not securely connected. | Ensure the probe cable is firmly connected to the monitor unit. |
| L'immagine è sfocata o scura. | Insufficient lighting; dirty camera lens; incorrect focus. | Adjust LED brightness. Clean the camera lens. Ensure the object is within the 45-70mm depth of field. |
| Impossibile registrare foto/video. | Scheda MicroSD piena o non inserita correttamente; errore della scheda. | Check MicroSD card insertion. Delete unnecessary files or replace the card. Format the card if necessary (this will erase all data). |
| L'articolazione è rigida o non risponde. | Mechanical obstruction; debris in articulation mechanism. | Carefully inspect the probe tip for any obstructions. Do not force articulation. Contact customer support if the issue persists. |
9. Specifiche
| Caratteristica | Specificazione |
|---|---|
| Nome del modello | Articulating Endoscope Inspection Camera (TD450D85L1) |
| Dimensioni dello schermo | LCD IPS da 4.5 pollici |
| Risoluzione fissa efficace | 2 MP |
| Risoluzione di acquisizione video | Formato: 1080p |
| Diametro della sonda | 8.5mm |
| Articolazione | Two-Way 180 Degrees |
| Macro Focus Range (Depth of Field) | 45-70mm |
| Angolo reale di View | 60 gradi |
| Tipo di sensore | CMOS |
| Tipo di supporto | Scheda Micro SD (inclusa da 8 GB) |
| File Formato | JPG (images), AVI (videos) |
| Registrazione audio | Yes (with internal microphone) |
| Tecnologia di connettività | USB |
| Capacità della batteria | 5000 mAh (ricaricabile) |
| Livello di resistenza all'acqua | Not Waterproof (probe) |
10. Garanzia e supporto
Your Teslong TD450D85L1 Articulating Borescope comes with a Garanzia di 12 mesi dalla data di acquisto. La presente garanzia copre i difetti di fabbricazione e assicura prestazioni affidabili in condizioni di utilizzo normali.
For technical assistance, troubleshooting, or warranty claims, please contact Teslong customer service. Refer to the contact information provided on the official Teslong website or in your product packaging for the most up-to-date support channels.
Please have your model number (TD450D85L1) and purchase details ready when contacting support.