1. Introduzione
Thank you for choosing the Mxmoonfree 300N Digital Force Gauge. This portable device is designed for precise measurement of push and pull forces, offering high accuracy and multiple measurement units. It is widely used in various fields including industrial testing, laboratory research, and educational demonstrations. Please read this manual thoroughly before operation to ensure correct usage and optimal performance.

Image: The Mxmoonfree 300N Digital Force Gauge, a compact and portable device for force measurement.
2. Cosa c'è nella scatola
Dopo aver aperto la confezione, verificare che tutti gli articoli elencati di seguito siano presenti e in buone condizioni:
- Digital Force Gauge (Main Unit)
- Various Accessories Kit (hooks, flat head, cone head, chisel head, extension rod)
- Custodia di stoccaggio
- 2 batterie AAA
- Manuale dell'utente (questo documento)
- Carta dei servizi
- Certificato di calibrazione

Image: A visual representation of all items included in the product package, neatly arranged in the storage case.
3. Specifiche
| Caratteristica | Descrizione |
|---|---|
| Max. Load Value | 300 N / 30 kg / 65 Lb / 7100 Oz |
| Min. Load Value | 0.1 N / 0.01 kg / 1 Oz |
| Precisione | ± 1% |
| Unità di misura | N, Lb, Kg, Oz |
| Modalità di misurazione | In tempo reale, Picco, Primo picco |
| Energia | 2 batterie AAA |
| Spegnimento automatico | Adjustable (0-15 minutes), default 10 minutes |
| Materiale | Acrilonitrile Butadiene Stirene (ABS) |
| Dimensioni (L x P x A) | Dimensioni: 6 x 12.4 x 3.1 cm |
| Distanza fori di montaggio | 41 x 73 mm (for M4 screws) |

Image: Diagram showing the physical dimensions of the force gauge, including length, width, and mounting hole distances.
4. Impostazione
4.1. Installazione della batteria
- Individuare il vano batteria sul retro del dispositivo.
- Far scorrere per aprire il coperchio della batteria.
- Inserire due batterie AAA, assicurandosi della corretta polarità (+/-).
- Chiudere bene il coperchio della batteria.

Immagine: A view of the back of the force gauge with the battery compartment open, showing the correct insertion of two AAA batteries.
4.2. Fissaggio degli accessori
Select the appropriate accessory (e.g., hook, flat head) for your specific testing requirement. Screw it firmly onto the threaded shaft at the top or bottom of the force gauge.
5. Istruzioni per l'uso
5.1. Accensione/spegnimento
Premere il tasto ENERGIA button (red button in the center) to turn the device on or off.
5.2. Conversione unità
The force gauge supports four measurement units: Newtons (N), Pounds (Lb), Kilograms (Kg), and Ounces (Oz). To switch between units, press the UNITÀ button (green button on the right).

Image: The force gauge display showing different measurement units (N, Kg, Oz, Lb) and how to cycle through them using the UNIT button.
5.3. Modalità di misurazione
The device features three measurement modes: Real-time, Peak, and First Peak. Press the PICCO button (blue button on the left) to cycle through these modes.
- Modalità in tempo reale: The display shows the current force being applied. The value changes dynamically with the load.
- Modalità Picco: The display holds the maximum force value recorded during the measurement. This is useful for destructive testing or capturing peak loads.
- Modalità Primo Picco: The display shows the first peak force value measured within a period of time. This is indicated by 'P' and 'T' on the screen.

Image: A hand holding the force gauge, demonstrating real-time force measurement as a spring is compressed.

Image: A hand holding the force gauge with a hook attachment, showing the 'P' indicator for Peak mode and a stable maximum force reading.

Image: A hand using the force gauge to test the insertion force of a plug into an outlet, displaying 'P' and 'T' for First Peak mode.
5.4. Azzeramento del display
Before taking a measurement, ensure the display reads 0.0. If not, press the ZERO button (green button on the right, above UNIT) to reset the reading.
5.5. Esecuzione di un test
Attach the appropriate accessory. Apply force to the object being tested. The display will show the force value according to the selected measurement mode.
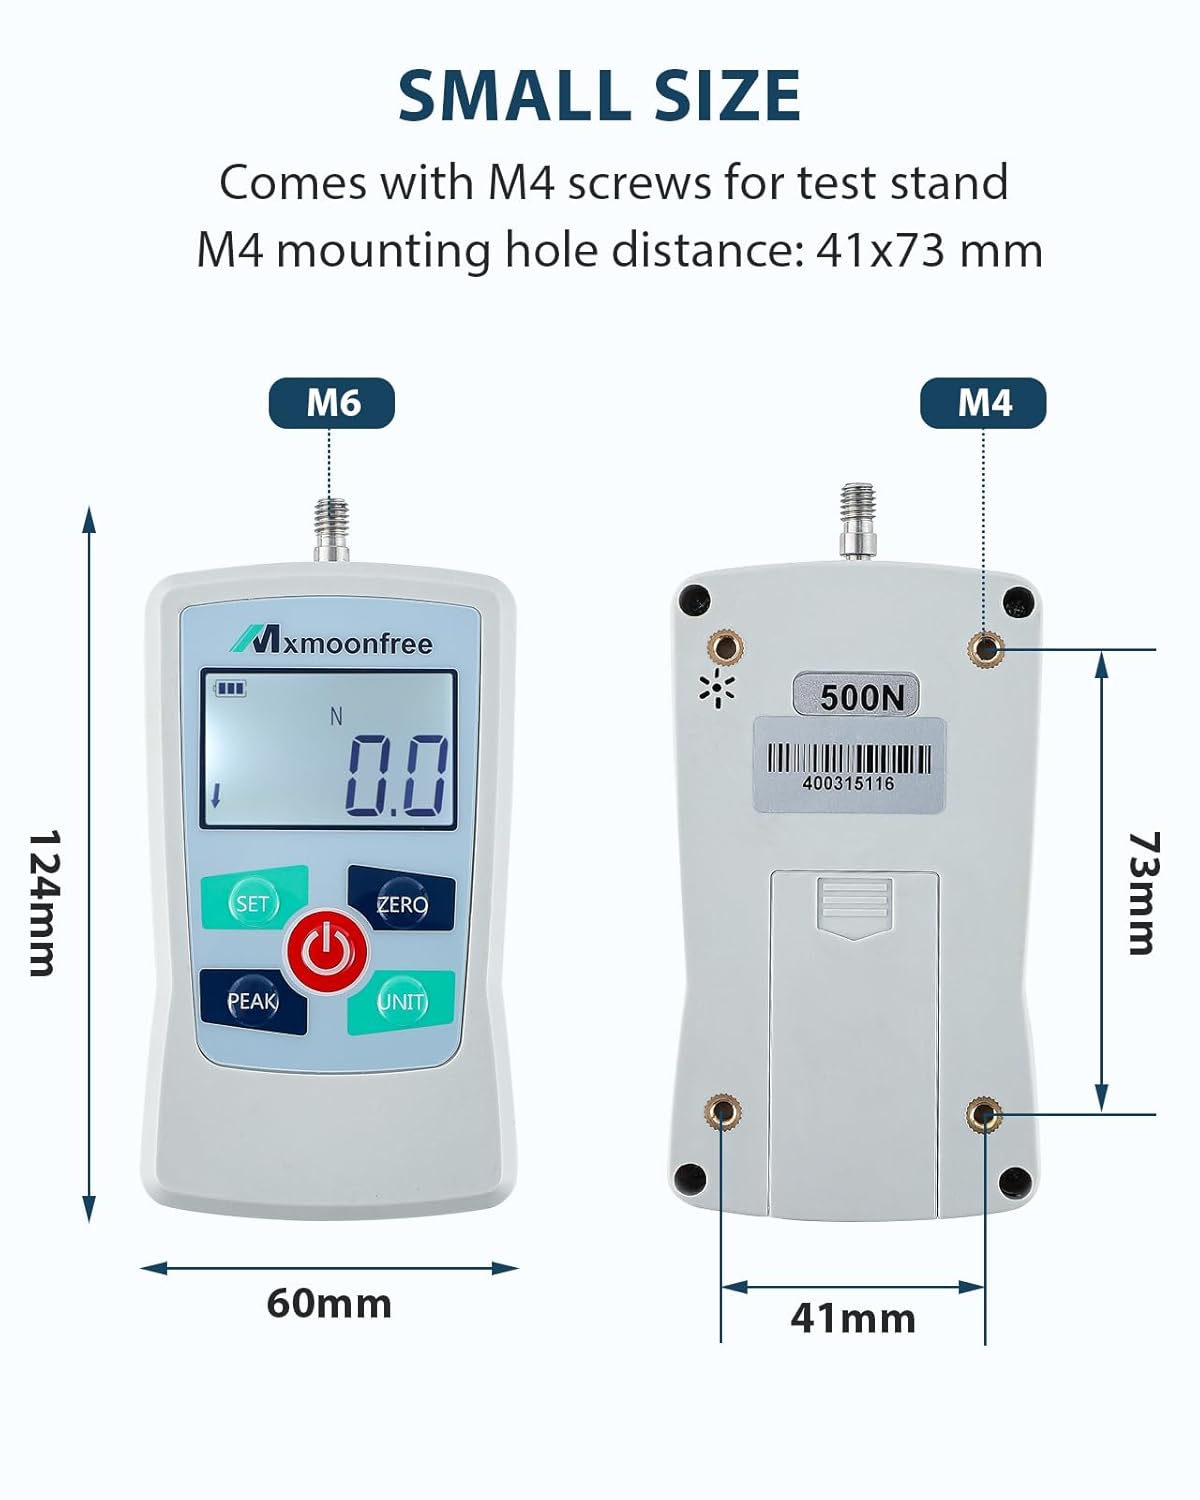
Immagine: Due examples of force testing: one showing a push test with a weight, and another showing a pull test using the hook attachment.
5.6. Spegnimento automatico
The device features an adjustable automatic shut-off time (0-15 minutes) to conserve battery life. The default setting is 10 minutes. If no operation is performed within the set time, the device will power off automatically.
6. Manutenzione
- Mantenere il dispositivo pulito e asciutto. Pulire con un panno morbido e asciutto. Non utilizzare detergenti abrasivi o solventi.
- Store the force gauge and its accessories in the provided storage case when not in use to prevent damage.
- Evitare di esporre il dispositivo a temperature estreme, umidità o luce solare diretta.
- Se il dispositivo non verrà utilizzato per un periodo prolungato, rimuovere le batterie per evitare perdite.
- Non tentare di smontare o riparare da soli il dispositivo. Contatta l'assistenza clienti per assistenza.
7. Risoluzione Dei Problemi
| Problema | Possibile causa | Soluzione |
|---|---|---|
| Il dispositivo non si accende | Batterie scariche o esaurite; Installazione errata della batteria | Sostituire le batterie; controllare la polarità delle batterie |
| Letture imprecise | Device not zeroed; Overload; Environmental interference | Press ZERO button; Do not exceed max load; Move away from strong electromagnetic fields |
| Il display è scuro o tremolante | Batteria scarica | Sostituire le batterie |
| I pulsanti non rispondono | Device frozen; Software error | Remove and reinsert batteries to reset; Contact support if issue persists |
8. Dimostrazione video
Guarda questo video per una rapida panoramicaview of the Mxmoonfree Digital Force Gauge's features, including unit conversion and various testing applications.
Video: Una breve dimostrazione mostraasing the Mxmoonfree Digital Force Gauge, its unit switching capabilities, and examples of destructive and pressure tests.
9. Garanzia e supporto
Mxmoonfree products come with a standard warranty. Please refer to the included Service Card for detailed warranty information and terms. For technical support, troubleshooting assistance, or warranty claims, please contact Mxmoonfree customer service through the contact information provided on your Service Card or the official Mxmoonfree websito.
We are committed to ensuring your satisfaction and providing reliable support for your Mxmoonfree product.