1. Introduzione
The Mxmoonfree ZMF-50N Digital Force Gauge is a portable instrument designed for accurate measurement of push and pull forces. It is suitable for various applications including industrial testing, educational experiments, and quality control. This manual provides detailed instructions for the proper setup, operation, and maintenance of your device.
2. Componenti del prodotto
The Mxmoonfree ZMF-50N Digital Force Gauge comes with a comprehensive set of accessories to facilitate various testing scenarios. Please ensure all components are present upon unboxing.

Immagine 2.1: The force gauge, various attachments (hooks, flat heads, conical heads), extension rod, screws, and nuts, all neatly organized within its protective storage case. A calibration certificate and user manual are also included.
Contenuto della confezione standard:
- Mxmoonfree ZMF-50N Digital Force Gauge
- Various measurement attachments (e.g., hook, flat head, conical head)
- Asta di prolunga
- Mounting screws and nuts
- Custodia protettiva per il trasporto
- Manuale d'uso
- Certificato di calibrazione
3. Specifiche
| Marca | Mxmoonfree |
| Numero di modello | ZMF-50N |
| Max. Load Value | 50N / 5kg / 11Lb / 180Oz |
| Load Value Increment | 0.01N / 0.001kg / 0.001Lb / 0.1Oz |
| Precisione | ±1% |
| Unità di misura | N, Lb, Kg, Oz |
| Modalità di misurazione | Real-time, PEAK, First-PEAK |
| Fonte di alimentazione | 2 batterie AAA (non incluse) |
| Spegnimento automatico | Adjustable (0-15 minutes), default 10 minutes |
| Minimum Force Shielding | Shields data below 0.5% of full scale (cancellable) |
| Materiale | Acrilonitrile Butadiene Stirene (ABS) |
| Dimensioni articolo (L x P x A) | 6 x 12.4 x 3.1 centimetri |
| Peso dell'articolo | 0.4 chilogrammi (400 g) |
| Distanza fori di montaggio | 41 x 73 mm (for M4 screws) |

Immagine 3.1: Davanti e dietro views of the force gauge showing its compact dimensions (124mm height, 60mm width) and M4 mounting hole distances (41x73mm).
4. Per iniziare
4.1 Installazione della batteria
The force gauge requires two AAA batteries for operation. Batteries are not included in the package.
- Individuare il coperchio del vano batteria sul retro del dispositivo.
- Per aprire il vano, far scorrere il coperchio verso il basso.
- Inserire due batterie AAA, assicurandosi che la polarità sia corretta (+/-) come indicato all'interno del vano.
- Riposizionare il coperchio del vano batteria finché non scatta in posizione.
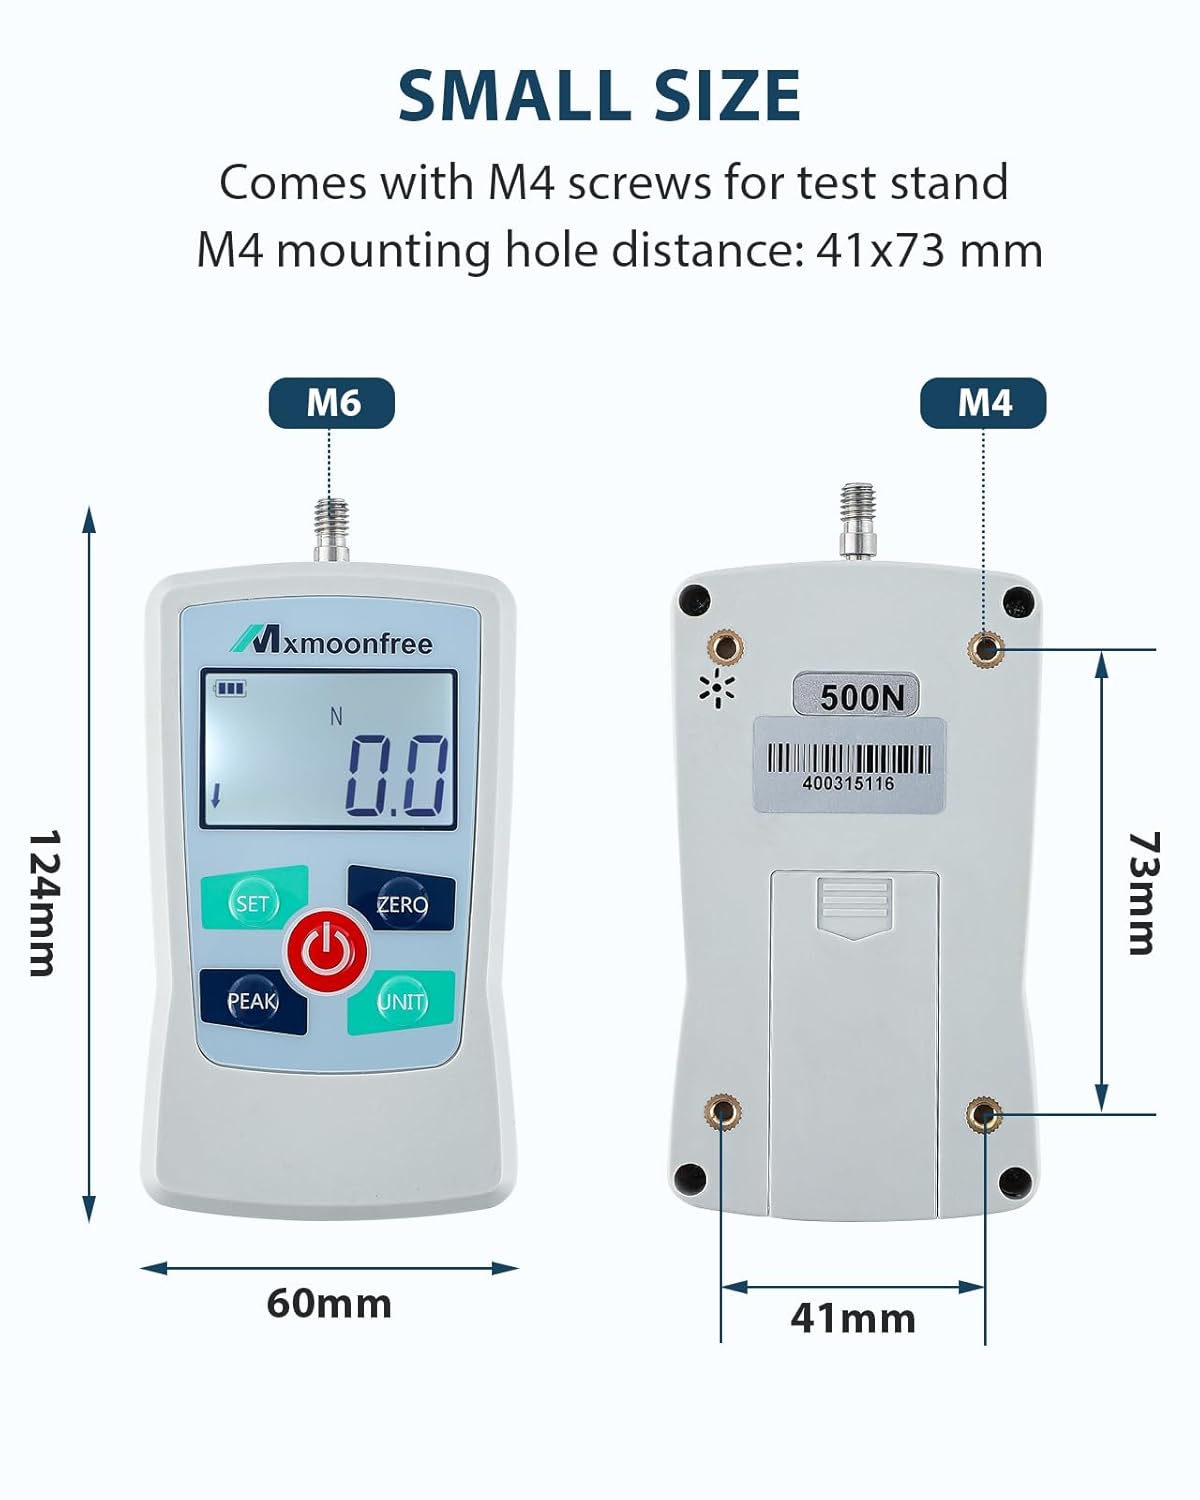
Immagine 4.1: Posteriore view of the force gauge showing the open battery compartment and the correct orientation for inserting two AAA batteries.
4.2 Fissaggio degli accessori di misurazione
Select the appropriate attachment (e.g., hook, flat head) for your specific measurement task. Screw the chosen attachment firmly onto the threaded shaft at the top of the force gauge.
5. Funzionamento di base
5.1 Accensione/spegnimento
- Per accendere il dispositivo, premere il pulsante ENERGIA button (red button with power symbol).
- Per spegnere il dispositivo, tenere premuto il pulsante ENERGIA per alcuni secondi fino allo spegnimento del display.
5.2 Azzeramento del display
Prima di effettuare una misurazione, è fondamentale azzerare il display per garantirne la precisione.
- Ensure no force is being applied to the gauge.
- Premere il tasto ZERO button. The display should show "0.0" or "0.00" depending on the selected unit.
5.3 Conversione unità
The force gauge supports four measurement units: Newtons (N), Pounds (Lb), Kilograms (Kg), and Ounces (Oz).
- Premere il tasto UNITÀ button to cycle through the available units. The current unit will be displayed on the LCD screen.

Immagine 5.1: The force gauge display showing measurements in Newtons (N), Kilograms (Kg), Ounces (Oz), and Pounds (Lb) after unit conversion.
6. Modalità di misurazione
The device offers three distinct measurement modes to suit different testing requirements.
- Premere il tasto PICCO pulsante per scorrere le modalità.

Immagine 6.1: The force gauge display showing the indicators for Real-time Mode, PEAK Mode, and First-PEAK Mode.
6.1 Real-time Mode
In Real-time Mode, the display shows the current force being applied to the gauge. This mode is suitable for continuous monitoring of force changes.
6.2 PEAK Mode
In PEAK Mode, the gauge records and holds the maximum force value detected during the measurement period. This is useful for capturing the highest force applied in a test.
6.3 First-PEAK Mode
First-PEAK Mode captures and holds the first peak force detected. This mode is often used in applications where the initial maximum force is critical, such as break-away force or initial insertion force.
7. Impostazioni avanzate
7.1 Spegnimento automatico
Il dispositivo è dotato di una funzione di spegnimento automatico per preservare la durata della batteria. Si spegnerà automaticamente dopo un periodo di inattività.
- The auto shutdown time can be set between 0 and 15 minutes.
- The default auto power-off time is 10 minutes.
- Refer to the full user manual for instructions on how to adjust this setting.
7.2 Minimum Force Shielding
The dynamometer can be configured to shield (not display) data below 0.5% of its full scale capacity. This helps to filter out minor fluctuations or noise in measurements.
- Questa funzione è abilitata per impostazione predefinita.
- It can be cancelled if desired, allowing the display of very small force values.
- Consult the comprehensive user manual for details on disabling this feature.
8. Esecuzione delle misurazioni
The Mxmoonfree ZMF-50N is designed for both push and pull force testing.

Immagine 8.1: The force gauge demonstrating a pressure (push) test using a flat attachment against a 500g weight, and a pull test using the hook attachment.
8.1 Push Test
- Attach a suitable flat or conical head to the gauge.
- Ensure the display is zeroed.
- Apply force by pushing the gauge against the object or surface to be measured.
- Read the force value on the display. If in PEAK mode, the maximum force will be held.
8.2 Pull Test
- Attach the hook accessory to the gauge.
- Ensure the display is zeroed.
- Hook the gauge onto the object to be measured and apply a pulling force.
- Read the force value on the display. If in PEAK mode, the maximum force will be held.
9. Cura e manutenzione
9.1 Pulizia generale
Pulire il dispositivo con un panno morbido e asciutto. Non utilizzare detergenti abrasivi o solventi, poiché potrebbero danneggiare il casing o display.
9.2 Sostituzione della batteria
When the battery indicator on the LCD shows low power, replace both AAA batteries promptly to ensure accurate readings and continuous operation. Refer to Section 4.1 for battery installation instructions.
9.3 Conservazione
When not in use, store the force gauge and its accessories in the provided protective carrying case in a cool, dry place, away from direct sunlight and extreme temperatures.
10. Risoluzione Dei Problemi
10.1 Il dispositivo non si accende
- Controllare se le batterie sono inserite correttamente con la giusta polarità.
- Sostituisci le batterie vecchie o esaurite con nuove batterie AAA.
10.2 Letture imprecise
- Ensure the display is zeroed before each measurement.
- Verify that the correct measurement unit is selected.
- Avoid applying force unevenly or at an angle.
- Assicurarsi che l'attacco sia fissato saldamente.
10.3 Display is Dim or Flickering
- Di solito questo indica che la batteria è scarica. Sostituire le batterie.
11. Informazioni di contatto
For further assistance, technical support, or inquiries regarding your Mxmoonfree ZMF-50N Digital Force Gauge, please refer to the contact information provided with your purchase or visit the official Mxmoonfree websito.